Felt Your Shed Roof: A Step-by-Step Guide

This concise guide explains how to felt a shed roof for homeowners and DIYers across the United Kingdom. It covers assessment, materials, tools, step‑by‑step installation, sealing, finishing, maintenance, costs and timescales so you can decide whether to tackle the job yourself or hire a tradesperson.
The article highlights key benefits — waterproofing, improved longevity and cost savings — and uses common UK materials such as bitumen felt, mineral‑surfaced options and cold‑applied liquid roofing. If you want clear advice on how to felt a shed roof, this felted shed roof guide sets out practical, trusted steps and product choices relevant to shed roofing felt UK.
Safety and legal context are signposted throughout. Follow Health and Safety Executive (HSE) guidance for working at height on domestic projects, check local council waste disposal rules and consult British Standards where applicable. Always verify planning or listed‑building constraints before you proceed.
Inhaltsverzeichnis
Key Takeaways
- Practical step‑by‑step instructions on how to felt a shed roof for UK garden buildings.
- Primary benefits include waterproofing, extended service life and lower cost than many alternatives.
- Guidance reflects common UK materials: bitumen felt, mineral‑surfaced and cold‑applied systems.
- Follow HSE working‑at‑height advice and local waste disposal rules when replacing felt.
- Assess your roof first to decide whether a DIY approach or a professional roofer is best.
Why Felt Your Shed Roof: Benefits of Roofing Felt for Garden Buildings
The right roof covering protects timber, tools and stored items from the British weather. Roofing felt creates a simple, flexible membrane that sheds water and gives immediate shed roof waterproofing when installed correctly. It suits typical garden buildings and performs well against wind-driven rain and light snow across the UK.
Weather protection and waterproofing
Bitumen felt forms a continuous layer that directs water away from joints and fastenings. Good overlaps and sealant at nail heads reduce leaks, while mineral-surfaced options add UV resistance. For most UK climates, a well-laid felt roof will cope with heavy rain and gusts, keeping interiors dry and reducing the risk of damp entering walls and floorboards.
Longevity and resistance to rot
Roofing felt advantages include shielding the roof deck from moisture, which helps prevent rot in sheathing and joists. Standard felt typically lasts between 5 and 10 years. Heavy-duty or mineral grades can last 10 to 20 years depending on exposure and quality.
Correct ventilation beneath the felt and neat detailing at edges reduce the chance of trapped moisture. That practice extends timber life and delays costly repairs to rafters or boards.
Cost-effectiveness compared with other roofing options
Felt generally costs less than EPDM rubber, interlocking shingles, metal sheeting or tiles. Materials are widely available from UK suppliers such as Wickes, B&Q, Travis Perkins and Jewson, which keeps prices competitive. Installation tends to be quicker and simpler, making DIY fit-outs realistic for many homeowners.
Trade-offs include fewer aesthetic choices and a shorter lifespan than premium systems. When weighing felt vs shingles UK, consider upfront cost, ease of installation and desired appearance before choosing the best solution for a garden building.
| Roofing Option | Typical Lifespan | Approx. Cost Level | DIY Friendliness |
|---|---|---|---|
| Standard bitumen felt | 5–10 years | Low | High |
| Heavy‑duty / mineral felt | 10–20 years | Medium | Medium |
| EPDM rubber | 20–30 years | High | Low |
| Interlocking shingles | 15–30 years | Medium–High | Medium |
| Metal sheeting | 25–40 years | Medium–High | Low–Medium |
how to felt a shed roof
Felt is a cost-effective way to weatherproof a garden building. Below is a clear overview that walks through the main stages, realistic time expectations for common sizes, and guidance on when to hire roofer for tricky work.

Overview of the process
- Inspect and prepare the roof deck, checking joists and boards for soundness.
- Remove old covering where necessary and dispose of waste responsibly.
- Repair or replace any damaged sheathing so the surface is clean and flat.
- Measure the roof area and buy materials: felt rolls, nails, battens, sealant and flashings.
- Lay underlay or battens if required by your chosen system.
- Roll and nail the felt from the eaves upwards, keeping correct overlaps and a neat finish.
- Seal seams and fixings with bitumen or approved sealant to prevent leaks.
- Install drip edges, verge trims and any flashings at abutments and penetrations.
- Finish with mineral surfacing or a liquid coating if specified, then perform a final inspection.
Typical time required
Expect DIY shed roof time to vary with size and condition. A small mono-pitch shed about 6–8 ft by 4–6 ft will usually take an experienced DIYer three to six hours from start to finish, assuming the decking is sound and the weather is dry.
A medium apex shed with a larger footprint or more complex flashing details may take one to two days. Allow extra time for preparatory work such as inspection, shopping for materials, repairs to boards and safe disposal of removed felt.
UK weather influences working windows. Plan for calm, dry days and factor in drying times for adhesives or sealants when estimating DIY shed roof time.
When to consider hiring a professional
- Hire a roofer if the roof is large, very steep or access is difficult.
- Call in a tradesperson when structural rot or extensive timber replacement is needed.
- Seek professional help for complex abutments, chimneys, skylights or multiple penetrations.
- Consider a contractor if you prefer a longer‑lasting system such as EPDM or torch‑on felt.
- Use reputable local trades listed on TrustATrader, Checkatrade or the Federation of Master Builders for vetted professionals with insurance and guarantees.
Assessing Your Shed Roof: Inspection and Preparation
Before laying new felt, carry out a careful assessment of the roof. A clear inspection plan saves time and prevents wasted materials. Check structure, measure the area you will cover and adopt strict safety measures when working at height.

Checking roof structure and joists for rot or damage
Lift any loose felt gently to expose the deck. Typical shed decks use OSB, plywood or tongued and grooved boarding. Use a screwdriver or awl to probe suspicious spots for soft timber, mould or woodworm.
Replace boards that show significant decay. Inspect rafters, purlins and joists for splits or deflection. Solid timber framing should be straight and free from long spans that sag under weight.
Measuring roof area and calculating materials
Measure the roof length and width across the surface you will cover. For apex or pitched roofs measure the rafter length to account for slope. Use Pythagoras where required or measure along the rafter itself to get an accurate figure.
Include recommended overlaps in your calculations: 75mm–100mm for end laps and 75mm for side laps for standard felt, unless the manufacturer states otherwise. Add a waste allowance of 10–15%.
Typical materials to list: rolls of felt (e.g. 1m x 10m), clout nails, bitumen adhesive, trims and flashings, and any underlay or battens. Work out the number of rolls by dividing roof area (plus waste) by roll coverage and round up.
Safety considerations and working at height
Follow HSE guidance on ladder use and roof-edge precautions for low domestic roofs. Use a stable ladder, platform or a mobile tower for larger sheds. Always position ladders on firm ground and tie or foot them if possible.
Work with a second person for handover of materials and to reduce risk. Wear non-slip footwear, gloves and eye protection. Secure loose materials on the roof and avoid working in windy or wet conditions.
| Task | What to check | Recommended action |
|---|---|---|
| Deck condition | OSB, plywood, or T&G boards; soft spots | Probe with screwdriver; replace decayed boards |
| Structure | Rafters and joists; sagging or splits | Repair or reinforce; ensure adequate thickness |
| Measurements | Length, width, rafter length for slopes | Use rafter length or Pythagoras; add overlaps and 10–15% waste |
| Materials list | Felt rolls, clout nails, bitumen, trims | Calculate rolls from coverage; buy extra for trims |
| Safety | Ladders, edge protection, PPE | Use two people, secure ladders, avoid bad weather |
Choosing Materials: Types of Felt and Recommended Accessories
Selecting the right materials shapes the lifespan and performance of a shed roof. Consider the balance between cost, durability and weather resistance when choosing from different types of roofing felt and the roofing accessories shed you will need.

Traditional bitumen felt rolls come in light/standard and heavy‑duty weights. Standard rolls, typically around 3.6kg/m², suit temporary or budget fits and are cheap to buy and lay. Heavy‑duty rolls, roughly 5kg/m², give better tear resistance and last longer under foot traffic.
Mineral‑surfaced options add a layer of mineral granules for UV protection. Mineral felt UK variants usually resist sunlight and weather better, extending service life by several years compared with plain felt. Torch‑on and cold‑applied systems differ in installation method and cost. Torch‑on delivers a seamless bond where heat application is permitted. Cold‑applied, using bitumen adhesive, suits sites with heat restrictions.
Underlay, battens and trims
An underlay or counter‑batten system improves ventilation and creates a rain screen beneath corrugated sheets or profiled roofing. Counter‑battening also helps avoid ponding on slightly uneven decks.
Trims include drip edges, verge trims and ridge rolls that tidy edges and guide water away from timber. For abutments use lead or aluminium flashings where appropriate. Choose corrosion‑resistant trims in galvanised steel or aluminium from established suppliers such as Marley, Crown and Roofline products for long service and neat finishes.
Fixings, sealants and adhesive options
Use galvanised clout nails for plain felt and square‑head nails or staples where the felt manufacturer permits. For cold‑applied felt, bitumen adhesive gives a reliable bond on clean, dry timber. Polymer bitumen sealants and mastics help seal seams, nails and details around pipes and abutments.
Recommended products include common roofing mastics such as Selleys Roof & Gutter Sealant and Everbuild roof sealants. Always follow the manufacturer’s guidance on compatibility and use a primer where recommended for porous substrates.
| Item | Typical Specification | When to Choose |
|---|---|---|
| Standard felt roll | ~3.6kg/m², plain bitumen | Short‑term roofs or tight budgets |
| Heavy‑duty felt roll | ~5kg/m², reinforced available | Regular access, longer durability |
| Mineral‑surfaced felt | Mineral granules for UV resistance | Exposed roofs wanting extended life; mineral felt UK standard options |
| Underlay / counter‑batten | Breathable membranes or timber battens | Poor ventilation, corrugated sheets or profiled roofs |
| Trims and flashings | Galvanised steel or aluminium | All external edges, abutments and verges |
| Fixings | Galvanised clout nails, square‑head nails, staples | As specified by felt and substrate manufacturers |
| Adhesives and sealants | Bitumen adhesive, polymer bitumen sealants | Cold‑applied felt, seam and detail sealing |
Tools You Will Need for Roofing Felt Installation
Preparing the right kit makes felt installation quicker and safer. Below is a clear breakdown of the essential hand tools, useful power options and the personal items that protect you while you work. Keep a neat shed roof tools list to avoid delays on the day.

Hand tools
Start with a claw or roofing hammer and a sharp utility knife with spare blades for clean cuts. A tape measure and chalk line help set straight runs. Use a spirit level for even courses and tin snips to trim verge flashing. A pry bar and hand saw are handy for removing old felt and cutting replacement decking. Keep a bucket for nails and small fixings.
Power tools and ladders
A cordless drill/driver speeds up screw fixing. A circular saw or jigsaw trims boards neatly. Use an angle grinder with a cutting disc when metal trims need shaping. Choose a sturdy extension ladder or a step ladder sized for your roof height. For larger projects, a mobile scaffold or tower gives a safe working platform. Inspect ladders before use and fit a ladder standoff where needed.
Personal protective equipment
PPE for roofing should include cut‑resistant work gloves, safety glasses and hearing protection when using power tools. Wear a hard hat for overhead work, non‑slip footwear and knee pads for comfort. When using cold‑applied adhesives or sealants in confined spaces, consider suitable respiratory protection and consult COSHH sheets for each product.
Preparing the Roof Deck: Repairing and Replacing Sheathing
Before laying new covering, you must prepare roof deck so the felt will bond and the finished roof lasts. Start with a careful inspection and clear plan. Work methodically to remove hazards and make minor repairs where possible.

Removing old felt
To remove old felt, cut the covering into manageable strips. Pry up nails and staples with a claw hammer or pry bar. Stack material neatly for disposal and keep the driveway and garden protected from debris.
Check local council rules for waste disposal. Roofing felt often goes in general waste or can be taken to household recycling centres. Some contractors accept roofing waste if you prefer a skip.
Patching or replacing boards
If boards are soft or rotten, replace shed roof boards rather than trying to patch them. Use exterior‑grade OSB, plywood of suitable thickness, or tongue‑and‑groove boarding made for sheds.
Fix new boards to joists with decking screws and stagger joints. Typical fixing centres are 150–200mm at edges. Treat exposed cut ends with Cuprinol or Ronseal preservative to slow decay.
Ensuring a smooth, clean surface
Remove nails and any protrusions, then plane or sand raised joints so the surface is flat. Sweep away dust and debris to avoid lumps beneath the felt.
Make sure the roof deck is dry before you lay felt. If an adhesive primer is recommended by the manufacturer, apply it evenly. Where gaps or unevenness remain, fit battens to create a uniform surface before you replace old felt.
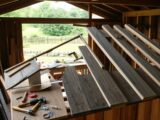
Step-by-Step Installation: Laying and Securing Roofing Felt
Start with a clear plan and tidy workspace before fitting felt. Measure the roof, check the deck is sound and have materials ready. Position the first roll carefully at the eaves so water sheds correctly and trims fit neatly.
Starting at the lower edge and working upwards
Position the first roll at the eaves with a 20–30mm overhang beyond the fascia or drip edge to allow drips to fall clear. For mono roofs unroll from the eaves up to the ridge, keeping the felt straight and snug against the boards. For pitched roofs place the bottom edges of each slope first, then work up each side so the felt sheds water effectively.
Correct overlaps and nailing patterns
Follow manufacturer guidance for laps. Typical side laps are 75mm–100mm. End laps usually sit between 100mm–150mm depending on the product. Use galvanised clout nails or staples at 150mm–200mm centres along the edges and stagger across the field. Nail twice over laps and at any penetrations to secure joins.
Use bitumen adhesive or a cold-applied adhesive on end laps where extra bond is needed. Press each lap flat to remove air pockets. These measures help with felt overlaps and nailing and reduce the risk of wind uplift.
Detail work around ridges, edges and abutments
At ridges dress felt from each slope to create a neat central cap or fit a factory-made ridge roll. Cut tidy mitres where two pieces meet and fix a central cap over the join. For abutments against walls or chimneys fit flashings and, where possible, dress the felt into a chase or under a lead or prospect flashing.
Install drip edges at the eaves and secure verge trims to stop wind-lift. Seal critical joints with a compatible mastic or bitumen sealant. Careful attention to these small areas provides a proper roof edge detail that lasts.
Sealing and Weatherproofing Details
Good sealing and careful trimming turn a correctly laid felt into a water-tight finish. This short guide covers the key steps to seal roofing felt seams, fit drip edges and edge trims, and prevent roof leaks at joins and corners.
Using bitumen sealant on seams and nails
Run a bead of bitumen mastic over all end laps and side laps once the felt is secured. Press the sealant into the overlap and spread it thinly to create a continuous barrier. Smear a small quantity over nail heads and press the felt gently down so the sealant fills gaps.
Choose established products such as Sika Bitumen Roof Seal or Bostik Roof and Gutter Seal and follow the manufacturer’s instructions for temperature limits and cure time. Some cold-weather formulations need a minimum 5°C to cure properly, so check labels before use.
Fitting drip edges and verge flashings
Drip edge installation prevents water from running back under the felt at the eaves. Fix galvanised steel or aluminium drip edges to the fascia or timber so the bottom lip projects beyond the boarding. Lay the felt over the top of the drip edge at the eaves to ensure positive runoff.
For gable ends fit verge flashings or barge boards to lock the felt at the edge and stop wind lift. Use corrosion-resistant fixings and ensure the flashing is screwed into sound timber. Trim excess felt and seal the top edge with a short run of bitumen sealant to secure the junction.
Preventing water ingress at joins and corners
Reinforce all corners with an extra patch of felt and a bead of mastic. Cut patches with tapered edges so they lie flat. Where proprietary corner flashings are available, fit them over the patch and seal all exposed edges.
At wall abutments use step flashing or continuous lead flashing, bedded on a clean primed surface. Seal the upper edge of the flashing with bitumen sealant where required to prevent capillary draw. Always ensure substrates are swept clean and primed before applying adhesive or sealant.
| Issue | Recommended Action | Product Examples |
|---|---|---|
| Seams and end laps | Apply bitumen mastic, press down, allow to cure per instructions | Sika Bitumen Roof Seal; Bostik Roof and Gutter Seal |
| Eaves run-off | Fit galvanised or aluminium drip edge; lap felt over edge | Round-edge aluminium drip; galvanised steel drip trims |
| Gable ends and wind uplift | Install verge flashing or barge boards; secure with corrosion-resistant screws | Galvanised verge trims; timber barge board |
| Joins, corners and abutments | Use extra felt patches, corner flashings, step or lead flashing and sealant | Proprietary corner flashings; lead flashing; bitumen mastic |
| Cold-weather application | Check product minimum temperature; choose cold-weather formulation if needed | Cold-temp bitumen sealants from major manufacturers |
Finishing Options: Top Coats and Mineral Surfaces
Choosing the right finish for a shed roof affects longevity, waterproofing and appearance. A good finish can extend service life and reduce maintenance. Below are practical options and what to consider when finishing your shed.
When to choose mineral-surfaced felt
Mineral-surfaced felt provides a hard-wearing, UV-resistant top layer that shields the bitumen beneath. It is ideal for exposed roofs and for owners who want a neat, finished look that needs less frequent attention.
Expect higher upfront cost for mineral-surfaced felt compared with plain rolls. The extra expense often pays off through better durability and reduced repair bills over time.
Applying cold-applied liquid roofing for added protection
Cold-applied systems include polymer bitumen and liquid rubber compounds. These create a seamless membrane when applied over rolls or directly to decking, cutting potential leak points around details.
These coatings bond well and simplify flashing around vents and joints. Some products need a primer and specific curing conditions. Plan work for dry, mild weather and allow adequate cure time to reach full performance.
Aesthetic considerations and colour choices
Felt roof colours range from black and grey to green and red. Colour choice influences garden aesthetics and how the shed blends with its surroundings.
Match or contrast trims to create a deliberate look. Darker colours may absorb slightly more heat, but for small garden sheds this is usually negligible. In shaded, damp areas consider mineral coatings with moss-retardant additives to keep the surface cleaner.
| Finish | Key benefit | Considerations |
|---|---|---|
| Mineral-surfaced felt | UV protection and durable finish | Higher price, long-term savings, good for exposed roofs |
| Cold-applied polymer bitumen | Seamless waterproofing and strong adhesion | May require primer, weather-dependent curing, skilled application advised |
| Liquid rubber / polyurethane | Flexible membrane, easy detailing | Check product compatibility with existing layers and cure times |
| Colour-coated mineral chips | Wide felt roof colours and improved appearance | Choose moss retardant for shaded sites; coordinate trims for best effect |
Maintenance and Troubleshooting Common Problems
Regular care keeps a shed roof performing well and avoids costly repairs. A simple schedule and a few tools let most owners maintain felt roof without fuss. Check after storms and at least twice a year, in spring and autumn.
Keep gutters clear and remove leaves or moss from the roof surface. Clear debris from corners and around flashings so water can flow freely. Record any small issues and keep spare clips, nails and a small patch of matching felt for quick fixes.
Common defects include splits from weathering or impact, blisters from trapped moisture and nails that have popped up. Small splits can be trimmed and patched with a felt scrap and bitumen adhesive. For blisters, pierce the raised area, press out trapped moisture, then nail and seal with bitumen to fix felt roof leaks quickly.
Replace loose or corroded fixings with galvanised clout nails or screws designed for roofing. If the substrate beneath the felt is soft or rotting, remove the felt and replace damaged boards before re-felting to prevent repeat problems. Keep an eye on overlaps and edges where wind can lift the felt.
Use the table below to judge repair urgency and likely outcome. It helps decide whether to patch, carry out a larger repair or schedule a full replacement.
| Issue | Signs | Immediate Action | Likely Outcome |
|---|---|---|---|
| Small split or tear | Single linear tear under 200mm; no substrate rot | Trim ragged edges, apply adhesive, tack on felt patch, seal edges | Short-term fix; durable if substrate sound |
| Blister or bubble | Raised area, damp under felt or recent heavy rain | Pierce, drain moisture, press down, nail and seal with bitumen | Good if isolated; monitor for recurrence |
| Nail pops and loose fixings | Raised nails or loose edges at overlaps | Remove corroded nails, refix with galvanised nails, seal heads | Reliable when concentrated; check surrounding felt |
| Widespread mineral loss or brittleness | Crumbly surface, many splits, frequent leaks | Inspect substrate; plan for full strip and re-felt | Long-term replacement recommended |
| Substrate failure | Soft, rotting boards, sagging roof | Remove felt, replace decking, re-felt with suitable grade | Essential to avoid ongoing leaks and timber replacement costs |
Understanding when to replace felt matters for budget and timber health. Standard non-mineral felt often lasts five to ten years. Mineral-surfaced felt typically reaches ten to twenty years if well maintained.
Replace the covering if it has widespread splitting, heavy mineral loss, repeated leaks you cannot fix, or if the deck is failing. Acting before the timber decays saves on labour and material costs in the long run.
Cost Estimate and Time Planning for Felted Sheds
Planning cost and time for a felted shed helps avoid surprises. Below is a compact guide to typical material outlay, how long jobs usually take and practical budgeting tips for buyers in the UK.
Typical material costs for different shed sizes
Small sheds (6×4) commonly need standard roofing felt, nails, adhesive and basic trims. Expect materials to range between £30 and £80 for 2024–25 prices. Medium sheds (8×6) require more felt and extra fixings, with materials typically costing £60 to £150.
Upgrading to heavy‑duty or mineral‑surfaced felt pushes costs higher, often up to £200 or more once quality trims, bitumen and flashings are included. Add a modest sum for verge trims, drip edges and sealant, which are readily available from retailers such as B&Q, Wickes, Jewson, Travis Perkins and Screwfix.
Labour time estimates for DIY vs professional installation
DIY labour varies with experience and roof condition. For a small shed expect a felt roof time estimate of roughly 3–8 hours including preparation, stripping old material and neat finishing. A medium shed normally takes about one to two days.
Professional installers price small roofing jobs from around £150 to £400 for labour only, depending on region and complexity. Quotes often vary. Obtain multiple estimates, check references and confirm public liability insurance before hiring.
Budgeting tips and sourcing quality materials in the UK
Allow an extra 10–15% of felt for waste and mistakes when calculating material needs. Choosing reputable brands and checking product guarantees reduces the chance of premature failure.
Look for seasonal sales and compare prices between builders’ merchants and national chains. Local collection can cut delivery charges. Reuse sound trims where possible or consider shed kits that include felt to simplify purchasing and control your shed roof budget UK.
| Item | Small shed (6×4) | Medium shed (8×6) |
|---|---|---|
| Standard felt and fixings | £30–£80 | £60–£150 |
| Mineral‑surfaced / heavy‑duty felt | £60–£120 | £120–£200+ |
| Trims, nail, adhesive, flashings | £10–£40 | £20–£60 |
| DIY labour time | 3–8 hours | 1–2 days |
| Professional labour (typical) | £150–£400 | £200–£600+ |
Keep receipts and check warranties when sourcing materials. Balancing cost to felt a shed against lifespan helps set a realistic shed roof budget UK while a clear felt roof time estimate ensures projects finish on schedule.
Conclusion
Felt your shed roof conclusion: properly felting a shed roof is an affordable and effective way to protect a garden outbuilding when you carry out a clear assessment and use the right materials, tools and technique. Begin with a careful inspection of the roof deck, measure accurately to build a materials list, and choose a felt grade suited to exposure and budget. Prioritise safety at height and make sure overlaps, nailing patterns and sealant application are correct to prevent leaks.
how to felt a shed roof summary: the process breaks down into preparation, laying and detailing. Prepare the deck by repairing or replacing damaged boards, lay felt from the lower edge with correct overlaps, and seal seams and fasteners with bitumen where required. For exposed ridges or complex abutments, consider professional help from a local roofing tradesperson to reduce risk and ensure longevity.
shed roof care UK: plan the job for a dry day, follow manufacturer instructions for adhesives and fixings, and keep records of materials and work. Schedule periodic inspections and attend promptly to splits, bubbles or loose nails to extend service life. Follow HSE guidance on working at height and local waste disposal rules when removing old felt.
FAQ
What does "how to felt a shed roof" cover and who is this guide for?
This guide explains assessment, materials, tools, step‑by‑step installation, sealing, finishing, maintenance, costs and timescales for felting a shed roof. It is written for UK garden shed owners, hobbyists, small builders and anyone weighing DIY against hiring a professional roofer. It reflects common British practice and available materials such as bitumen felt, mineral‑surfaced rolls and cold‑applied liquid roofing.
Why should I felt my shed roof instead of using EPDM or metal sheeting?
Roofing felt provides continuous, flexible waterproofing at a lower material and labour cost than many premium alternatives. Correctly installed felt protects timber sheathing from damp, resists wind‑driven rain and can deliver good longevity—standard felt typically 5–10 years, heavy or mineral‑surfaced 10–20 years. Trade‑offs include appearance and life expectancy; if you want a near‑seamless, long‑lasting membrane, options such as EPDM or torch‑on systems may be preferable.
How long will it take to felt a typical shed roof?
Time depends on size and condition. An experienced DIYer can felt a small mono‑pitch shed (about 6×4 ft) in 3–6 hours. A medium apex shed often takes 1–2 days when you include decking repairs, shopping and waste disposal. Allow extra time for adhesives or coatings to cure and choose a dry, calm day—the UK weather strongly affects scheduling.
When should I hire a professional roofer instead of doing it myself?
Hire a professional if the roof is large or steep, the decking or rafters show significant rot, there are complex abutments or penetrations, or there are safety concerns working at height. Professionals offer guarantees, insurance and access to specialist systems. Use reputable trade services such as TrustATrader, Checkatrade or the Federation of Master Builders to find local contractors.
How do I assess the existing roof before starting work?
Lift loose felt to inspect the sheathing and rafters for soft spots, mould, woodworm or rot. Probe suspect timber with a screwdriver. Measure the roof including slope for apex roofs (measure rafter length or use Pythagoras). Check decking type and thickness (OSB, plywood, tongue‑and‑groove), and plan to replace boards that are decayed.
How should I calculate materials and overlaps?
Measure length and width of each slope and add a waste allowance of 10–15%. Typical overlaps are 75–100mm for side laps and 100–150mm for end laps—follow the manufacturer. Include fixings (galvanised clout nails), bitumen adhesive, trims, flashings and any underlay or battens in your shopping list.
What safety equipment and precautions are recommended?
Follow HSE guidance for ladder use and working at height. Work with a partner where possible, use a sturdy ladder, platform or mobile tower for larger roofs, and wear PPE: gloves, eye protection, non‑slip footwear, hard hat and knee pads. Avoid windy or wet conditions and secure materials on the roof. For adhesives, consult COSHH and use respiratory protection if ventilation is poor.
Which types of felt and accessories should I choose?
Choose from light/standard rolls (cheaper, shorter life), heavy‑duty rolls, or mineral‑surfaced felt for UV protection and longer life. Use galvanised or aluminium trims, drip edges, verge flashings and suitable lead or aluminium flashings for abutments. Buy galvanised clout nails, bitumen adhesive for cold‑applied systems and polymer bitumen sealants from reputable UK brands or merchants such as B&Q, Wickes, Jewson or Travis Perkins.
What tools will I need to install roofing felt?
Essentials include a hammer or roofing hammer, utility knife with spare blades, tape measure, chalk line, spirit level and tin snips. Optional power tools are a cordless drill, circular saw or jigsaw. Use a suitable ladder or mobile scaffold for safety. Keep PPE—gloves, safety glasses, hearing protection and hard hat—on hand.
How do I remove old felt and dispose of roofing waste responsibly?
Cut old felt into manageable strips, pry up nails and stack waste for collection. Check local council rules—roofing felt often goes to household recycling centres or general waste; some contractors will collect. Minimise dust and debris, protect drives and gardens, and consider reclaiming salvageable trims.
What preparatory repairs should I do to the roof deck?
Replace rotten or soft boards with exterior‑grade OSB, plywood or tongue‑and‑groove boarding. Secure new boards with decking screws into joists, stagger joints and maintain recommended fixing centres. Treat exposed cuts with a preservative and ensure the deck is smooth, clean and dry before applying felt. Use primer where adhesive manufacturers advise.
What is the correct method for laying and nailing felt?
Start at the eaves, overhanging the drip edge by 20–30mm. Work upwards for mono or pitched roofs, unrolling and aligning each course before fastening. Use side laps of 75–100mm and end laps of 100–150mm. Nail with galvanised clout nails at roughly 150–200mm centres along edges and stagger across the field; double nail laps. Use bitumen adhesive at end laps where recommended.
How do I detail ridges, edges and abutments to prevent leaks?
Dress felt neatly at ridges and cap with a ridge roll or overlapping courses. Fit flashings at wall abutments—step flashing or continuous lead—and seal with appropriate mastic. Fit drip edges and verge flashings so felt laps over the trim to shed water. Reinforce corners with additional felt or proprietary corner flashings and seal seams and nail heads with bitumen mastic.
When should I choose mineral‑surfaced felt or a liquid roof top coat?
Choose mineral‑surfaced felt where UV resistance and aesthetics matter; it lengthens service life in exposed locations. Apply cold‑applied liquid roofing (polymer bitumen or liquid rubber) for a seamless membrane and easier detailing around penetrations. Liquid systems require primer, suitable weather and attention to cure times—follow product guidance.
What routine maintenance will keep the felt in good condition?
Inspect the roof twice yearly (spring and autumn) and after storms. Clear debris, check flashings, and look for splits, bubbles or nail pops. Keep a small repair kit with spare felt, nails and sealant. Patch small splits with adhesive and a felt patch; reseal bubbles and replace loose fixings promptly to prevent timber damage.
How do I know when to replace the felt completely?
Replace the felt when it becomes brittle, has lost most mineral surfacing, shows widespread splitting or repeated leaks, or when the substrate is failing. Typical service life markers: standard felt 5–10 years, mineral felt 10–20 years. Early replacement saves on later timber repair costs.
How much will it cost to felt a shed roof in the UK?
Ballpark 2024–25 material costs: small shed (6×4) £30–£80 for standard felt and fixings; medium shed (8×6) £60–£150. Mineral or heavy‑duty felt and extra trims can push costs toward £200+. DIY labour adds your time; professional labour for small jobs can range widely—typical small roofing jobs may add £150–£400 plus materials. Prices vary by retailer and region.
Any budgeting tips for sourcing materials?
Buy slightly more felt than calculated for waste, compare prices at B&Q, Wickes, Screwfix, Jewson and Travis Perkins, and look for seasonal deals. Collect locally to avoid delivery charges, reuse sound trims where possible, and consider bundled kits for sheds. Obtain multiple quotes from tradespeople and check product guarantees.
Are there legal or safety regulations I need to consider?
Follow HSE guidance for ladder use and working at height on domestic roofs. Check local council waste disposal rules and any listed‑building or planning constraints. For hazardous products, consult COSHH sheets and follow manufacturer instructions. If in doubt about structural work or safety, engage a qualified roofer or builder.