Temporary Bracing for Plumb Timber Fence Post Installation
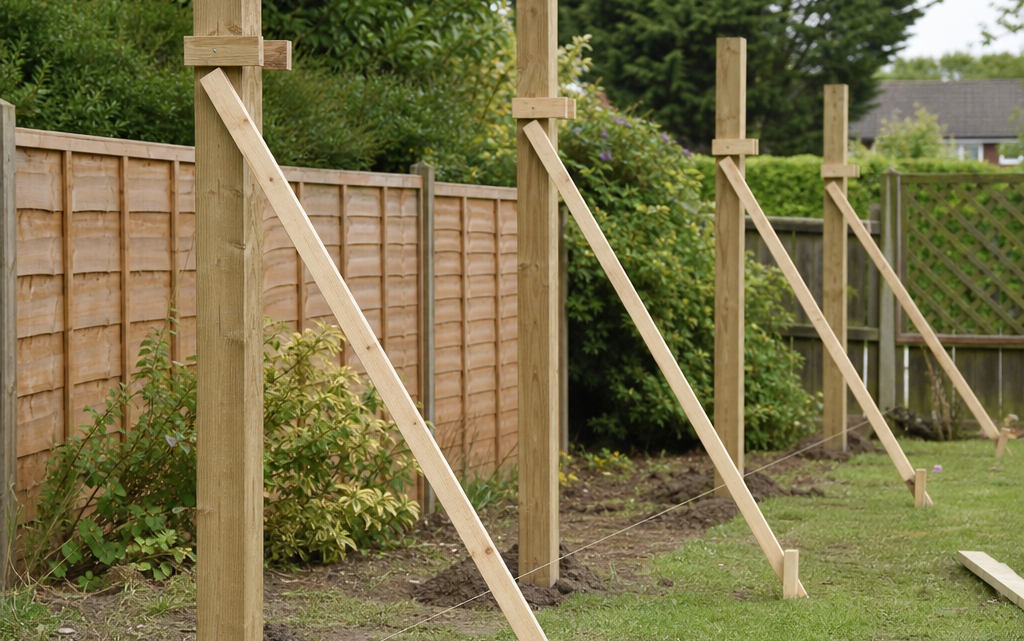
Installing a run of panel fencing often looks straightforward until the first post starts to lean while the concrete is still wet. A timber post that is only a few millimetres out of plumb at ground level can become very noticeable once the panels are fitted, especially along a straight boundary line. Temporary bracing is the simple, practical way to hold each post upright, square and in line while the footing sets.
If you are fitting timber fence posts for panel fencing in a garden, driveway edge or boundary line, you should treat bracing as part of the installation rather than an optional extra. It is especially important where the ground is uneven, the site is exposed to wind, the panels are heavy, or you are working without a second person to hold the post steady.
Inhaltsverzeichnis
Why temporary bracing matters when setting timber fence posts
A fence post has to do more than stand vertically on the day it is installed. It must stay correctly positioned while you pour or pack the footing, check the panel spacing, adjust the string line and allow the fixing material to harden. During that time, wet concrete, loose sub-base or disturbed soil can allow the post to drift.
Temporary bracing prevents three common problems:
- Leaning out of plumb: the post tilts forwards, backwards or sideways before the footing sets.
- Twisting: the post rotates slightly, causing the panel slots, arris rails or fixing faces to misalign.
- Line creep: each post moves a little off the string line, leaving a fence run that looks wavy.
Good bracing gives you time to work carefully. It also lets you stand back, sight along the run and make small corrections before the installation becomes permanent.
What you are trying to achieve
The purpose of temporary bracing is not simply to stop the post falling over. Your aim is to hold the post in three ways at once:
- Plumb: vertical on both faces, checked with a spirit level.
- In line: touching or sitting consistently to a taut string line.
- At the correct height and spacing: positioned so the panels fit without forcing or cutting unnecessarily.
For panel fencing, accuracy matters because the panels are usually made to fixed widths. If one post is set too close or too far away from the last, the panel may not fit neatly. If a post twists, the face of the panel may sit proud at one end and recessed at the other.
Choosing a suitable bracing method
The right bracing arrangement depends on the job. A short, sheltered run in firm ground may need only simple timber braces. A longer boundary fence, exposed garden or soft ground may need more support.
Decision criteria before you start
Consider the following before digging the first hole:
- Fence height: taller panels create more leverage and need more secure temporary support.
- Post length in the ground: a deeper hole gives better stability, but the post still needs holding while the footing sets.
- Ground condition: clay, made-up ground, wet soil and loose rubble can all let posts move during installation.
- Wind exposure: do not rely on a newly set post to resist gusts before the footing has hardened.
- Working method: if you are installing panels as you go, each new panel may pull on a fresh post unless it is braced.
- Access: where braces cannot be fixed on one side due to a boundary, path or wall, you may need angled braces from the available side and more frequent checks.
Basic bracing arrangement
For most timber panel fence posts, use two temporary braces fixed at roughly right angles to one another. One brace controls movement along the fence line; the other controls movement across the fence line. This is much more reliable than using a single prop.
A common arrangement is:
- one diagonal brace from the post to a ground stake along the fence run;
- one diagonal brace from the post to a ground stake at 90 degrees to the run;
- temporary screws, clamps or battens to hold the braces firmly while allowing adjustment.
The braces should be long enough to form a stable triangle. Very steep, short props are less effective because they do not resist sideways movement well.
Materials and tools for temporary bracing
You do not need specialist equipment, but you do need materials that are straight, sound and strong enough for the job.
Useful bracing materials
- Timber battens, offcuts or straight lengths of treated softwood for diagonal braces.
- Timber stakes or pegs for anchoring braces into the ground.
- Exterior-grade screws for temporary fixing.
- Clamps, where you want to avoid screw holes in visible faces.
- Packers or wedges for fine adjustments.
- A taut string line and line pins or stakes.
- A long spirit level, ideally checked on two adjacent faces of the post.
- A tape measure for panel spacing and post centres.
Where possible, fix temporary braces to a part of the post that will later be hidden by the panel or trimmed. If you must screw into a visible face, use small fixings and avoid unnecessary damage. Do not split the post by driving large screws too close to edges.
Setting out before bracing
Temporary bracing works best when the fence line is already properly set out. Do not use the braces to compensate for poor measuring.
Establish the fence line
Run a string line between the start and end points of the fence. Pull it tight and keep it clear of vegetation, uneven ground or debris. The line should represent the finished face or centre line of the posts, depending on how you prefer to work. Be consistent throughout the run.
Mark the post positions according to the panel width and the fixing method. Remember that the clear gap between posts may need to suit the actual panel width, not simply a nominal size. Measure the panels if there is any doubt.
Check levels and finished height
Before you commit the first post, decide how the fence will deal with slopes. You may install panels level with stepped posts, follow the ground with raked panels if suitable, or use gravel boards where required. Temporary bracing should hold posts at the correct finished height as well as plumb.
Practical example: selecting posts and planning depth
As a practical example, a 6′ x 3″ x 3″ Forest Sawn Pressure Treated Fence Post measures 1800mm x 75mm x 75mm and is described as suitable for panel fencing, with a sawn finish and pressure treatment. The product information also highlights the general principle that you should allow at least 600mm of post length into the ground. On that basis, a 1800mm post is commonly associated with lower panel heights, such as a 4ft panel, rather than a full 6ft finished fence. For a 6ft panel fence, you would normally need a longer post to allow adequate embedment.
This example is useful because it shows why bracing and post selection are linked. If a post is too short for the intended fence height, no amount of temporary bracing will create a properly durable installation. Bracing keeps a correctly chosen post in position while the footing sets; it does not replace adequate post length, suitable ground preparation or correct fixing.
Step-by-step: bracing a timber fence post plumb
1. Dig and prepare the post hole
Dig the hole to the required depth and width for the post and site conditions. As a general principle, allow sufficient depth below ground for the post to resist leverage from the fence above. Remove loose material from the bottom of the hole. If the ground is very wet or unstable, take extra care because the post can shift as soon as concrete or backfill is added.
Place the post in the hole and roughly align it with the string line. Do not pour the footing material yet.
2. Set the post to height
Use a tape measure, level marks or a temporary datum line to set the post height. If you are using gravel boards or panels of a fixed height, check the combined height before fixing anything permanently. Pack under the post temporarily if needed, but do not leave loose packing that could compromise the footing unless it is part of a suitable installation method.
3. Check plumb on two faces
Hold a spirit level against one face of the post and adjust until the bubble is centred. Then check the adjacent face. A post can look upright from one direction while leaning in the other, so always check both. If the post is slightly twisted, align the face that will take the panel fixings.
4. Fit the first brace along the fence line
Drive a stake into the ground a reasonable distance from the post, usually along the fence run. Fix a diagonal brace from the stake to the post. Use a clamp or a temporary screw so you can still make adjustments. This brace helps control movement forwards and backwards along the run.
5. Fit the second brace across the fence line
Install a second stake and brace at roughly 90 degrees to the first. This controls sideways movement away from the string line. Recheck the post with the spirit level after tightening or screwing the brace, as the act of fixing can pull the post slightly out of position.
6. Confirm line, spacing and panel fit
Check the post against the string line and measure from the previous post. If you are fitting panels as you go, offer up the panel or use a measured spacer to confirm the gap. Do not force a panel between posts; forcing can move a newly set post or introduce stress into the fence.
7. Add concrete or backfill carefully
Once the post is braced, add the footing material gradually. If using concrete, place it evenly around the post rather than dumping it all on one side. Uneven loading can push the post out of plumb. Keep checking the level as you fill. If you are using a compacted backfill method, compact in layers and recheck frequently.
8. Final check before leaving it to set
When the hole is filled and the top shaped to shed water away from the post, check plumb on both faces again. Sight along the run. Check height. Check spacing. Only then should you leave the post undisturbed.
Temporary bracing checklist
Use this checklist before moving on to the next post:
- The post is the correct length for the intended fence height and ground depth.
- The post hole is deep enough and cleared of loose spoil.
- The string line is taut and has not been knocked out of position.
- The post is plumb on two adjacent faces.
- The post face is square to the panel direction.
- There are two braces, ideally set at roughly right angles.
- Ground stakes are firm and do not wobble.
- Temporary screws or clamps are tight but not splitting the timber.
- The panel gap or post centre measurement has been checked.
- The post has been rechecked after adding concrete or backfill.
- The braces will remain in place until the footing has gained enough strength.
When to remove temporary braces
Do not rush to remove bracing. A post can feel firm at the surface while the footing is still weak below ground. Follow the instructions for the concrete or post-fixing material you are using, and allow for weather conditions. Cold, wet weather can slow curing, while hot, dry weather may affect how quickly the surface firms up.
As a practical rule, avoid loading fresh posts with heavy panels, gates or wind-catching sections until the footing has adequately set. If you have to fit panels before the concrete has fully cured, keep the braces in place and handle the panels carefully. On exposed sites, leaving braces longer is usually wise.
Common practical mistakes to avoid
Using only one brace
A single brace may stop the post falling in one direction, but it does little to prevent movement at right angles. Two braces provide much better control and reduce the risk of a post drifting while you work.
Checking plumb only once
Posts often move when concrete is poured, tamped or compacted. Check the level before filling, during filling and after finishing the top of the footing. Small corrections are easy while the mix is workable and difficult later.
Letting the brace pull the post out of line
A brace is meant to hold the correct position, not create it by force. If the post is being pulled away from the string line when you tighten the brace, reposition the stake or adjust the fixing point.
Setting posts to panel size without measuring the actual panels
Panel sizes can vary slightly, and posts may not be perfectly straight. Measure the actual panel or use a spacer that matches the required clear opening. This is particularly important when installing several panels in sequence.
Removing braces too soon
Freshly set posts are vulnerable. Removing braces early, then fitting panels immediately, can pull posts out of plumb or weaken the footing. Patience at this stage prevents a fence line that looks uneven for years.
Ignoring wind during installation
Fence panels act like sails. Even a moderate gust can move newly set posts if panels are fitted before the footing has cured. In windy conditions, brace more securely, work in shorter sections and avoid leaving unsupported panels attached to fresh posts.
Extra tips for long, straight panel runs
For longer fences, install and brace the end posts first, then use them as reference points for the string line. If the run is very long, intermediate reference posts can help maintain accuracy. Keep the line just clear of the posts so it is not pushed out by uneven timber.
Step back regularly and look along the top line and face of the posts. A spirit level tells you whether one post is vertical; your eye and string line help reveal whether the run looks straight as a whole.
If you are working alone, temporary spacers between posts can be useful, but they should not replace bracing. A spacer controls distance; it does not reliably control plumb or twisting.
FAQ
Do I need to brace every fence post?
For best results, yes, at least while each post is being set. Some experienced installers may use a simplified method in firm ground, but temporary bracing is the safer and more accurate approach, particularly for panel fencing.
Can I fit the fence panel before the concrete sets?
You can sometimes use a panel to help establish spacing, but you should avoid relying on a fresh post to carry full panel loads before the footing has gained strength. If panels are fitted early, keep the posts braced and take extra care in windy conditions.
How many braces should I use per post?
Two diagonal braces set at roughly right angles are suitable for most timber fence post installations. Taller fences, exposed sites or unstable ground may require stronger or additional temporary support.
Can I use clamps instead of screws?
Yes. Clamps are useful where you want to avoid screw marks, especially on visible faces. Make sure the clamps are secure and cannot slip as the post is adjusted or the footing material is added.
What if the post moves after I have filled the hole?
If the concrete or backfill is still workable, adjust the braces, bring the post back to plumb and recheck the line. If the footing has already hardened with the post out of position, the proper remedy is usually to reset the post rather than trying to force it straight.
Conclusion
Temporary bracing is a simple but essential part of installing plumb timber fence posts for panel fencing. It holds the post upright, square and aligned while the footing sets, giving you time to check measurements and correct small errors before they become permanent. Choose posts of suitable length for the fence height, set out the run carefully, brace each post in two directions and keep checking plumb throughout the process. A well-braced installation takes a little longer at the start, but it produces a straighter, stronger and more professional-looking fence.