
Replacing Damaged Fence Panels Without Rebuilding the Whole Boundary
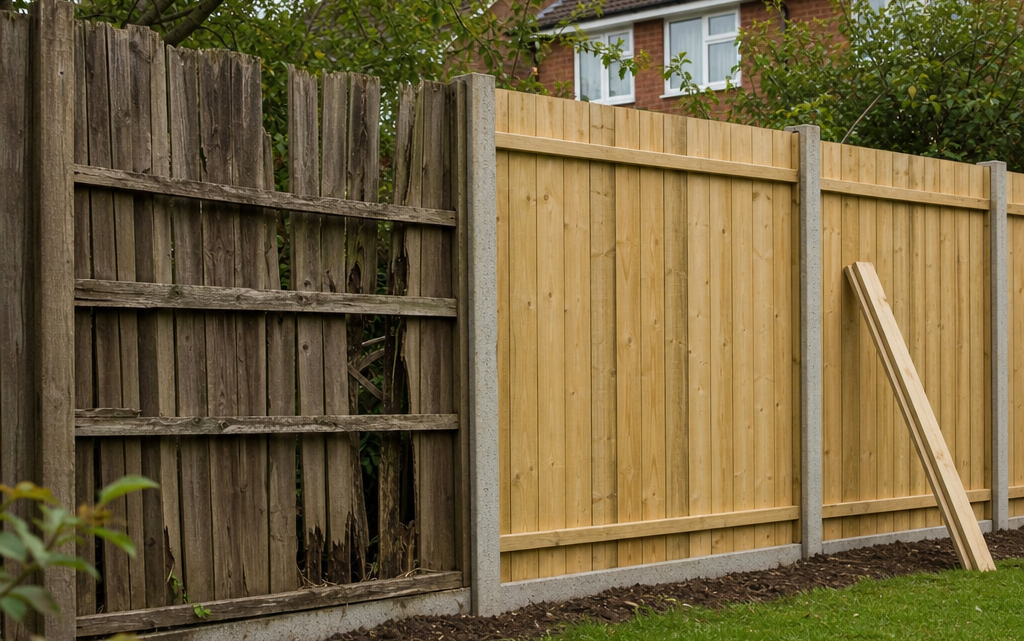
A winter storm, a rotted bottom rail or one badly split panel can make an otherwise sound garden boundary look neglected. In many cases, you do not need to rebuild the whole fence line. If the posts are still upright, the boundary position is unchanged and the remaining panels are serviceable, replacing only the damaged timber fence panels is usually the most sensible repair.
This guide explains how to assess the existing boundary, choose suitable replacement panels, remove damaged sections safely and fit new timber panels without disturbing neighbouring property or carrying out unnecessary work. It is aimed at typical UK garden fences with timber panels set between timber, concrete or metal posts.
Inhaltsverzeichnis
Start by confirming the boundary and ownership
Before you buy panels or start dismantling anything, make sure you are working on the fence you are responsible for. Garden boundaries can be shared, owned by one property, or maintained by agreement between neighbours. Title plans can help, but they are not always precise enough to settle small disputes about the exact fence line.
If the fence is clearly yours and sits inside your boundary, you can usually replace damaged panels like-for-like. If the fence is shared, attached to a neighbour’s structure, or access is needed from next door, speak to your neighbour first. A short conversation before work begins can avoid disagreement later, especially if a panel falls into their garden or plants need temporary protection.
When a simple panel replacement is usually suitable
- The posts are plumb or only slightly out of true.
- The fence line is not being moved.
- The overall height is not being increased.
- Only one or several panels are damaged, while the rest of the run is sound.
- There is no major rot at the base of the posts.
- The existing fixings, rails or slots can be reused or replaced without rebuilding the structure.
When you may need more than panel replacement
If posts are loose, leaning badly, cracked through or rotten at ground level, new panels will not solve the problem. A fresh panel fixed between failing posts can twist, drop or blow out in the next strong wind. Similarly, if the fence has moved from its original line, or if the ground has shifted, it may be a boundary or structural issue rather than a straightforward repair.
Check planning and height before changing the style
Like-for-like replacement is normally straightforward, but changing the height or appearance can raise practical and legal issues. In England, for example, planning permission is commonly required if a fence exceeds 2 metres in height, or 1 metre where it is next to a highway used by vehicles. Local rules and circumstances can vary, so check with your local planning authority if you are unsure.
Decorative trellis-topped panels, solid closeboard panels, hit-and-miss panels and continental-style screens can all affect wind loading, privacy and light. Even if permission is not required, it is good practice to consider how the replacement will look from both sides and whether it will impose extra force on the existing posts.
Assess the existing fence before buying panels
The most common mistake is buying a standard 6 ft by 6 ft panel and discovering that the gap is not standard. Older fences often have uneven post spacing, ground levels may have changed, and previous repairs may have used non-standard sizes.
Measure each opening separately
Measure the clear gap between posts at the top, middle and bottom. Then measure the height available from the top of the gravel board or ground level to the desired finished height. Do not assume every bay is identical. If the posts lean inwards or outwards, you may need a slightly trimmed panel or a bespoke size.
For slotted concrete posts, measure the slot-to-slot width and the depth of the groove. For timber posts, check whether the panel is face-fixed, held with U clips, screwed through battens, or fixed to rails. The replacement panel must work with the existing fixing method or with a practical alternative.
Check the gravel boards
Gravel boards protect timber panels from ground moisture and strimmer damage. If the gravel board is cracked, rotten or missing, replacing the panel alone may shorten the life of the repair. Concrete gravel boards can often be reused if intact; timber gravel boards should be checked carefully for rot, especially at the ends.
Inspect the posts properly
Push each post gently from both sides. A small amount of movement in timber is not unusual, but a post should not rock in the ground. Look for dark, soft or crumbly timber at soil level, splitting around old fixings, rusting metal post supports, or cracked concrete spurs. If the post is poor, repair or replace it before fitting a new panel.
Choose a replacement panel that suits the existing boundary
Your replacement panel should match the opening, the exposure of the site and the condition of the posts. A heavy decorative panel may look attractive, but it can be unsuitable if the posts were originally installed for lightweight lap panels.
Key decision criteria
- Size: Match the measured opening rather than relying only on nominal panel sizes.
- Weight: Heavier panels need sound posts and reliable fixings.
- Wind exposure: Solid panels catch more wind; slatted or open designs can reduce pressure.
- Privacy: Closeboard and overlap panels give more screening than trellis or open slatted designs.
- Durability: Pressure-treated panels usually offer better resistance to decay than untreated timber.
- Appearance: If you are replacing only one or two panels, consider how closely they match the existing run.
- Maintenance: Some panels will need regular staining or preservative treatment, especially cut edges.
If you trim a timber panel to fit, treat any cut edges with a suitable end-grain preservative before installation. Factory treatment is often compromised where the timber is cut, and exposed end grain absorbs moisture readily.
Fixings and brackets: small components that matter
Panels are only as secure as their fixings. Existing clips may be rusted, distorted or too weak for the replacement panel. When fitting panels between timber posts, U-shaped panel clips or brackets can make installation easier and help hold the panel in the correct position. As a practical example, a pack of four powder-coated U fence panel brackets may be used for one panel where the manufacturer states that at least four brackets are required. The exact fixing choice should always suit your panel, post material and exposure.
Whether you use brackets, screws, nails or slotted posts, avoid relying on a single fixing point on each side. Panels need support at sensible positions, usually near the top and bottom, and sometimes additionally at the centre for taller or heavier sections. Use corrosion-resistant fixings suitable for outdoor timber work, and avoid mixing incompatible metals where corrosion may be accelerated.
Tools and materials you are likely to need
- Replacement timber fence panel of the correct size and style
- Suitable panel clips, brackets, screws or nails
- Drill/driver and exterior-grade bits
- Hammer, pry bar and pliers for old fixings
- Spirit level and tape measure
- Handsaw or circular saw if trimming is required
- Timber preservative for cut ends
- Work gloves and eye protection
- Temporary battens or wedges to support the panel while fitting
Step-by-step: replacing damaged panels
1. Clear the working area
Move pots, furniture, children’s toys and garden ornaments away from both sides of the fence where possible. Tie back shrubs and climbing plants carefully. If plants are growing through the panel, cut them free rather than pulling the panel out and damaging roots or stems.
2. Remove the damaged panel safely
Old panels can collapse suddenly once fixings are removed. Wear gloves, as broken timber and rusty nails are common. If the panel is in slotted concrete posts, lift it vertically with help. If it is swollen, rotten or jammed, you may need to cut it into sections rather than forcing it and risking damage to the posts.
For panels fixed to timber posts, remove screws or nails where possible. If fixings are rusted solid, use a pry bar carefully and avoid splitting the post. Any remaining sharp nail ends should be pulled out or driven safely below the surface.
3. Clean and inspect the opening
Once the panel is out, check the posts again. Clean debris from concrete post slots and remove old bracket fragments from timber posts. This is the ideal time to treat small areas of exposed timber, tighten loose fixings or replace damaged gravel boards.
4. Dry-fit the new panel
Before final fixing, test the panel in the opening. With slotted posts, lower it carefully into place and check that it sits evenly on the gravel board. With timber posts, support the panel on temporary blocks to achieve an even gap and level top line.
If trimming is needed, mark accurately and cut squarely. Treat the cut edges and allow the preservative to soak in according to the product instructions before final installation.
5. Fix the panel securely
For timber posts, position brackets or clips so they support the panel without forcing it out of shape. Fix to the post first, then secure the panel as appropriate. Check level and alignment before fully tightening all fixings. For slotted concrete posts, the panel is usually retained by the slots, but it should still sit correctly and not rattle excessively.
6. Check the finished repair
Stand back and look along the fence line. The new panel should follow the existing boundary, sit level where practical and not place sideways pressure on the posts. Remove waste timber, nails and offcuts from the garden, especially if children or pets use the area.
Useful checklist before you start
- Have you confirmed the fence is yours or agreed the repair with the relevant neighbour?
- Are you keeping the fence in the same position and broadly the same height?
- Have you measured every opening rather than assuming a standard size?
- Are the posts firm enough to take a new panel?
- Is the gravel board sound and correctly seated?
- Have you chosen a panel weight and style suitable for the existing posts?
- Do you have outdoor-suitable fixings or brackets?
- Will cut edges be treated before installation?
- Can you lift the panel safely, or do you need another person to help?
Common practical mistakes to avoid
Forcing a panel into a tight gap
Timber expands and contracts with moisture. If a panel is wedged hard between posts, it can bow, split or push the posts apart. Leave a small practical tolerance where the fixing method allows, while still ensuring the panel is properly supported.
Ignoring post condition
A new panel can hide a failing post for a short time, but it will not strengthen it. If the post moves when pushed, deal with that first. Otherwise, the new panel may be damaged when the post eventually fails.
Using unsuitable indoor fixings
Bright steel screws and lightweight internal fixings can corrode quickly outdoors. Rust stains, loose panels and snapped screw heads are common results. Use fixings intended for external timber and compatible with the bracket or clip system you are using.
Increasing wind resistance without upgrading support
Replacing a damaged open or lightweight panel with a tall solid panel may increase wind load significantly. In exposed gardens, this can lead to broken posts or panels lifting out in storms. Choose a style appropriate to the site.
Leaving untreated cut timber exposed
Cutting a pressure-treated or pre-treated panel can expose less protected timber. Always treat cut ends, especially at the bottom edge where water sits and decay starts fastest.
Maintenance after replacement
Once the new panel is fitted, maintenance is simple but worthwhile. Keep soil, mulch and dense vegetation away from the lower edge of timber. Check annually for loose fixings, early rot and water traps. If the panel requires a decorative finish or further preservative treatment, follow the manufacturer’s guidance and apply it in dry conditions.
After high winds, inspect the repair from both sides if possible. Look for clips pulling away, panels rattling in slots or posts beginning to lean. Early adjustment is much cheaper than replacing another damaged panel later.
FAQ
Can I replace just one fence panel?
Yes, provided the posts, gravel board and boundary line are sound. Replacing a single damaged panel is often the most economical repair. The main challenge is matching the appearance and size of the existing fence.
Do I need my neighbour’s permission?
If the fence is wholly yours and you are working from your own side, permission is not usually needed for a like-for-like repair. However, if the boundary is shared, access is needed from next door, or the work affects their plants or structures, you should discuss it first.
Can I put in a taller panel than the old one?
You should be cautious. A taller panel may require planning permission in some circumstances and can increase wind loading on existing posts. Check local rules and assess the structure before changing height.
Should I use nails or screws?
Both can be suitable if they are intended for external use and appropriate for the bracket, post and panel. Screws often make future removal easier, while nails may be specified for some clips or brackets. Follow the fixing manufacturer’s instructions where provided.
What if the new panel does not quite fit?
If it is too wide, a timber panel may sometimes be trimmed, depending on its construction. Do not cut structural parts without understanding how the panel is held together. If in doubt, order a made-to-measure panel or seek professional help.
Conclusion
Replacing damaged timber fence panels within an existing boundary is a practical repair when the posts remain sound and the fence line is not being altered. The key is to measure accurately, choose a panel suited to the existing structure, use proper outdoor fixings and avoid hiding more serious post or gravel board problems. With careful preparation, you can restore privacy, security and appearance without the cost and disruption of rebuilding the whole boundary.

