Siting a Compact Timber Garden Store to Reduce Damp and Splashback
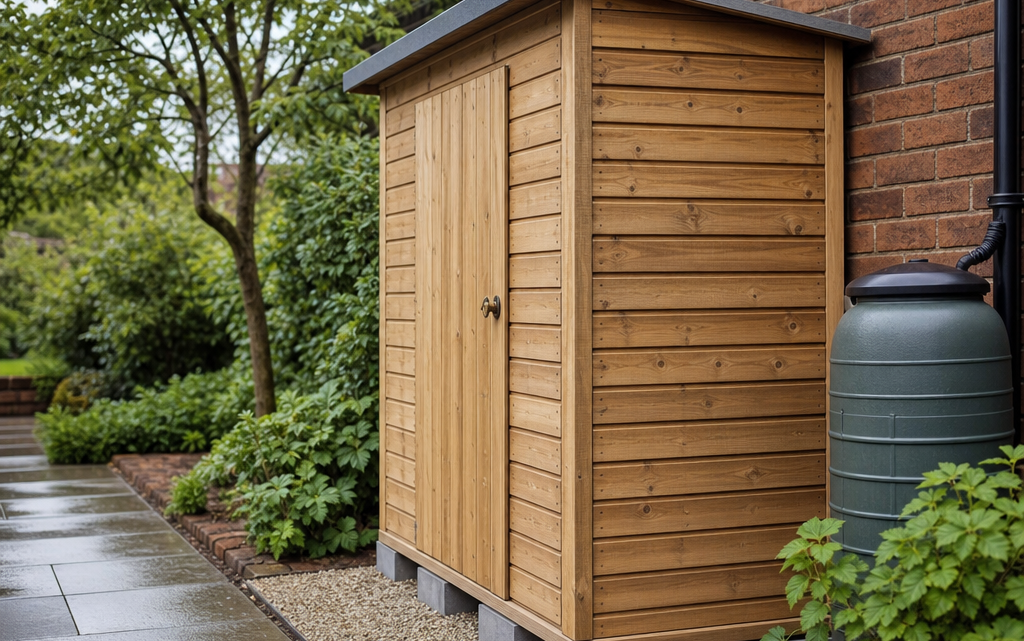
You have a narrow side return, a paved patio corner, or a small space beside the back door, and you want a compact timber garden store for hand tools, outdoor toys, bags of compost or watering cans. The temptation is to put it wherever it fits and start filling it straight away. For timber storage, however, the base and the surrounding ground are just as important as the store itself. Poor drainage, standing water and soil splashback can shorten the life of timber panels, mark the cladding and make the floor feel damp even when the roof and walls are sound.
This guide explains how to site a compact timber garden store so that rainwater drains away, splashback is reduced and air can circulate around the structure. It is written for small timber stores rather than full-sized sheds, but the same principles apply: keep timber off wet ground, avoid trapping moisture, and plan where roof water and surface water will go.
Inhaltsverzeichnis
Why base drainage matters for a compact timber store
A small store can look light and easy to move, but once it is loaded with tools, compost, pots and garden equipment it becomes a permanent feature in practice. If it sits on damp slabs, uneven soil or a patio that falls towards the wall, moisture will collect under and around it. Timber may be pressure-treated or supplied with protective finishes, but it still performs best when it is allowed to dry between wet periods.
The main risks are:
- Standing water under the floor: this raises humidity around the base and can affect stored contents.
- Splashback from hard surfaces: rain hitting paving, concrete or compacted gravel can bounce dirty water onto lower boards.
- Blocked airflow: placing the store tight against a wall, fence or dense planting can keep the back panel damp.
- Water running towards the doors: this can wet the threshold and make access messy in winter.
- Soil contact: soil, mulch and leaf litter hold moisture against timber and should be kept away from the base.
Start by reading the ground, not measuring the store
Before deciding on the exact position, look at how water already behaves in the area. Do this after rain if possible. You are looking for low spots, puddles, algae on paving, green staining on fences, mud splashes on walls and places where roof water drops from gutters or overhanging edges.
Check the fall of the surface
A store should sit on a level base, but the ground around that base should not direct water towards it. On patios and paths, use a long spirit level, a straight piece of timber or even a hose test to see which way the surface falls. Ideally, water should run away from the store and towards an existing drain, border or permeable area.
If the only available space falls towards a house wall, fence line or step, you may need to create a raised pad, add a gravel drainage strip or choose a different position. A compact store may fit physically, but if it sits in the wettest point of the garden it will be harder to keep dry.
Look above the store as well as below it
Many damp problems come from water falling onto the store or the ground beside it. Avoid placing a timber store directly below a faulty gutter, an overflowing water butt, a roof valley discharge, or a tree that drips for hours after rainfall. If the store has a pent roof, think about the direction of the roof fall. You do not want the roof to discharge water straight into a narrow gap where it cannot dry.
Choose a suitable base for drainage and support
The base has two jobs: it must support the store evenly, and it must help water move away. A compact store does not usually need a large concrete slab, but it does need a firm, flat and durable surface. The best choice depends on your garden, budget and whether you may want to move the store later.
Paving slabs
Paving slabs are often the most practical option for a small timber store. They provide firm support, spread the weight and can be laid with a slight surrounding fall. The slabs themselves should be level where the store sits, with no rocking corners. If you are laying new slabs, prepare a compacted sub-base and a suitable bedding layer rather than placing slabs straight onto soil.
For drainage, it is often better for the slabbed pad to be just larger than the store footprint, with a gravel margin around it, rather than a wide hard surface that bounces rain back onto the timber. If the store doors open over the paving, allow enough firm standing room so you can access it without stepping into a wet border.
Concrete pad
A concrete pad is strong and long-lasting, but it must be planned carefully. A dead-flat slab surrounded by raised soil can become a tray for water. If you use concrete, ensure the finished pad is slightly proud of the surrounding ground and that water cannot pond around the edges. The store itself should still be level, and you should avoid burying any timber bearers or lower cladding below the surrounding surface.
Compacted gravel with a stable edge
Gravel can drain well, but only if it is properly constructed. Loose decorative gravel tipped onto soil is not a reliable base because it can move, settle and leave the store uneven. A better approach is to excavate, add a compacted sub-base, use a permeable membrane to reduce weed growth, and contain the area with edging. For many timber stores, you will still need slabs, bearers or a frame to provide stable support points.
Existing patio or path
An existing patio can work well if it is level, sound and drains away from the proposed position. Check for rocking slabs, sunken joints and algae, which may indicate persistent damp. If the patio falls towards the house, position the store so it does not block water flow or trap debris. Do not assume a patio is suitable simply because it feels hard underfoot.
Plan clearance around the store
Compact garden stores are often placed in tight spaces, but tight is not always better. You need enough clearance for airflow, maintenance and water shedding. If the back of the store is pressed against a fence, damp air can linger and leaves can build up unseen. If the sides are too close to walls, splashback and runoff are harder to control.
As a practical rule, leave a service gap wherever you can. Even a modest gap helps you brush away leaves, inspect the lower boards and check that water is not collecting. Where space allows, a wider gap at the back is useful because it is the area most likely to be neglected after installation.
Consider the door side
The front of the store needs more than just door swing clearance. You also need a dry standing area and a route that does not turn muddy. If you store items you use in bad weather, such as wellies, secateurs or bags of grit, the approach should be safe and non-slippery. Avoid placing the doors where water runs across the threshold or where a downpipe empties nearby.
Use a splashback zone
Splashback is the dirty water thrown upwards when rain hits the ground. It is most noticeable where the store sits on hard paving, but it can also happen with compacted soil or gravel. The lower section of a timber store is the most exposed, so plan a splashback zone around the base.
Useful measures include:
- keeping soil, mulch and planting away from the lower boards;
- using clean gravel as a drainage strip around the base;
- avoiding deep puddles on paving next to the store;
- ensuring roof runoff does not fall onto bare soil and bounce back;
- regularly sweeping leaves and compost from around the floor edge.
A gravel strip of clean, angular stone can reduce mud splash and allow water to drain. It should not be piled against the timber; keep it below the level of the floor and cladding. The aim is to create a dry, free-draining margin, not to bury the base.
Using a compact timber store as a practical example
For scale, consider a small shiplap pent garden store with a footprint of roughly 1 m by 0.55 m and a capacity of around 600 litres. A store of this size is commonly chosen for patios, side passages and small gardens because it can hold tools and outdoor items without dominating the space. The example below shows the type of compact timber product for which careful base planning is especially important: it is small enough to fit in tight corners, but it still needs a dry, level, well-drained position.
When siting a similar compact store, do not let the modest size lead you to compromise on the base. A store with timber cladding, an OSB floor and bearers still benefits from being kept clear of standing water. The roof covering protects from rainfall above, but it does not solve water collecting beneath or splashback striking the sides from below.
Step-by-step siting method
1. Mark the footprint and door swing
Use a tape measure and mark the intended footprint with chalk, string or spare timber. Then mark the door opening zone. This helps you see whether the store will block access, foul a gate, interfere with a hose reel or make a path too narrow. Remember that you will often be carrying awkward items in and out, not simply opening the doors.
2. Test the base area for level and stability
Place a long level across the base area in several directions. If the surface is uneven, correct it before assembly. Packing one corner with loose offcuts or stones is a common mistake because it creates point loading and may move over time. The store should sit evenly so doors remain aligned and the floor is properly supported.
3. Decide where rainwater will go
Stand back and trace the path of water. Rain may fall from the store roof, run across paving, drip from nearby structures or be blown against the doors. If the store has a pent roof, orient it so the roof fall does not discharge into an inaccessible damp gap. Where necessary, create a gravel strip or make sure the receiving surface drains away.
4. Keep timber above wet ground
Do not sink the base into a border or surround it with raised soil. If you are making a new pad, it should finish slightly above the adjacent ground so water does not flow onto it. If the store has bearers, they should be allowed to dry and should not be buried by gravel, compost or lawn edging.
5. Leave inspection and cleaning access
Plan how you will clean behind and beside the store. If you cannot get a brush, hand or hose nearby without moving everything, debris will accumulate. Leaf litter is particularly troublesome because it holds moisture and can sit against the lower timber through winter.
Checklist before you assemble the store
- The base is firm, level and large enough to support the full footprint.
- Water drains away from the base rather than towards it.
- There are no puddles where the store will sit after rain.
- The store is not directly under a leaking gutter, heavy tree drip or roof runoff.
- There is a clear splashback zone around the lower timber.
- Soil, mulch and planting are kept away from the sides.
- The doors can open fully and you have a safe standing area.
- There is enough clearance to sweep leaves and inspect the rear and sides.
- The roof fall has been considered, especially for a pent roof.
- Any pad, slabs or gravel area are finished before assembly, not adjusted afterwards.
Common practical mistakes to avoid
Putting the store straight onto soil
Soil is rarely firm or dry enough for a timber garden store. It moves with the seasons, holds moisture and encourages splashback. Even if the store feels stable on day one, the base may settle and the doors may stop lining up properly.
Using a base that is too small
A base that only supports part of the floor can leave edges vulnerable and make the store unstable. The full footprint should be supported according to the assembly requirements. If you use slabs, they should be arranged so that weight is carried evenly, not just at random corners.
Trapping the store in a corner
A corner between two walls may look sheltered, but it can be damp if there is poor airflow. Wind-driven rain, algae and leaf build-up are common in shaded corners. If you must use a corner, leave as much gap as practical and make cleaning part of routine maintenance.
Allowing gravel or soil to build up against timber
Gravel is useful for drainage only when it remains below the timber and does not trap damp material against the boards. The same applies to bark, compost and raised beds. Keep the lower edge visible and ventilated.
Ignoring the roof discharge
On a small pent-roof store, rainwater will run towards one side or the rear depending on orientation. If that water lands in a narrow gap, it can keep the area wet. Plan the direction of fall before assembly, particularly where the store is close to a fence or wall.
Simple maintenance to keep the base dry
Good siting reduces damp risk, but it does not remove the need for basic maintenance. Sweep around the base regularly, especially in autumn. Keep weeds, soil and fallen leaves away from the lower boards. After heavy rain, check whether water is ponding and correct the cause rather than accepting it as normal.
Inspect the roof covering, doors and base area at least a few times a year. If the store is on a patio, clear moss and algae because they indicate damp conditions and can make access slippery. If you use a water butt, hose or irrigation system nearby, make sure it does not leak towards the store.
FAQ
Can I put a compact timber garden store directly on paving?
Yes, if the paving is firm, level, stable and drains properly. Check that slabs do not rock and that water does not pond around the base. A patio that falls towards the store or stays green with algae may need improvement before use.
Is gravel a good base for a small timber store?
Gravel can be part of a good drainage solution, but loose gravel alone is not always a stable structural base. For many compact stores, slabs or a firm pad provide better support, with gravel used around the edges to reduce splashback and improve drainage.
How much space should I leave around the store?
Leave enough space for airflow, inspection and cleaning. The more shaded or damp the location, the more valuable this gap becomes. Avoid pressing the rear or sides tightly against fences, walls or dense planting where moisture and debris can accumulate.
Should the base slope?
The store itself should sit level so the doors and floor work correctly. The surrounding ground should shed water away. If using a larger pad, ensure it does not create a basin where rainwater collects around the timber.
Does pressure-treated timber mean drainage is less important?
No. Treatment helps protect timber, but good drainage and airflow remain important. Keeping the base dry, reducing splashback and clearing debris will help the store perform as intended over time.
Conclusion
Siting a compact timber garden store is not only about finding a space where it fits. The best position is firm, level, well drained and easy to keep clean. Before assembly, check how rainwater moves across the area, provide a stable base, plan the roof fall, and create a splashback zone around the lower timber. These simple decisions reduce damp risk, protect stored contents and make day-to-day use more practical. A small store may take up little room, but it deserves the same careful base planning as any larger garden building.