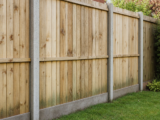
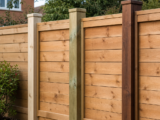
Choosing Fence Post Lengths for Panel Height, Ground Depth and Exposure

You have chosen your fence panels, measured the boundary and worked out roughly where the posts will go. The next decision is less visible but just as important: how long should each timber fence post be? If the post is too short, you may not have enough timber in the ground to resist wind and movement. If it is much longer than needed, you may waste money, make installation harder and still not improve the finished fence. Good planning means matching the panel height, buried depth, ground conditions and exposure of the boundary before you order.
This guide explains how to choose timber fence post lengths for typical panel fencing in UK gardens, including sheltered boundaries, open or windy sites, sloping ground and decorative panels. It uses a pressure treated timber post as a practical example, but the same decision process applies to most timber panel fence projects.
Inhaltsverzeichnis
Start with the finished fence height
The simplest way to plan post length is to begin with the height you want to see above ground. For panel fencing, this usually means the height of the fence panel, plus any gravel board, trellis, capping rail or decorative feature you intend to include.
For example, if you are fitting a 1.8m panel directly above ground level, the exposed fence height will be around 1.8m. If you add a 150mm gravel board beneath it, the visible height becomes about 1.95m. If you then add trellis or a decorative finial, you need to take that into account too. The post must be long enough to support the full visible arrangement, not just the main panel.
Typical visible heights to consider
- 900mm decorative panels: often used for front gardens, low boundaries or screening.
- 1.2m to 1.5m panels: useful where you want partial screening without creating a full-height barrier.
- 1.8m panels: common for rear garden privacy fencing.
- Panel plus gravel board: adds height and protects the panel from ground moisture.
- Panel plus trellis: increases visual height and wind load, even if the trellis is partly open.
Before buying posts, sketch one fence bay from ground level upwards. Mark the panel height, gravel board height and any top features. This gives you the exposed height that the post must support.
Allow enough post below ground
For many domestic timber panel fences, a common rule is to allow at least 600mm of post below ground. This is why you will often see advice to buy posts around 600mm, or approximately 2ft, longer than the panel height. For instance, a 1.8m fence often uses 2.4m posts, leaving about 600mm below ground and 1.8m above ground.
This rule is useful, but it should not be treated as the only consideration. The correct buried depth depends on fence height, soil type, exposure, post section and the amount of wind load on the fence. A tall solid panel on an exposed boundary needs more support than a low decorative panel in a sheltered courtyard.
A practical post length calculation
Use this basic formula:
Required post length = exposed fence height + buried depth + allowance for levelling or trimming
For a straightforward 1.8m panel fence with no gravel board, a typical calculation might be:
- Exposed panel height: 1800mm
- Buried depth: 600mm
- Allowance: small amount if the ground is uneven or posts will be trimmed
- Likely post length: 2400mm
For a 900mm panel where the manufacturer recommends a 1500mm post, the same principle applies: 900mm exposed plus around 600mm in the ground equals 1500mm. This is a clear and easy example of the panel-height-plus-buried-depth approach.
Match post length to exposure and wind load
Wind is one of the main reasons fences fail. A fence panel acts like a sail, and the post has to resist the force transferred through the rails and fixings. The more exposed the site, the more carefully you should choose post length, post section and installation method.
Sheltered boundaries
A boundary enclosed by neighbouring gardens, sheds, walls or planting is generally easier to fence. Standard buried depths are often suitable, provided the soil is firm and the posts are properly concreted or otherwise fixed. Even so, you should not reduce the buried depth simply because the area feels sheltered. A fence that is sound in summer still needs to cope with winter storms and wet ground.
Exposed boundaries
Open boundaries, corner plots, coastal areas, elevated gardens and fieldside fences experience greater wind pressure. For these locations, consider whether a taller or more robust post is needed, whether a larger post section is sensible, and whether the fence style should allow some wind through. Solid panels, closeboard fencing and high privacy screens all need careful support.
If the boundary is particularly exposed, the standard “600mm in the ground” rule may be a starting point rather than a final answer. You may need deeper holes, heavier posts, additional bracing during installation or professional advice. It is better to address exposure at the planning stage than to repair a leaning fence after the first storm.
Understand post section as well as post length
Length is only one part of the decision. The thickness of the post also matters. A narrow post may be adequate for a low decorative panel, while taller fencing generally needs a stronger section. Many timber posts for panel fencing are around 70mm to 75mm square, with larger sections commonly used for heavier or more exposed installations.
When comparing posts, look at the actual dimensions in millimetres rather than relying only on imperial descriptions. A post described as 3in by 3in may have a finished size close to 75mm by 75mm, while a planed post may have slightly different actual dimensions. Make sure the post is compatible with your panels, brackets, gravel boards and post caps.
Use the product dimensions as a planning example
A 1500mm x 70mm x 70mm pressure treated timber post is a practical example of the calculation in action. If used with a 900mm panel and around 600mm buried depth, the post length matches the usual approach of allowing approximately 2ft of post below ground. The 70mm by 70mm section is also a reminder to check post thickness against the style and height of fencing you intend to build.
For taller fencing, such as a 1.8m panel, the same calculation normally points towards a longer post, commonly around 2400mm where 600mm is to be set into the ground. The key lesson is not that one post suits every job, but that every post length should be selected by adding visible fence height to the required in-ground depth.
Plan for gravel boards, caps and decorative features
Gravel boards are often overlooked when calculating post length. They sit beneath the fence panel and help protect it from wet soil, splashback and garden debris. However, they also raise the panel and increase the overall visible fence height.
If you are using a 1.8m panel with a 150mm gravel board, you are no longer building a 1.8m visible fence. You are building approximately 1.95m of visible structure, before allowing for any cap or finial. That may affect both post length and local height considerations.
Post caps and finials do not usually alter the structural post length in the same way as panels and gravel boards, but they affect the finished appearance and may add a small amount to the overall height. If the top of the post must sit just above the panel, plan this before cutting. It is easier to trim a post neatly after installation than to discover it is too short.
Check boundary height rules before ordering
In many UK domestic situations, planning permission may be required if a fence exceeds 2m in height, or if it exceeds 1m next to a highway used by vehicles. There are also additional considerations for listed buildings, conservation areas, covenants and shared boundaries. Rules can vary according to circumstances, so you should check with your local planning authority if you are unsure.
This matters when choosing post length because you may be adding gravel boards, trellis or raised ground levels without realising the final structure is higher than planned. Measure from the relevant ground level and consider how the fence will appear from both sides of the boundary.
Allow for slopes and uneven ground
Sloping ground makes post length planning more complicated. If the fence steps up or down, some posts may need to stand higher above ground than others. If the ground falls sharply, the lower side of a post may appear more exposed, and you may need extra length to keep the top line consistent.
Stepped panels
With stepped fencing, each panel remains level and the fence drops in stages. This is common with standard rectangular panels. You need to set each post so it supports the panel on both sides at the correct height. Corner and intermediate posts on a slope may need careful marking because one panel could sit higher than the next.
Raking or following the slope
Some fencing follows the gradient more closely. This can look neater on gentle slopes but may not suit rigid framed panels. If the panel or rail arrangement is angled, check that the post has enough exposed height at each end and that the fixings have adequate timber to bite into.
Practical steps for choosing your post lengths
- Measure the boundary: Record the total run, corners, gates, changes in level and any obstructions.
- Choose the panel height: Decide whether you are using low decorative panels, medium-height screening or full-height privacy panels.
- Add components: Include gravel boards, trellis, capping rails and any features that alter the visible height.
- Decide the buried depth: Use at least 600mm as a common starting point for many panel fences, then adjust for exposure, height and soil conditions where necessary.
- Select a suitable post section: Match the post thickness to panel height, weight and wind exposure.
- Check treatment suitability: For timber in ground contact, use posts treated for that purpose and follow the manufacturer’s instructions.
- Plan fixing method: Decide whether posts will be set in concrete, used with suitable spikes or bases, or fixed to masonry.
- Allow for trimming: Where possible, leave a small allowance so post tops can be aligned neatly after installation.
Checklist before you buy timber fence posts
- Have you confirmed the actual panel height in millimetres?
- Are you adding gravel boards, trellis or capping?
- Have you allowed at least 600mm below ground where appropriate?
- Is the boundary sheltered, moderately exposed or highly exposed?
- Is the soil firm, clay, sandy, waterlogged or made ground?
- Are the posts treated for ground contact if they will be buried?
- Is the post section strong enough for the panel height and style?
- Have you checked local height restrictions and boundary responsibilities?
- Do you need longer posts for sloping sections or stepped panels?
- Have you included end posts, corner posts, gate posts and any extras?
Common mistakes when planning post length
Buying posts the same height as the panels
This is the most basic error. A 1.8m panel does not need a 1.8m post; it needs a post long enough to support the panel above ground and remain firmly anchored below ground. If you forget the buried section, the fence will be unstable or impossible to install properly.
Ignoring gravel boards
A gravel board may only add 150mm or 300mm, but that extra height changes the calculation. It can also bring the finished fence closer to planning height limits. Always include it in the visible height.
Using short posts on windy boundaries
Exposed sites demand more thought. A fence that seems solid during installation can loosen as wind loads work the post and concrete over time. If the site is open, do not cut corners on buried depth or post strength.
Assuming all timber treatment is the same
Timber posts set into the ground need treatment suitable for ground contact. Pressure treatment can improve durability, but you should still check the stated use and any warranty conditions. Cutting the bottom of a treated post can expose untreated timber, so avoid unnecessary cuts at the buried end unless the cut is properly protected in line with the manufacturer’s guidance.
Forgetting gates and corners
Gate posts and corner posts often carry extra loads. A gate post supports moving weight and repeated impact from opening and closing. Corners can also take tension from two fence runs. These positions may need stronger or longer posts than simple intermediate posts.
Installation considerations that affect post performance
Even the right post length can fail if the installation is poor. Dig holes wide enough to allow a solid concrete surround, keep posts plumb, and brace them while the concrete sets. Avoid leaving soil and debris directly against untreated cuts or vulnerable timber surfaces. In wet ground, consider drainage at the base of the hole so water does not sit around the post longer than necessary.
When setting posts in concrete, many installers slope the top of the concrete slightly away from the post to shed water. This reduces the chance of water pooling at the timber-concrete junction. Keep panel fixings consistent and avoid forcing panels between posts that are too close together, as this can twist the fence and place unnecessary strain on the posts.
Short FAQ
How much of a timber fence post should be in the ground?
For many domestic panel fences, at least 600mm below ground is a common rule of thumb. Taller, heavier or more exposed fences may need deeper setting or stronger posts.
What length post do I need for a 6ft fence panel?
A typical 6ft, or approximately 1.8m, fence panel commonly uses an 8ft, or approximately 2.4m, post so that around 600mm can be set into the ground. Add extra height if you are using gravel boards or other components.
Can I use shorter posts with fence post spikes?
Post spikes and bases can be useful in some situations, but suitability depends on the fence height, ground conditions and exposure. Always follow the fixing manufacturer’s guidance and avoid using light-duty fixings for tall, solid or exposed fencing.
Do I need longer posts on a slope?
Sometimes, yes. Sloping ground can create extra visible post height on one side or require stepped panel positions. Measure each change in level before ordering and allow for trimming where necessary.
Should timber fence posts be pressure treated?
For posts in ground contact, choose timber treated for that purpose and follow the manufacturer’s installation and maintenance advice. Pressure treatment helps improve service life, but correct installation is still essential.
Conclusion
Choosing the right fence post length is a simple calculation backed by practical judgement. Start with the full visible fence height, including panels, gravel boards and decorative additions. Add a suitable buried depth, commonly at least 600mm for many panel fences, and then adjust for exposure, soil conditions, slopes and load-bearing positions such as gates and corners.
If you plan before you buy, you are more likely to order posts that are long enough, strong enough and suitable for the boundary you are building. A well-chosen post may be mostly hidden once the fence is complete, but it is one of the main reasons the finished fence stays upright, straight and secure.