Framing Garden Routes with a Freestanding Timber Pergola Arch
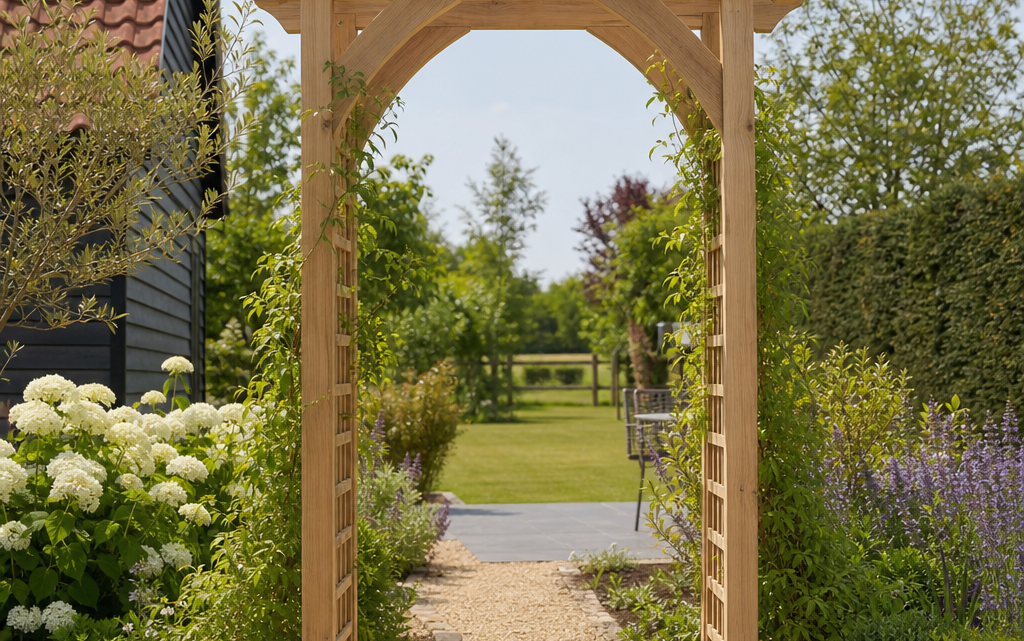
You may have a path that technically works, yet still feels unresolved: a gravel route from the patio to the lawn, a side passage leading into a vegetable garden, or a stepping-stone path that disappears into a border without any sense of arrival. A freestanding timber pergola arch can solve this design problem by giving the route a clear threshold. Used well, it frames a view, marks a transition and makes movement through the garden feel more deliberate.
Unlike a gate, a pergola arch does not necessarily stop access or provide security. Its value is spatial and visual. It tells you that you are moving from one garden area to another: from formal to informal, open to enclosed, sunny to shaded, or practical to decorative. This article explains how to plan, position and install a freestanding timber pergola arch so that it looks intentional, remains stable and contributes to the wider garden design.
Inhaltsverzeichnis
Why use a freestanding timber pergola arch?
A pergola arch is a simple structure, but it can have a strong design effect. In many gardens, the most successful routes are not just lines across the ground; they have pauses, views and changes in atmosphere. An arch helps to create that rhythm.
A freestanding timber arch is particularly useful where you do not have walls, fences or masonry piers to build into. It can be placed over a path, at the entrance to a seating area, between two lawn sections or at the start of a planted walkway. Timber also suits a wide range of garden styles, from cottage planting and wildlife-friendly borders to more contemporary layouts where the structure is kept simple and uncluttered.
Choosing the right transition to frame
Before choosing an arch, decide exactly what it is meant to do. If you install one simply because there is a gap, it may look decorative but disconnected. A good location usually has a clear reason.
Marking a change of garden use
One of the most practical uses is to signal that the garden is changing function. For example, an arch can mark the move from a dining terrace to a lawn, from an ornamental garden to a productive area, or from a family play space to a quieter seating corner. This is especially helpful in medium-sized gardens where several uses sit close together.
Creating a sense of arrival
If you have a destination such as a bench, summerhouse, greenhouse or secluded patio, an arch placed on the approach can make the journey feel more considered. It works best when the view through the opening is worth framing. Think about what you see when you stand on the main route and look through the arch. A focal plant, pot, sculpture, tree or seat can make the composition stronger.
Breaking up a long route
A long straight path can feel exposed or monotonous. A pergola arch can divide the route into stages, particularly when combined with planting on either side. It does not need to be halfway along the path; sometimes placing it at a slight narrowing, a bend or a change in surface feels more natural.
Key decision criteria before you buy
A freestanding timber pergola arch should be chosen for the space, not just for its appearance in a product image. Use the following criteria to avoid common sizing and placement problems.
Width and comfortable access
Measure the path or intended route first. The opening needs to feel comfortable for normal use, particularly if you regularly carry tools, watering cans, trays of plants or garden furniture through the space. If the arch is to sit over an existing path, ensure the posts will not reduce the usable width too much.
Also consider whether the path edges are fixed. A brick or paved path may require a more accurate fit than gravel or bark, where the edges can often be adjusted.
Height and visual proportion
An arch should feel tall enough to pass through easily and proportionate to surrounding planting and boundaries. If it is too small in an open lawn, it may look isolated. If it is too large in a narrow side garden, it can dominate the space. Check the stated dimensions carefully, including whether the measurement is taken at the widest point, the rails or the posts.
Stability and fixing method
Freestanding does not always mean that no fixing is required. It means the structure is not dependent on a wall or fence. In exposed gardens, open sites, windy corners or soft ground, you may still need suitable ground fixings. The correct method depends on the product design, soil conditions and surface type.
For lawns and borders, you may use proprietary post supports or ground anchors where suitable. For paved areas, fixing brackets may be required, provided the paving and sub-base can take the load. If you are unsure, seek advice from a competent installer, especially where the structure could move in strong winds.
Planting intentions
If you plan to grow climbers, choose a structure that can support the type of planting you have in mind. Light annual climbers place very little load on an arch, while mature roses, wisteria or vigorous honeysuckle can become heavy over time. Integrated trellis sides can help with training plants, but you still need to prune regularly and avoid allowing growth to pull the structure out of shape.
Planning the position in the garden
Once you have chosen the transition, mark the proposed position before installing anything. This stage is worth doing slowly because a small shift can significantly improve the design.
Use temporary markers
Place canes, buckets or timber offcuts where the posts would stand. Walk towards the position from the house, from the far end of the garden and from any side routes. Check whether the arch aligns with the path and whether the view through it is appealing.
Do this at different times of day if possible. Low evening sun, shadows and glare can change how the arch feels in the space. If it will support plants, consider how shade will affect both the climbers and nearby planting.
Align with surfaces and edges
An arch usually looks best when it has a clear relationship with the path below it. It may sit squarely over a straight path, frame a curve, or mark a change from one material to another, such as paving to gravel. Avoid placing it slightly off-centre unless that asymmetry is part of a deliberate design.
Allow for growth and maintenance
Leave enough space around the posts for weeding, pruning and occasional treatment if needed. Do not place the timber hard against dense shrubs that will trap moisture and reduce air circulation. Good airflow helps timber dry after rain and contributes to long-term performance.
Using planting to soften and define the arch
Planting is often what makes a pergola arch feel settled rather than newly placed. The aim is to integrate the structure without overwhelming it.
Climbers for different effects
For a romantic, informal look, climbing roses, clematis or honeysuckle can work well, provided the arch is suitable for the mature weight and you maintain them properly. For seasonal coverage, annual climbers such as sweet peas or runner beans can give quick results with less long-term load. Evergreen climbers may provide year-round structure, but many become dense and require careful pruning.
Choose plants according to aspect. A sunny arch suits many flowering climbers, while shaded positions need more tolerant choices. Always check the eventual size of the plant, not just its size at purchase.
Planting at the base
Low planting around the base can help the arch feel rooted in the garden. Hardy geraniums, salvias, nepeta, ferns or ornamental grasses may be suitable depending on the style and light levels. Keep soil and mulch from building up directly against timber posts or supports, as constant damp contact is best avoided.
A practical example of scale and specification
When comparing options, it helps to look at a real product as a scale reference rather than as the only possible answer. For instance, a freestanding timber arch with a stated size of around 6 ft by 4 ft 6 in, or approximately 1.82 m by 1.36 m, gives you a sense of the footprint needed for a garden route. Features such as integrated trellis sides, rounded rail ends, flat-pack self-assembly, supplied structural fixings and pressure-treated timber are all practical details worth checking when you compare similar arches.
One example is the Forest Ultima Wooden Garden Pergola Arch 6’x4′, described as a freestanding pergola arch from the Arbour-Plus range, with diamond trellis sides, long-life pressure treatment and a 15-year anti-rot warranty. It is supplied flat-packed with instructions and fixings, and the manufacturer notes that, because it is freestanding and the posts are not long enough to be set into the ground, additional ground fixings may be needed where extra support is required. At a listed price of 254.99 EUR, it illustrates the sort of mid-sized timber arch you might assess for a path transition, while still needing to judge suitability against your own site conditions.
Installation: practical steps for a sound result
Always follow the instructions supplied with your chosen arch. The steps below are general guidance for planning and installation rather than a substitute for the manufacturer’s directions.
1. Check all parts before assembly
Unpack the components and compare them with the parts list. Confirm that fixings, side panels, rails and any trellis sections are present. It is easier to resolve missing or damaged parts before you start assembly than halfway through the job.
2. Assemble on a flat surface
Use a level, stable area such as a patio, driveway or flat lawn with boards laid down. Timber structures can twist if assembled on uneven ground. Do not fully tighten every fixing until the main frame is aligned, unless the instructions state otherwise.
3. Offer the arch into position
With help, lift the assembled arch into its intended position. Check alignment with the path and confirm that the posts sit evenly. Step back and view it from the main approach, the house and the far side of the garden.
4. Check level and plumb
Use a spirit level to check that the posts are upright and the top rails sit level. Small errors are noticeable once climbers grow or when the arch is viewed against a fence, building or horizon line.
5. Secure appropriately
If the product or site requires additional support, use fixings suitable for the ground and the structure. Freestanding arches in windy locations should not simply be placed loose on the ground. If fixing to paving, make sure the surface is stable and capable of taking the fixing. If fixing into soil, use supports suited to the soil type and expected loads.
6. Re-check after the first bad weather
After strong wind or heavy rain, check that the arch has not shifted and that fixings remain secure. This is particularly important before climbers have established, as a newly installed structure is more exposed.
Checklist: before you commit to a position
- Have you identified the transition the arch is meant to frame?
- Is the route wide enough for comfortable everyday access?
- Will the arch align with the path, opening or view?
- Have you checked the actual stated dimensions, including maximum width?
- Is the ground firm, level and suitable for the fixing method?
- Will the structure be exposed to strong winds?
- Is there enough space for pruning and maintenance?
- Are your chosen climbers suitable for the aspect and mature size?
- Will planting or mulch be kept from trapping moisture around the base?
- Can you assemble and install it safely, or do you need help?
Common practical mistakes to avoid
Choosing an arch that is too narrow
A narrow arch may look attractive in isolation but become irritating if it restricts movement. Remember that garden routes are used for more than walking. You may need to move a wheelbarrow, carry compost, bring through a mower or pass with tools. Measure real use, not just the path surface.
Placing it where there is no design reason
An arch standing in the middle of a lawn without a route, view or planting relationship can look stranded. If you want a focal point, consider what it frames and how people reach it. A pergola arch usually works best as part of movement through the garden.
Ignoring wind exposure
Because an arch has height and can catch wind, especially once covered in foliage, stability matters. Do not assume that a freestanding format is automatically stable in every location. Exposed plots, coastal gardens and open rural settings need particular care.
Letting climbers become too heavy
Climbers can transform an arch, but unchecked growth adds weight and wind resistance. Prune annually, tie in stems properly and remove dead or congested growth. Avoid allowing a vigorous plant to dominate the frame unless the structure is designed and fixed to cope with it.
Forgetting long-term access
Do not position an arch so that it blocks access to inspection chambers, outdoor taps, shed doors or maintenance routes. What looks good during installation must still work when you are cutting hedges, cleaning paving or moving garden equipment.
Design ideas for different garden situations
Small gardens
In a compact garden, an arch can make the space feel larger by suggesting there is another area beyond. Place it just before a slight turn or a change in planting style. Keep climbers restrained so they do not make the route feel cramped.
Long narrow gardens
Use an arch to divide the length into rooms. This reduces the tunnel effect and creates a more interesting sequence. Pair it with planting that partially screens the next section without blocking the route completely.
Cottage-style borders
A timber arch with trellis sides can sit naturally among roses, perennials and informal planting. Let plants soften the edges, but keep the opening clear so that the arch remains usable and the route is inviting.
Contemporary layouts
For a cleaner look, use the arch sparingly. Keep the path surface neat, restrict planting to one or two species and maintain a clear silhouette. The structure should frame the transition without becoming overly decorative.
Maintenance considerations
Timber garden structures vary in treatment, durability and maintenance needs, so follow the care guidance for the product you buy. Pressure-treated timber is designed to resist decay for longer than untreated timber, but it still benefits from sensible installation and regular checks.
Inspect the arch at least once a year. Look for loose fixings, movement at the base, damaged timber, rubbing plant stems and areas where soil or wet leaves are collecting. Keep climbing plants tied in with soft ties rather than wire that can cut into stems or damage timber. If any part becomes unstable, deal with it promptly rather than waiting until the structure is under the extra load of summer growth.
FAQ
Do I need planning permission for a timber pergola arch?
In many domestic gardens, a modest pergola arch will not require planning permission, but rules can vary, particularly for listed buildings, conservation areas or structures close to boundaries. If in doubt, check with your local planning authority before installation.
Can a freestanding arch be used on paving?
Yes, in some cases, but it depends on the arch, the paving and the fixing method. The paving must be stable enough to accept suitable fixings. Loose slabs or thin decorative paving may not provide adequate support.
What is the best climber for a pergola arch?
There is no single best climber. The right choice depends on sun, shade, soil, desired appearance and the strength of the structure. Roses, clematis, honeysuckle and annual climbers can all work in the right setting, but check mature size and pruning needs before planting.
Should the arch match my fences and other timber?
It does not have to match exactly, but it should relate to the garden. Similar tones, repeated materials or consistent planting can help the arch feel integrated. If the timber weathers differently from nearby structures, planting can soften the contrast.
How far from plants should the posts be?
Leave enough space for air circulation and maintenance. Avoid burying the base in dense planting or mulch. Climbers can be planted nearby and trained onto the structure, but the base should remain inspectable and not constantly damp.
Conclusion
A freestanding timber pergola arch is most successful when it does more than decorate a path. It should frame a meaningful transition, guide movement and improve the way you experience the garden. By checking dimensions, access, alignment, fixing requirements and planting plans before you install, you can avoid the most common mistakes and create a feature that feels naturally connected to the route.
Use product specifications as practical reference points, but make the final decision according to your own site. The right arch, positioned carefully and maintained sensibly, can turn an ordinary garden route into a clear and attractive threshold between spaces.