
Layered Planting Displays with Raised Timber Garden Containers
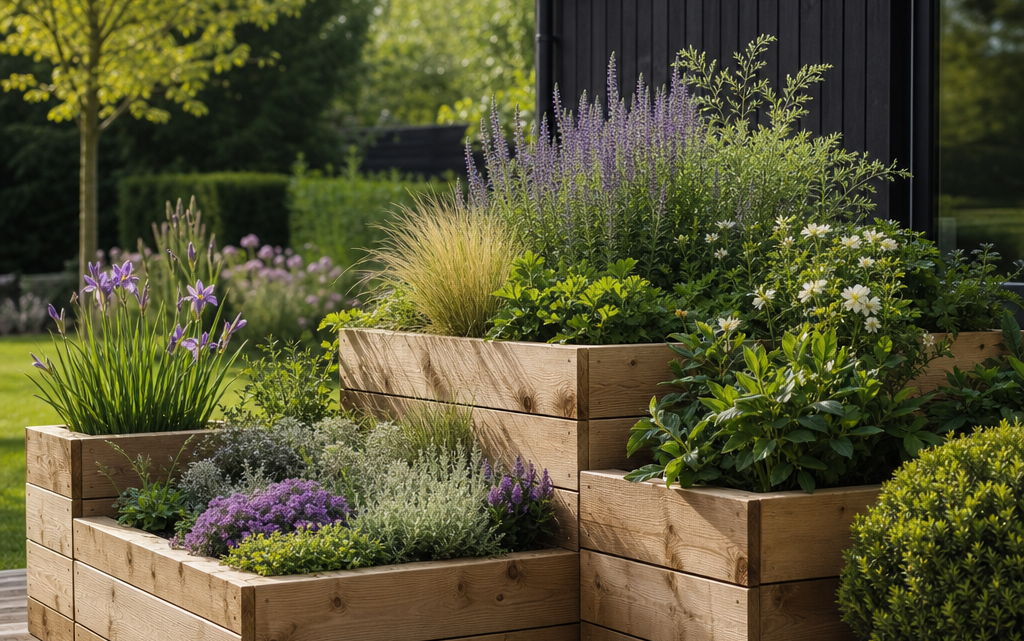
If you have a patio, a small lawn edge, a balcony-style terrace or a paved corner that feels flat and unfinished, raised timber containers can be a very effective way to create a layered planting display. Rather than relying on one border at ground level, you can build height, depth, seasonal colour and texture using a group of planters arranged with purpose. The result can feel designed rather than simply decorated, especially when the planting is planned in tiers.
Layered planting is not just about putting tall plants at the back and short plants at the front. In containers, you also need to think about root space, drainage, exposure to wind, watering demands, the weight of compost, and how the display will look in winter as well as summer. This guide explains how to plan attractive and practical layered displays using raised timber garden containers, with clear decision points, planting ideas and common mistakes to avoid.
Inhaltsverzeichnis
What a layered container display should achieve
A good layered display gives you more than a collection of individual pots. It should create a small composition where each planter contributes to the overall effect. You might want screening, colour near a seating area, a productive herb and edible flower display, or a softer transition between hard landscaping and the rest of the garden.
In most cases, your aim is to combine three visual layers:
- Structure: the permanent or long-lasting plants that give shape, such as compact shrubs, grasses, small evergreens or clipped herbs.
- Seasonal interest: plants that provide flowers, foliage colour, berries, seedheads or scent at particular times of year.
- Softening and trailing growth: lower plants that spill slightly over the edges or fill gaps between stronger forms.
Raised timber containers are particularly useful because they lift the display above ground level. This makes the planting easier to see, easier to tend and less likely to be overlooked against paving or decking. Timber also has a softer, more natural appearance than many plastic or metal containers, so it works well in both traditional and contemporary gardens.
Start with the site, not the plants
Before choosing plants, assess where the containers will stand. This one step prevents many later problems. A planter that looks ideal in a shop or online may perform very differently depending on sun, shade, wind and access to water.
Light levels
Watch the site across the day if you can. A south-facing patio may need drought-tolerant plants, while a shaded side return may be better suited to ferns, heucheras, hostas and shade-tolerant herbs. Avoid mixing full-sun Mediterranean plants with moisture-loving shade plants in the same container, as their care needs will conflict.
Wind exposure
Raised containers can be more exposed than ground-level borders. Tall, top-heavy plants may rock in the wind, damaging roots or drying out quickly. If the site is breezy, choose compact shrubs, ornamental grasses with flexible stems, or plants with smaller leaves. You can still create height, but it should be stable height.
Water access
Containers dry out faster than borders because their root volume is limited. If the planters are far from an outdoor tap, design the display with drought tolerance in mind. You may also want to group containers so that watering is quick and consistent rather than scattered across the garden.
Choosing raised timber containers for layered planting
The right container depends on the scale of your space and the plants you want to grow. For layered displays, a set of containers in related sizes can be easier to arrange than several unrelated pots. Rectangular planters are especially practical because they sit neatly against walls, along paths or at the edge of a patio.
When comparing raised timber containers, consider the following criteria:
- Size and depth: deeper containers suit shrubs, grasses and longer-term planting, while shallower containers are better for annuals, herbs and seasonal bedding.
- Durability: pressure-treated timber can offer better resistance to rot and fungal decay than untreated timber, provided it is used and maintained appropriately.
- Raised base or feet: lifting the planter off the ground helps reduce direct contact with damp surfaces and can improve airflow beneath the container.
- Ease of movement: empty containers are much easier to reposition than filled ones, so decide the layout before filling them with compost.
- Visual consistency: using similar materials and shapes helps the whole display feel intentional.
- Sustainability: look for timber from certified sources where this matters to you.
As a practical example, a rectangular set such as the Forest Durham Rectangular Wooden Garden Planter 3’x1’9 (0.9×0.5m) – Set of 3 gives you three different planter sizes: 900 x 500 x 330 mm, 810 x 410 x 260 mm and 720 x 320 x 230 mm. The stepped sizes are useful for creating a tiered arrangement without needing separate stands. According to the product information, the timber is pressure treated, raised off the ground, PEFC certified and supplied without assembly required. Details such as these are worth comparing when you are choosing containers, but the same design principles apply to many raised timber planter sets.
Planning the layout before planting
Arrange the empty planters first. This is much easier than trying to move them once they are filled with compost and watered. Stand back and view the arrangement from the places you will actually see it: the kitchen window, the garden gate, a bench, the patio doors or a favourite chair.
Use height deliberately
If the containers are different sizes, use the largest planter as the anchor. Place it at the back of a display against a wall or fence, or slightly off-centre if the arrangement will be viewed from several angles. The medium planter can sit beside it or forward of it, while the smallest planter can soften the front edge.
Avoid lining different-sized planters up in a perfectly straight row unless you want a very formal effect. For a more natural layered display, overlap the containers visually. This does not mean they need to touch; it means they should appear connected when viewed from the main angle.
Think about access
Leave room to reach each container for watering, pruning and deadheading. Do not place the tallest planting where it blocks access to a tap, storage box, gate or seating area. If the containers are beside a path, make sure trailing plants will not become a trip hazard.
Match scale to the surrounding garden
Small containers can look lost against a large blank wall, while very bulky planters can overwhelm a narrow balcony or courtyard. If the space is large, use repeated groups or add vertical features such as a trellis behind the planters. If the space is small, use one strong group rather than lots of separate pots.
Building the planting layers
Once the layout is decided, plan the planting for each container as part of a single composition. A simple method is to use “backbone, middle and edge” planting.
Backbone plants
These give the display structure. In a large or deeper planter, you might use a compact evergreen shrub, a dwarf conifer, lavender, rosemary, pittosporum, skimmia, euonymus or an ornamental grass such as carex or stipa. The best choice depends on light, exposure and the size of the container.
Do not overplant with large shrubs if the planter is modest in size. A plant may look small when purchased but quickly become stressed if its roots outgrow the space. Check the likely mature size and choose compact varieties where possible.
Middle-layer plants
The middle layer links the structural plants to the lower edge planting. This is where you can use seasonal colour, foliage contrast and scent. Pelargoniums, salvias, dwarf dahlias, nemesia, diascia, heuchera, compact hardy geraniums, violas, primroses and herbs such as thyme or parsley can all work, depending on the season and conditions.
For year-round value, mix flowering plants with foliage plants. Flowers are often brief; foliage carries the display through quieter weeks.
Edge and trailing plants
The edge layer softens the timber sides and makes the display feel established. Suitable choices may include trailing lobelia, creeping thyme, ivy, bacopa, calibrachoa, trailing violas or small sedums. Use restraint: a few trailing plants can look elegant, but too many can hide the shape of the planter and make maintenance awkward.
Compost, drainage and filling technique
Layered displays succeed only if the plants have suitable growing conditions. Use a good-quality peat-free multipurpose compost for short-term seasonal displays. For longer-term planting with shrubs or perennials, consider a loam-based peat-free container compost or a mix designed for more permanent planting, as it usually holds nutrients and structure better over time.
Check that water can drain freely from the container. Raised planters are helpful because they are lifted from damp ground, but you still need to avoid waterlogging inside the planter. If drainage holes are present, keep them clear. If you are lining a timber planter, use a permeable liner or ensure that water can escape rather than sitting against the timber or around the roots.
When filling, firm the compost gently rather than compacting it heavily. Leave a watering gap of around 2-3 cm below the rim so water does not immediately run off. After planting, water thoroughly to settle compost around the roots.
Planting combinations that work well
The best combinations are based on shared growing requirements. Here are some practical approaches.
Sunny, dry-style display
Use lavender or rosemary as the structural plant, with salvias, thyme, compact sedums and trailing herbs around the edge. This suits a warm patio and gives scent as well as pollinator value. Avoid adding thirsty bedding plants that will need very different watering.
Soft cottage-style display
Use a compact rose or small shrub as the anchor in the largest container, with hardy geraniums, violas, nepeta and trailing campanula. This creates a relaxed layered effect and can suit timber particularly well.
Shaded foliage display
In part shade, combine ferns, heucheras, hostas, carex and ivy. The interest comes from leaf shape and colour rather than constant flowering. This is a good option for side returns, north-facing patios and shaded courtyards.
Edible and ornamental display
Combine herbs such as rosemary, thyme, parsley, chives and oregano with edible flowers such as nasturtiums or violas. Keep vigorous mint in its own pot, as it can dominate a mixed planter.
Useful checklist before you plant
- Have you checked how much sun the area receives in spring and summer?
- Can you reach every planter easily with a watering can or hose?
- Are the planters positioned before being filled with compost?
- Have you chosen plants with similar water and light needs?
- Is there a clear structural plant in the largest or most visible container?
- Have you allowed room for plants to grow rather than filling every gap immediately?
- Can excess water drain away freely?
- Have you left a watering gap below the rim?
- Will the display still have shape after the main flowering season?
- Are trailing plants positioned where they will not obstruct paths or steps?
Common practical mistakes to avoid
Overfilling the containers on day one
It is tempting to pack planters tightly for instant effect, but overcrowding leads to competition for water, nutrients and light. The display may look good for a few weeks and then decline. Leave growing room, especially around shrubs and perennials.
Ignoring mature height
A plant label may show an attractive young specimen, but the mature plant could be too large for the container. This is particularly important with shrubs, grasses and climbers. Choose compact or dwarf forms where space is limited.
Mixing incompatible plants
Lavender, rosemary and sedums prefer freer-draining conditions, while ferns and hostas need more moisture and shade. Combining them in one planter usually means one group will suffer.
Forgetting winter structure
Many displays look full in June but bare in January. Include at least some evergreen foliage, interesting stems, grasses, bulbs or winter bedding if the containers are in a prominent position year-round.
Placing planters directly where water gathers
Even raised containers benefit from being sited sensibly. Avoid low points in paving where puddles form after rain. Constant damp around any timber garden feature can shorten its useful life.
Seasonal care for layered timber container displays
Containers need regular attention, but the work is straightforward if you build it into your routine. In spring, remove dead growth, refresh the top layer of compost and add slow-release fertiliser if suitable for the plants you are growing. In summer, water consistently, deadhead flowering plants and trim trailing growth if it becomes untidy.
In autumn, replace tired annuals with violas, cyclamen, small evergreens or spring bulbs. In winter, raise vulnerable pots further if necessary, check that drainage remains clear and avoid letting containers sit in permanently wet conditions. If severe frost is forecast, some tender plants may need fleece or moving to a more sheltered position.
FAQ
Can you create a layered display with only three containers?
Yes. Three containers are often enough if they differ in size or are arranged carefully. Use the largest for structure, the middle one for colour and texture, and the smallest for low or trailing planting that ties the group together.
Do raised timber planters need lining?
It depends on the planter design and how you intend to use it. A liner can help reduce compost contact with the timber, but it must not trap water. If you use a liner, make sure drainage is still effective.
What is the easiest planting style for beginners?
A simple evergreen shrub, two or three seasonal flowering plants and a few trailing edge plants is a reliable formula. Keep all plants suited to the same light and watering conditions.
How often should you water raised containers?
There is no fixed rule. In warm, dry weather, containers may need watering daily, especially in full sun. In cooler weather they may need much less. Check the compost with your finger; if the top few centimetres are dry, water thoroughly.
Can timber containers be used on decking or paving?
Yes, provided the surface can take the weight once the containers are filled and watered. Use raised designs or feet to improve airflow and reduce damp contact, and avoid blocking drainage across the surface.
Conclusion
Layered planting displays with raised timber containers are a practical way to add depth, height and seasonal interest to patios, courtyards, terraces and garden edges. The key is to plan the site, container layout and plant choices together rather than treating each planter separately. Choose compatible plants, allow for growth, provide reliable drainage and include some year-round structure. With thoughtful positioning and regular care, a small group of raised timber containers can become a well-balanced garden feature rather than just a collection of pots.

