Balancing privacy and openness in slatted timber side gates
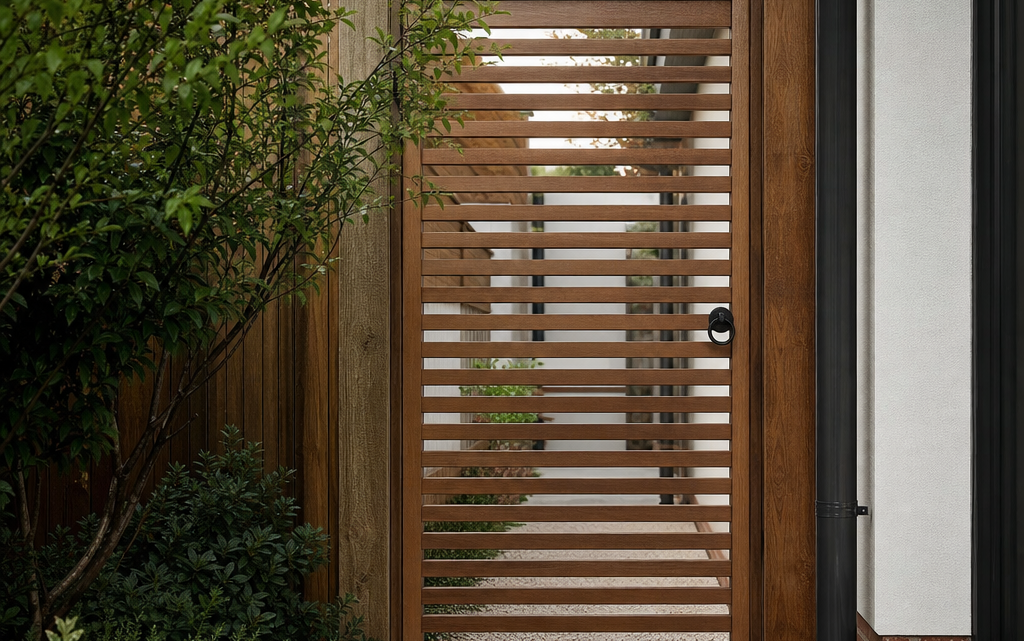
You may be replacing a tired side gate between the house and garden, closing off a bin store from the street, or finishing a boundary alongside new fencing. In each case, the same question usually arises: how private should the gate be? A fully boarded gate can feel secure but may look heavy and restrict airflow. A very open slatted design can look smart and modern, but it may reveal more than you want. Slatted timber side gates sit between these two extremes, offering screening, ventilation and visual interest when chosen and installed carefully.
The right gate is not simply the one that looks best in a catalogue. It needs to suit the width of the opening, the exposure of the site, the level of privacy you need, the style of the adjoining boundary and the way you use the space day to day. This guide explains how to balance privacy, airflow and boundary style so you can make a practical, long-lasting choice.
Inhaltsverzeichnis
Why slatted timber side gates are popular
Slatted timber gates are often chosen because they avoid the harsh, blank appearance of a solid panel while still creating a clear boundary. The gaps, overlaps or decorative slatted sections can soften the look of a side entrance and help it feel more considered as part of the garden design.
They are particularly useful in narrow side passages, where a completely solid gate can make the area feel enclosed and gloomy. A slatted top section, or horizontally arranged boards with shadow gaps, can allow light and air to pass through while retaining enough screening for bins, bikes, tools or a private route into the garden.
Timber also works well with many British garden styles. It can sit comfortably beside brick, render, stone, painted masonry, hedging and timber fencing. Depending on the design, a slatted gate can look contemporary, Japanese-inspired, rustic or simply neat and understated.
Understanding the privacy and openness trade-off
Before choosing a side gate, decide what you are trying to screen and from where. Privacy is not just about whether a passer-by can see through the gate directly. You also need to think about viewing angles, height, lighting and what happens when the gate is wet, weathered or backlit.
When you need more privacy
Choose a more enclosed slatted or part-boarded design if the gate faces a public pavement, shared driveway, neighbour’s window or service alley. You may also want higher privacy if the side passage stores bins, recycling boxes, bicycles or gardening equipment. In these situations, a design with boards arranged to interrupt sightlines is often more practical than widely spaced open battens.
Look for features such as overlapping boards, alternately mounted boards, a rebated frame or a partly solid lower section. These can reduce direct views while still giving the gate texture and depth.
When openness matters more
A more open design may be suitable if the gate is within the garden rather than on a public boundary, or if you are defining a transition between garden areas rather than creating security. Openness can also be helpful where the side passage is dark, damp or enclosed by high walls. Extra air movement can reduce the feeling of stagnation and may help timber dry more quickly after rain.
However, openness should be judged in real conditions. A gate that looks discreet from straight ahead may reveal much more when viewed diagonally. If you are unsure, mark out the proposed slat spacing with cardboard strips or battens and view it from the most likely angles.
Assessing your site before choosing a gate
The best design depends heavily on the location. Take time to assess the site before buying, especially if the opening is exposed, uneven or close to the house.
Measure the opening accurately
Measure the width at the top, middle and bottom of the opening. Walls, posts and fences are often not perfectly parallel. You also need to allow for posts, hinges, latch clearance and any swelling or seasonal movement in the timber. Measure the height in relation to both the finished ground level and any nearby fence panels.
Do not rely on an old gate as your only guide. It may have sagged, been cut down or fitted badly. If you are replacing it, measure the structural opening as well as the existing gate leaf.
Check exposure to wind
Side passages can act like wind tunnels. A completely solid gate in a windy position can place significant strain on hinges, posts and fixings. Slatted sections reduce wind resistance, although the amount depends on how open the design is. If the site is exposed, prioritise strong posts, robust hinges and a frame that resists twisting.
Think about damp and drainage
Timber gates last longer when they can dry out. Avoid positioning the bottom of the gate too close to standing water, soil or wet leaves. Allow sensible ground clearance while still keeping the gate secure and visually balanced. If the gate sits beside a wall or in a shaded passage, airflow becomes more important because the timber may dry slowly after rain.
Choosing a slatted style that suits your boundary
A side gate should look like part of the boundary rather than an afterthought. It does not always need to match the fence exactly, but it should have a clear relationship with the surrounding materials.
Matching adjacent fencing
If you have contemporary horizontal fence panels, a gate with horizontal boards or a slatted top will usually feel coherent. Matching the rhythm and direction of the boards is often more important than matching every detail. Where the fence has vertical closeboard panels, a horizontal slatted gate can still work, but it may stand out as a feature rather than blending in.
Working with brick and rendered walls
Timber softens hard boundaries. Against brick, a smooth-planed timber gate can look tidy and warmer than metal. Against pale render, darker stained timber can create contrast, while natural timber gives a calmer look. Keep the gate hardware in mind: black hinges and latches can look traditional or graphic, while galvanised or stainless finishes may suit a cleaner modern scheme.
Considering height and proportions
A common side gate height is around 1.8m, which provides useful screening without feeling excessively tall in most domestic settings. The width should feel proportionate to the opening and practical for access. If you need to move bins, bikes, wheelbarrows or garden machinery through the side entrance, check the clear opening width after hinges and posts are fitted.
Decision criteria for balancing privacy, airflow and style
Use the following criteria to narrow your choice before you commit to a particular gate design.
- Privacy level: Decide whether you need to screen people, stored items, pets, the garden beyond, or simply define the boundary.
- Viewing angle: Check visibility from the pavement, neighbouring property, driveway and house windows.
- Airflow: Give higher priority to airflow in narrow, shaded, damp or windy side passages.
- Strength: Look for sound framing, reliable joints and appropriate hinges, particularly on exposed sites.
- Compatibility: Match or complement adjoining fence panels, walls and garden structures.
- Maintenance: Consider whether the timber is treated and what future care it may need.
- Access: Make sure the gate width and swing direction suit everyday use.
- Security: Choose a suitable latch, bolt or lock arrangement for the location and risk level.
As a practical example of the type of specification you may encounter, the Forest Kyoto Gate 1.8 x 0.9m is a 6ft timber side gate measuring 1800mm x 900mm x 40mm. It has horizontally mounted boards, a slatted top section, a rebated frame, mortise and tenon joints, a smooth-planed finish and pressure-treated PEFC-certified timber with a 15-year anti-rot guarantee. Those details illustrate the kind of features to compare when judging privacy, structure, finish and maintenance requirements, rather than suggesting that one design will suit every boundary.
Practical steps for planning and fitting a slatted side gate
A good gate can perform poorly if the planning or installation is weak. Use a methodical approach before fitting.
1. Decide which way the gate should open
Most side gates open inwards for security and to avoid obstructing a public path. However, your layout may require a different arrangement. Check whether bins, steps, drain covers, wall lights, external taps or garden furniture will obstruct the swing. If the passage is very narrow, consider how you will stand while unlocking and opening the gate.
2. Confirm post and support requirements
The gate is only as reliable as the structure it hangs from. If you are fixing to timber posts, they must be sound, upright and securely set. If fixing to masonry, use suitable fixings and check the condition of the bricks or blocks. Weak old brickwork, crumbling mortar or thin decorative walls may not be suitable without reinforcement.
3. Allow for gaps and ground clearance
Timber moves slightly with changes in moisture. A gate fitted too tightly can bind in wet weather. Allow clearance at the sides and bottom according to the hinge and latch arrangement. The bottom gap should be enough to avoid scraping over uneven paving but not so large that it looks unfinished or compromises security.
4. Choose appropriate ironmongery
Hinges should be strong enough for the size and weight of the gate. For a tall side gate, robust tee hinges or hook and band hinges are commonly used, depending on the design and support. Choose latches, bolts or locks based on how secure the entrance needs to be. A simple garden latch may be adequate inside a garden, while a side access from the street may require a lockable solution.
5. Check alignment before final fixing
Offer the gate into position and check the levels before drilling final holes. Use packers if needed to maintain even gaps. Stand back and view the gate in relation to the fence line, wall and house. A slight misalignment can be very noticeable on a horizontal slatted design.
Checklist before buying a slatted timber side gate
- Have you measured the opening at three points across the width?
- Have you allowed for posts, hinges, latch clearance and seasonal timber movement?
- Is the chosen height suitable for privacy without overpowering the boundary?
- Can you move bins, bikes and garden equipment through the clear opening?
- Does the slat arrangement block the most important sightlines?
- Will the design allow enough airflow for a damp or shaded side passage?
- Are the supporting posts or walls strong enough for the gate?
- Is the timber treated, and do you understand future maintenance needs?
- Does the gate style complement nearby fencing, walls and planting?
- Have you chosen suitable hinges, latch, bolt or lock for the location?
Common practical mistakes to avoid
Choosing appearance before function
A gate that looks attractive online may not solve your site’s actual problems. If your main issue is screening a public view, avoid designs with slats that are too open. If the issue is damp and poor light, avoid making the passage feel like a sealed corridor. Start with the function, then choose the style.
Ignoring the diagonal view
Slatted gates can appear private from straight ahead but much more open from an angle. This matters beside pavements, shared drives and neighbouring paths. Always consider how the gate will be viewed in movement, not just from a fixed point.
Underestimating wind load
Even a partly slatted gate can catch the wind. Weak hinges, undersized posts or poor fixings may lead to sagging, rattling or movement over time. In exposed locations, do not treat the gate as a light decorative panel; it is a moving structure that must withstand repeated use and weather.
Fitting the gate too close to the ground
A minimal bottom gap may look neat at first, but it can cause problems when the ground swells, paving shifts or leaves collect. Timber should not sit where it is constantly wetted by puddles or soil. Sensible clearance improves operation and durability.
Forgetting the finish of surrounding timber
If the gate sits beside older fencing, the difference in colour may be obvious. New pressure-treated timber often changes tone as it weathers. If you plan to stain or paint the boundary, consider treating the gate and surrounding fencing as one visual composition, while following the manufacturer’s guidance for treated timber.
Using planting to fine-tune privacy and openness
You do not have to solve every privacy issue with the gate alone. Planting can soften sightlines while keeping airflow. A narrow climber on a nearby trellis, a well-placed shrub, or pots arranged just inside the gate can reduce direct views without making the gate solid. This is particularly useful if you like a slatted design but want slightly more screening in summer.
Be careful with vigorous climbers directly on the gate. Heavy growth can add weight, trap moisture and interfere with hinges and latches. If you want climbing plants, provide a separate frame or trellis nearby so the gate can open freely and dry properly.
Maintenance considerations for timber side gates
Timber is a natural material and will weather. Treated timber may offer resistance to rot, but you should still inspect the gate periodically. Check for loose fixings, movement at joints, damage to the surface, debris at the base and any areas where water is being trapped.
Keep hinges and latches operating smoothly. If the gate begins to sag, deal with it early rather than forcing it open and closed. Clear leaves and soil from the bottom edge, and trim back planting that holds moisture against the timber. If applying any additional stain, paint or preservative, follow the relevant product guidance and ensure the timber is clean and dry before treatment.
Short FAQ
Are slatted timber side gates private enough for a front or side boundary?
They can be, but it depends on the spacing and arrangement of the boards. Designs with overlapping or alternating boards provide more screening than widely spaced battens. Always check privacy from the key viewing angles before choosing.
Do slatted gates cope better with wind than solid gates?
Generally, openings in the design can reduce wind resistance, but this does not remove the need for strong posts, hinges and fixings. A tall gate in an exposed passage still needs robust support.
What height should a side gate be?
Many domestic side gates are around 1.8m high, which offers useful privacy. The right height depends on your boundary, the level of overlooking, local context and how the gate relates to nearby fencing or walls.
Can I match a slatted side gate with existing fence panels?
Yes, if the proportions, board direction and finish are compatible. An exact match is not always necessary, but the gate should look intentional rather than unrelated to the boundary.
Is pressure-treated timber maintenance-free?
Pressure treatment helps protect timber against rot, but it does not mean you can ignore the gate. You should still keep it clean, ensure it can dry out, inspect fixings and follow any care guidance supplied with the product.
Conclusion
Balancing privacy and openness in a slatted timber side gate is a practical design decision. You need enough screening to protect your side access and garden, enough airflow to avoid a dark and damp passage, and a style that works with the wider boundary. Measure carefully, study the sightlines, consider wind and drainage, and choose a structure that is suitable for daily use.
A well-chosen slatted timber gate can make a side entrance feel secure, attractive and integrated with the garden. The best result comes from treating it not as a small finishing detail, but as an important part of the boundary design.