When a Windowless Shed Makes Sense for Storage and Workshop Use
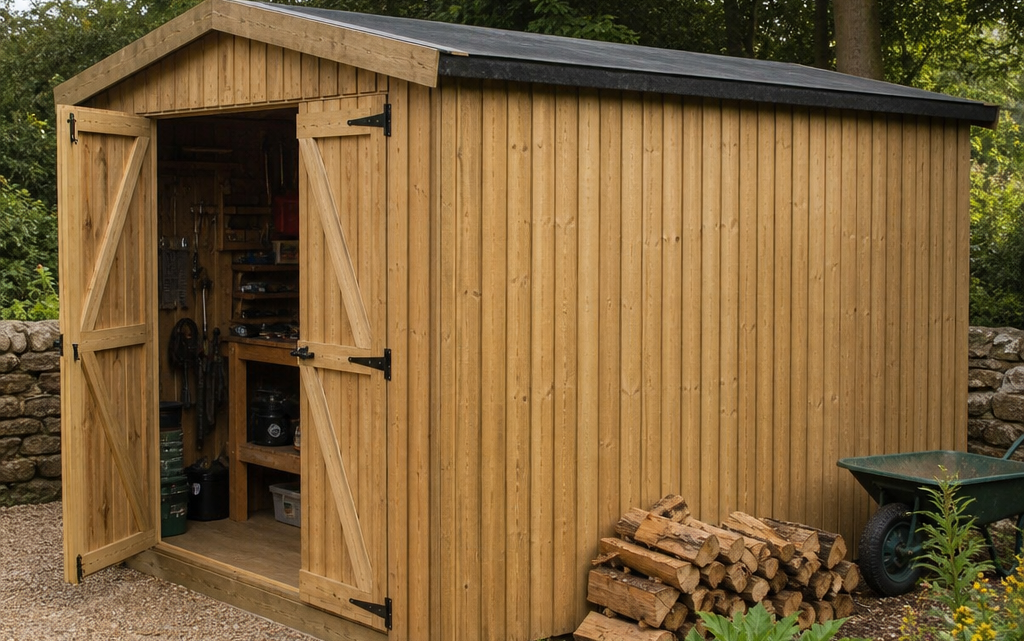
You may be looking at your garden and thinking that you need somewhere secure for bikes, power tools, paint tins, camping kit or bulky household overflow, but you do not necessarily want a fully glazed summerhouse-style building. Perhaps you also want a bench for occasional repairs, sharpening tools or potting up plants on wet days. In that situation, a windowless timber shed can be a sensible choice: it keeps contents out of sight, gives you more usable wall space and can be easier to position in a tight or overlooked garden.
A windowless shed is not automatically the right answer for everyone. It reduces natural light and ventilation, and you will need to think carefully about access, base preparation, security, lighting and moisture control. This guide explains when a windowless timber shed makes practical sense for storage and occasional workshop use, what to check before buying, and how to avoid the common mistakes that shorten a shed’s working life.
Inhaltsverzeichnis
Why choose a windowless timber shed?
The main reason is security. If a shed has no windows, passers-by, neighbours, delivery drivers and opportunist thieves cannot easily see what is inside. That matters if you store bicycles, cordless tools, garden machinery or workshop equipment. A windowless design also removes one of the most vulnerable points in a shed wall, because there is no glazing or acrylic panel to prise out or break.
There is also a practical storage benefit. Windows interrupt wall space. In a small or medium shed, every section of wall can be useful for shelving, tool hooks, a folding workbench or a rack for timber offcuts. With no windows to keep clear, you can plan storage more efficiently from floor to roofline.
Timber is still a popular choice because it is easy to customise. You can add shelving, fix hooks into framing, paint or stain the outside, and repair individual elements more readily than with many other materials. A well-built timber shed with tongue and groove boards, a solid roof, a proper floor and a sound base can be a dependable storage and light workshop space for many years.
When a windowless shed makes the most sense
You mainly need secure storage
If your shed’s first job is to hold valuables rather than act as a leisure room, windowless is often the more practical option. Garden tools, bikes and machinery are less visible and there are fewer weak points. Look for strong doors, decent framing and a proper latch or lock arrangement rather than relying on the absence of windows alone.
You only need occasional workshop use
A windowless shed can work well as a mini-workshop if you use it for short tasks: bike repairs, tool maintenance, seed tray preparation, simple woodworking, sharpening, cleaning equipment or assembling garden furniture. For longer sessions, you will need to add good lighting and manage ventilation carefully, especially if you use paints, oils, adhesives or petrol-powered equipment.
Your garden is overlooked or close to a boundary
In urban and suburban gardens, a shed may be visible from upstairs windows, neighbouring properties or a rear access lane. A windowless model helps keep the contents private. It can also be easier to position against a fence or boundary because you do not need to preserve a view or natural light through side windows.
You want maximum internal wall storage
For storage-heavy use, wall space is valuable. A windowless shed lets you install shelving along multiple sides, hang hand tools, mount a rack for garden equipment and keep long items upright. This can make a modest footprint far more useful than a larger shed with awkwardly placed glazing.
Key decision criteria before you buy
Size and access
Do not judge size only by the shed’s headline footprint. Think about what has to pass through the doors and what needs to be moved around inside. Double doors are useful for lawnmowers, bicycles, wheelbarrows, pressure washers and timber sheets. If you plan to use a bench, mark out the likely footprint on the ground and allow space to stand, open toolboxes and remove stored items without emptying the whole shed.
A nominal 7×7 shed, for example, may be large enough for a compact workbench on one wall and storage on the others, but it will quickly feel cramped if you keep several bikes and bulky garden machines inside. If the shed will be both storage area and occasional workshop, plan the interior before ordering.
Wall, floor and roof construction
For timber sheds, tongue and groove boards generally provide better weather resistance and rigidity than basic overlap cladding. Strong internal framing also matters, particularly if you want to fix shelves or hooks. A solid timber floor is important where you will store heavy items or stand at a bench. The roof should have a suitable covering and a slope that sheds rain properly.
Some premium sheds use pressure-treated timber, which reduces maintenance demands and improves resistance to rot. Others are supplied untreated and must be coated with a suitable preservative soon after assembly, then maintained according to the manufacturer’s instructions. Always check which applies before you buy.
Door security
A windowless shed still needs proper door security. Look for ledged and braced doors, robust hinges, a reliable latch, bolts or a lockable fitting. If a padlock is required, choose a weather-resistant closed-shackle model and pair it with a substantial hasp and staple. Consider internal bolts for double doors, because the inactive leaf can otherwise become a weak point.
Headroom and roof shape
If you will use the shed as a workshop, headroom is more important than many buyers expect. A higher roofline makes it easier to move tools, lift bikes onto hooks and work comfortably at a bench. Apex and reverse apex designs can give a more open feel than very low pent roofs, although pent roofs can suit modern gardens and boundary positioning well.
Planning the base properly
The base is one of the most important parts of the project. A good shed on a poor base will twist, leak, suffer door alignment problems and rot prematurely. The base should be firm, level and slightly larger than the shed footprint where appropriate, while still allowing water to run away rather than pool against the walls.
Common base options include concrete, paving slabs, timber base frames and plastic grid systems. Concrete is long-lasting but takes more work and is permanent. Slabs can be effective if laid correctly on a compacted sub-base. Timber base kits can be quicker, provided they are suitable for ground contact and properly levelled. Plastic grid bases are useful where you want drainage and a less permanent solution, but they still need a firm, level prepared surface.
As a practical example, some 7×7 plastic shed base kits use interlocking recycled plastic grids laid over a weed membrane and filled with pea gravel. The product details may specify square grids of 500 x 500 x 40mm and advise a certain amount of 10mm pea gravel per square. This type of base should not simply be placed straight onto grass. The ground still needs to be prepared according to the instructions, especially if a professional installer is due to arrive and expects the base to be ready.
Setting up a windowless shed for occasional workshop use
Lighting
The main drawback of a windowless shed is the lack of natural light. If you only visit briefly for storage, a battery work light may be enough. For regular workshop tasks, consider a properly installed electrical supply by a qualified electrician, with bright LED lighting and suitable sockets. Avoid trailing extension leads across wet ground or leaving temporary power supplies in place as a permanent solution.
Position lighting above the bench and near the entrance. A head torch or rechargeable inspection lamp can be useful for detailed work, but it should not be your only light source if you use sharp tools.
Ventilation and moisture control
Windowless does not have to mean airless. In fact, ventilation is crucial because stored tools, timber, mower decks and bikes can bring moisture inside. Without airflow, condensation can form on metal tools and encourage mildew on cardboard, fabrics and timber.
Consider discreet high and low vents, keeping them secure and positioned to reduce driven rain. Do not block every gap with storage boxes. Leave a little space behind shelves and avoid stacking items tightly against walls, especially in winter. If the shed has a raised floor on bearers or a ventilating base, keep the airflow beneath clear by cutting back vegetation and avoiding soil build-up around the sides.
Workbench layout
For occasional use, a compact bench is usually better than a large permanent one that dominates the floor. A folding bench or narrow fixed bench along the back wall can work well. Keep heavy items low, frequently used tools at chest height and seasonal items higher up.
If you plan to drill, saw or sand, think about dust and noise. A windowless shed can feel enclosed, and dust can build up quickly. Open the doors during messy work, wear suitable protection and avoid using equipment that produces fumes in a confined space.
Checklist: is a windowless timber shed right for you?
- You want to store tools, bikes or equipment out of sight.
- You value wall space for shelves, hooks and racks more than natural light.
- You are willing to add suitable artificial lighting for workshop tasks.
- You can provide ventilation to reduce condensation and mustiness.
- You have enough door width for the largest items you need to store.
- You can prepare a firm, level, well-drained base before assembly.
- You have checked whether the timber is pressure treated or requires treatment.
- You have considered lock quality, hinges, bolts and door construction.
- You can access the shed comfortably in wet weather without walking mud inside.
- You have planned internal storage before filling the shed with bulky items.
Common practical mistakes to avoid
Choosing too small a shed
A shed that looks large enough when empty can become unusable once bikes, mowers, ladders and boxes are inside. If you want even occasional workshop space, allow a clear standing area. You should be able to reach the back of the shed without unloading everything at the front.
Ignoring the base
Many shed problems start below floor level. An uneven base can cause doors to catch, panels to distort and rainwater to collect. A base laid directly onto grass is rarely suitable for a timber shed. Prepare the ground properly, follow the base manufacturer’s guidance and check levels before the shed is assembled.
Assuming windowless means secure
No windows help, but the doors are usually the critical point. Weak hinges, small screws, a flimsy hasp or an exposed padlock can undermine an otherwise sensible design. Upgrade security where needed and consider anchoring valuable bikes or machinery inside.
Forgetting ventilation
A sealed shed can trap damp air. This is especially problematic if you store wet garden tools, logs, compost bags, fuel cans or machinery. Add ventilation, keep the floor dry and avoid packing contents hard against every wall.
Not treating timber when required
Some timber sheds are supplied pressure treated, while others are untreated or dip treated and need prompt care. If treatment is required, apply a suitable wood preservative after assembly and repeat as instructed. Skipping this step can affect durability and may invalidate parts of a guarantee.
Overloading walls and roof framing
Timber sheds are useful for shelves and hooks, but fixings should go into suitable framing rather than thin cladding alone. Heavy shelves full of paint tins, fixings or power tools need proper support. Do not hang excessive loads from roof members unless the building is designed for it.
Practical buying steps
- List the contents. Write down the largest items first, including bikes, mower, ladders, workbench and storage boxes.
- Measure access. Check garden gates, paths, turns and the planned door opening.
- Mark out the footprint. Use string, canes or chalk to see how the shed will sit in the garden.
- Decide on the base. Choose concrete, slabs, timber or plastic grids, then prepare it before delivery.
- Check construction details. Look at cladding type, framing, floor, roof covering and treatment requirements.
- Plan security. Consider locks, bolts, hinges, internal anchors and whether contents are visible when doors are open.
- Plan light and ventilation. Decide whether you need mains power, solar lighting, battery lights or vents.
- Read delivery and installation terms. Some services require a completed base in advance and may not assemble separate base kits.
FAQ
Is a windowless shed too dark to use as a workshop?
Not necessarily. It can work well for occasional tasks if you add effective lighting. For regular or detailed work, fixed LED lighting installed safely is far better than relying on daylight through open doors.
Will a windowless shed get damp inside?
It can if ventilation is poor or the base allows moisture to rise. Use a firm, level, drained base, maintain airflow underneath where applicable, add vents if needed and avoid storing wet items in a closed shed for long periods.
Is timber suitable for storing heavy tools?
Yes, provided the shed has a strong floor, sound framing and a proper base. Heavy items should be kept low and distributed sensibly. Shelves must be fixed into suitable structural members, not just thin boards.
Do I need planning permission for a garden shed?
Many garden sheds fall within permitted development, but rules depend on height, location, use and your property. Restrictions can apply in front gardens, conservation areas, listed properties and near boundaries. Check current local guidance before ordering.
Should I choose a plastic base or concrete?
It depends on permanence, ground conditions and your DIY ability. Concrete is robust and long-lasting but more involved. A plastic grid base can be quicker and provides drainage, but it still needs correct ground preparation and must be suitable for the shed size and load.
Conclusion
A windowless timber shed makes sense when your priorities are secure storage, flexible wall space and occasional practical work rather than natural light or leisure use. It is particularly well suited to tools, bicycles, garden machinery and a compact workbench, provided you plan lighting, ventilation and access carefully.
The best results come from matching the shed to your real contents, choosing solid construction, preparing a proper base and taking door security seriously. If you avoid the common mistakes of buying too small, neglecting airflow or rushing the base, a windowless timber shed can become one of the most useful and dependable buildings in your garden.