Setting Up an Outdoor Repotting Area for Container Gardening
If you grow plants in containers, you will know how quickly a simple job can turn into a messy one. A few herbs need moving into larger pots, summer bedding plants arrive from the garden centre, the tomato seedlings are ready to pot on, and suddenly the patio is covered in compost, labels, empty trays and half-used bags of grit. Setting up a dedicated outdoor repotting area gives you a practical place to deal with these seasonal tasks without turning the whole garden into a worksite.
A good repotting area does not have to be large or expensive. It simply needs to be comfortable to use, easy to clean, close to the things you need, and suitable for the way you garden. Whether you have a compact courtyard, a family garden, a greenhouse corner or a side passage, a well-planned potting station can make container gardening quicker, tidier and more enjoyable throughout the year.
Inhaltsverzeichnis
Why an outdoor repotting area is worth planning properly
Container gardening involves repeated handling of compost, pots, tools, watering cans, plant supports and seasonal plants. Without a defined area, these jobs often happen wherever there is spare space: on the lawn, a patio table, the back step or even the kitchen floor. That can lead to wasted compost, damaged surfaces, awkward working positions and tools going missing.
A dedicated outdoor repotting area helps you keep all the essentials together. It also encourages better plant care because you are more likely to pot on seedlings at the right time, refresh tired compost, check roots, remove pests and clean pots if the job is convenient. In practical terms, the right set-up can reduce bending, improve hygiene and make seasonal changeovers far easier.
Choosing the best location
The first decision is where to put your repotting area. You are looking for a spot that is convenient, sheltered and easy to clean, rather than the most decorative part of the garden.
Look for firm, level ground
A potting bench or worktable needs a stable base. Paving, decking, compacted gravel or a firm concrete area will usually work better than bare soil or lawn. If the ground is uneven, pots may wobble, trays can slide and water may pool in the wrong place. If you only have lawn available, consider laying a small paved or gravel pad first.
Keep it close to water
Repotting almost always involves watering in. A position near an outdoor tap, water butt or hose point saves repeated trips across the garden with a heavy watering can. If you use harvested rainwater, make sure the water butt is accessible and that you have space to fill a can without knocking over trays or plants.
Consider shelter and light
You do not need full sun for repotting. In fact, a slightly shaded position is often better because young plants dry out less quickly while you are working. Shelter from strong wind is important too. Compost, labels, lightweight plastic pots and seed trays can blow about very easily. A spot beside a shed, fence, greenhouse or wall can work well, provided it does not become damp and stagnant.
Think about access from the house and garden
If the area is too far from the back door, shed or greenhouse, you may stop using it. Ideally, place it on a practical route between your storage area and your growing space. If you overwinter pots near the house and grow summer containers on a patio, a position nearby will make seasonal swaps easier.
Deciding what your repotting area needs to do
Before buying or building anything, be clear about the jobs you expect the area to handle. A balcony gardener with ten pots has different needs from someone raising dozens of annuals, vegetables and tender perennials.
Use these decision criteria to plan the space:
- Scale of use: how many pots or trays do you repot at one time?
- Type of plants: do you mainly grow herbs, bedding plants, shrubs, vegetables or houseplants moved outdoors for maintenance?
- Storage needs: do you need space for compost, tools, labels, gloves, twine and spare pots?
- Cleaning needs: can you sweep, hose or wipe down the area easily?
- Comfort: will the working height reduce bending and strain?
- Weather exposure: will materials cope with rain, frost and sun?
- Appearance: is the area visible from the house or seating area?
The main components of a practical potting station
A stable work surface
The central element is a surface where you can fill pots, divide plants and prepare containers. A purpose-made potting bench, a sturdy outdoor table or a homemade worktop can all do the job. The best option is one that is at a comfortable height, has enough depth for a medium-sized pot and is strong enough to hold damp compost and terracotta containers.
A boarded or slatted surface can be useful outdoors because small amounts of water and compost are less likely to sit in puddles. However, you still need to clean it regularly to prevent the build-up of old compost and plant debris.
Storage for everyday essentials
Lower shelves, hooks, boxes and lidded tubs help keep the area organised. Store frequently used items within arm’s reach: hand trowel, secateurs, labels, pencil, gloves, pot brush and plant ties. Compost bags are best kept off permanently wet ground and closed after use, otherwise they can become waterlogged or attract pests.
A compost handling system
For small gardens, a lidded storage tub can hold multipurpose compost and reduce mess. For larger gardens, you may want separate containers for seed compost, peat-free multipurpose compost, grit, bark and homemade compost. Label them clearly. Always keep opened compost covered to stop it drying out in summer or becoming saturated in winter.
Waste and recycling points
Repotting produces waste: old labels, broken crocks, dead roots, damaged pots and spent compost. Keep a small bucket for green waste, another container for reusable pots, and a bag or box for recycling where appropriate. Do not add diseased plant material to ordinary compost unless you are confident your system reaches sufficient heat to deal with pathogens.
Choosing a potting bench or worktable
A potting bench is often the most convenient solution because it raises the working surface and may include storage underneath. When assessing one, concentrate on practical criteria rather than looks alone.
Size and footprint
Measure the available space before choosing a bench. Allow room not only for the bench itself but also for you to stand comfortably in front of it, move a watering can, lift bags of compost and place trays temporarily to one side. In a narrow side return, even a small bench may feel awkward if you cannot turn around safely.
Material and weather resistance
Outdoor benches are commonly made from treated timber, metal or plastic. Timber often looks natural in a garden setting, but it should be suitable for outdoor use and maintained according to the maker’s guidance. Metal can be durable but may be cold to touch and prone to rust if the finish is damaged. Plastic is light and easy to wash but may not feel as stable with heavy pots.
Working height
Comfort is often overlooked. A bench that is too low encourages stooping; one that is too high makes it harder to apply pressure when firming compost. If possible, check the height against your own body position. You should be able to work with relaxed shoulders and minimal bending.
Assembly and fixings
If buying a flat-packed bench, check that fixings and instructions are supplied. Assemble it on level ground, tighten fixings properly and re-check stability after the first few uses. If the bench will stand in an exposed spot, consider whether it needs positioning against a wall or otherwise securing safely.
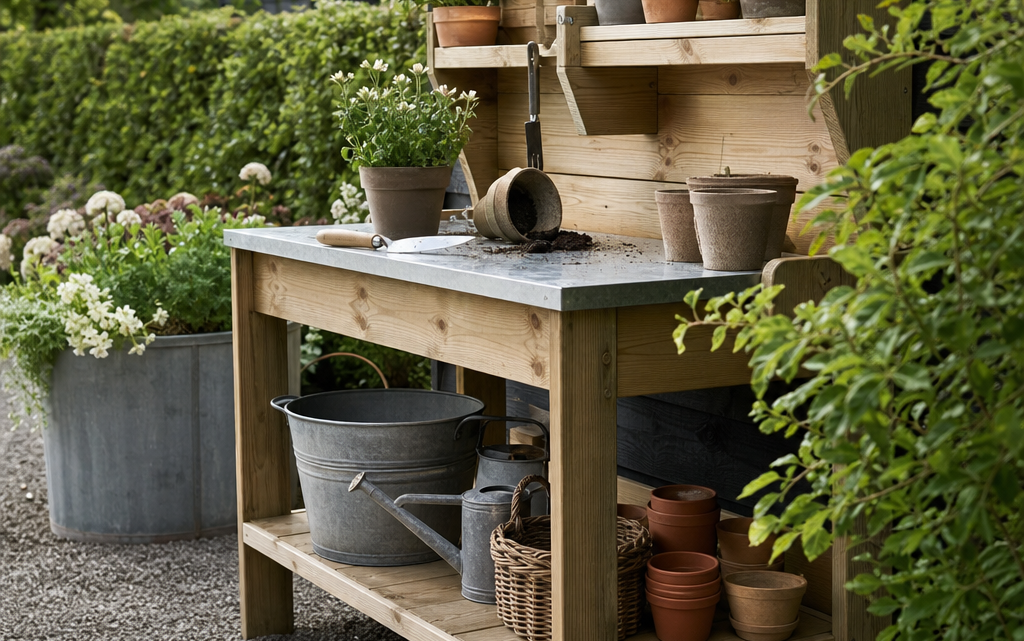
As a practical example, a simple wooden potting bench can suit a modest container garden if it provides a usable work surface and some lower storage. The key is to treat it as one part of the wider repotting area, not as the entire solution.
Setting up your repotting area step by step
1. Clear and prepare the base
Remove weeds, loose debris and anything that could cause rocking or slipping. Sweep paving, level gravel if necessary and check that water drains away. If the surface becomes slippery in wet weather, deal with that before installing furniture.
2. Position the bench or table
Place the work surface where you can stand comfortably. Leave enough space for a bucket or compost tub beside you. If the area is against a wall or fence, make sure you can still reach the back of the bench for cleaning. Avoid placing timber directly against constantly damp vegetation.
3. Arrange tools by frequency of use
Put everyday hand tools in a caddy, wall rack or lidded box. Store sharp tools safely, especially if children use the garden. Keep labels and pencils dry; ordinary pens often fade or wash off, so a suitable garden marker or pencil is more reliable.
4. Create a pot sorting system
Stack clean pots by size. Keep seed trays, saucers and decorative containers separate. Throw away cracked plastic pots that collapse when filled, and set aside terracotta pots with frost damage. If you reuse pots, wash them before using them for young or vulnerable plants.
5. Add a cleaning routine
At the end of each session, sweep loose compost into a bucket, wipe down the surface and put tools away. This takes only a few minutes but prevents the area becoming unpleasant and discourages pests.
Useful repotting area checklist
Use this checklist when planning or improving your outdoor potting station:
- Firm, level surface underfoot
- Comfortable working height
- Access to water nearby
- Shelter from strong wind where possible
- Space for compost tubs or bags
- Storage for hand tools, gloves, labels and ties
- Separate area for clean pots and used pots
- Bucket for green waste and old compost
- Brush, scoop and cloth for cleaning up
- Safe storage for sharp tools and chemicals, if used
- Good drainage so the area does not remain wet
- Lighting if you often work in the evening
Seasonal plant care tasks to handle in your repotting area
Spring
Spring is the busiest time. Use your repotting area for sowing, pricking out seedlings, potting on young plants and refreshing the top layer of compost in permanent containers. Check overwintered plants for vine weevil larvae, damaged roots and signs of rot before moving them into fresh compost.
Summer
In summer, the area is useful for deadheading, replacing failed bedding plants, tying in climbers and preparing extra containers for gaps in displays. Keep compost covered because it dries out quickly in warm weather. Water newly repotted plants thoroughly and move them into shade for a short period if they are stressed.
Autumn
Autumn is ideal for dividing perennials in pots, planting spring bulbs and moving tender plants into containers ready for protection. It is also a good time to wash pots that will not be used over winter. Clear fallen leaves from the area so they do not trap moisture around stored items.
Winter
Winter use may be limited, but the area can still serve for cleaning tools, checking stored containers and preparing pots for early sowings. Avoid leaving bags of compost open to rain. If frost is forecast, be careful with wet paving and do not leave watering cans where spilled water can freeze.
Common practical mistakes to avoid
Making the area too small
Many gardeners underestimate the space needed around the work surface. You need room for the plant you are repotting, the new pot, the compost, a waste bucket and somewhere to put finished plants. If everything is balanced on top of everything else, the area will be frustrating to use.
Ignoring drainage
A repotting station that sits in a puddle will quickly become unpleasant. Timber can stay damp, metal may corrode and compost bags can deteriorate. Choose a well-drained spot and avoid blocking drainage channels with loose compost.
Storing dirty pots with clean ones
Used pots can harbour pests, weed seeds and disease. If you mix them with clean pots, you undo the benefit of washing and sorting. Keep a separate crate for pots that need cleaning.
Leaving compost uncovered
Open compost bags attract rain, insects and sometimes animals. Saturated compost is heavy and difficult to use, while dried-out compost can be hard to re-wet. Fold bags closed or transfer compost to a lidded container.
Using the area as general dumping ground
A potting bench can easily become a shelf for unrelated garden clutter. Once it is covered with toys, paint tins, old ornaments or barbecue equipment, you will stop using it for plant care. Keep the purpose clear and review the area regularly.
Cleaning and hygiene for healthier container plants
Good hygiene matters because container plants rely on a limited root environment. Old compost can contain pests, fungal spores and weed seeds. You do not need a clinical set-up, but you should keep the area reasonably clean.
Brush down the surface after use and wash it periodically with water and a suitable garden-safe cleaner if needed. Clean cutting tools after pruning diseased material. Empty old compost from pots and inspect roots before reuse. Where plants have died from suspected disease, dispose of the compost responsibly rather than spreading it around healthy containers.
If you use saucers under pots, check them regularly. Standing water may be useful briefly in hot weather for thirsty plants, but persistent waterlogging can damage roots and encourage mosquitoes in some situations.
Making the area look good in the garden
A repotting area is primarily practical, but it does not have to look untidy. Choose storage containers that fit the setting, group pots neatly and use hooks or shelves to keep tools off the ground. If the area is visible from a seating space, consider screening it with a trellis, a row of tall pots or a small section of fencing.
Do not hide it so well that it becomes inconvenient. The best design balances appearance with everyday use. A tidy bench with stacked terracotta pots, labelled tubs and a few healthy plants waiting for attention can look like a natural part of the garden rather than a utility corner.
FAQ
Do I need a potting bench for container gardening?
No, but a raised work surface makes repotting more comfortable and organised. A sturdy outdoor table can work, provided it is stable, weather-resistant and easy to clean.
Where should I store compost outdoors?
Store compost in its bag with the top folded closed, or in a lidded tub. Keep it off waterlogged ground and away from places where rain pours directly onto it.
Can I repot plants in full sun?
You can, but it is often better to work in light shade, especially with young plants or during warm weather. Roots can dry quickly when exposed, and newly repotted plants may wilt if left in strong sun.
Should old compost be reused?
Old compost from healthy containers can sometimes be reused as a soil improver or mixed into large outdoor planters, but it may be low in nutrients. Avoid reusing compost from diseased plants or pots with serious pest problems.
How often should I clean my repotting area?
Clear loose compost and waste after every session. Give the work surface, tools and storage areas a more thorough clean at the start and end of the main growing season.
Conclusion
A well-planned outdoor repotting area makes container gardening easier, cleaner and more efficient. Start by choosing a level, well-drained location close to water and storage. Add a stable work surface, organise your compost and tools, and create simple systems for clean pots, used pots and waste. The details can be modest, but the benefits are significant: less mess, fewer misplaced tools, healthier plants and a more enjoyable routine throughout the gardening year.
Whether you use a purpose-made potting bench, a simple table or a custom-built corner, focus on practical comfort and good organisation. If the area is easy to use, you will use it more often — and your container plants will be better cared for as a result.