Installing Drive-In Post Spikes for Garden Fence Posts
You may be replacing a short run of tired garden fencing, screening a patio, or putting up decorative timber panels along a boundary where digging deep post holes is awkward. In these situations, drive-in post spikes can be a practical alternative to setting posts in concrete. They are quick to install, create less spoil, and allow a timber fence post to sit above the ground rather than directly in wet soil.
However, post spikes are not suitable for every fence or every site. A neat, strong result depends on choosing the right spike, driving it in straight, and understanding the limits of the ground you are fixing into. This guide explains how to install drive-in post spikes for timber garden fencing, what to check before you start, and the common mistakes that lead to leaning posts or damaged fittings.
Inhaltsverzeichnis
What Is a Drive-In Post Spike?
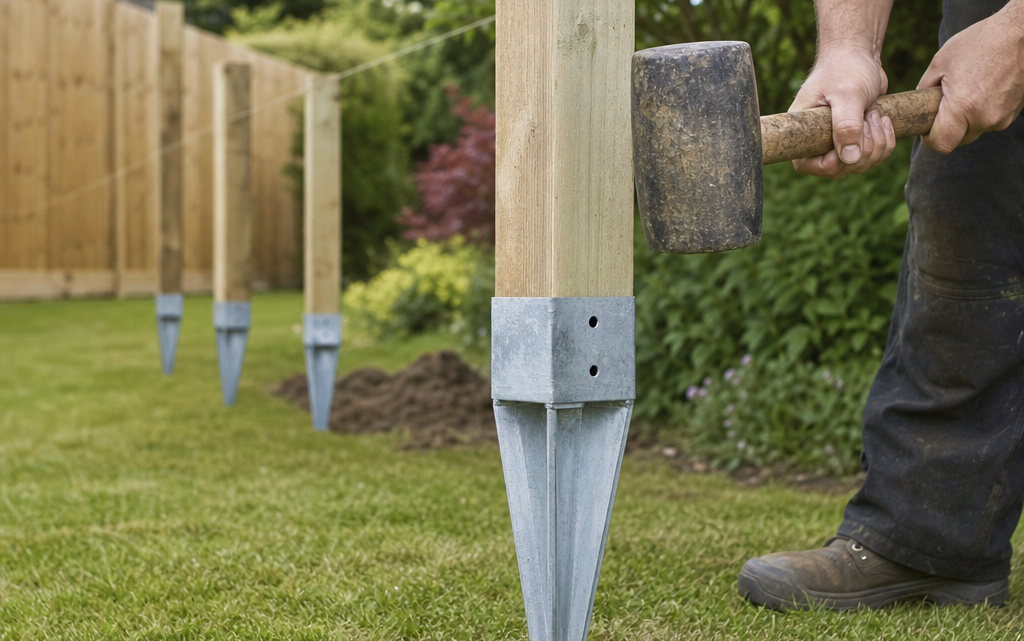
A drive-in post spike is a metal ground fixing with a pointed lower section and a square or rectangular shoe at the top. The spike is hammered into the ground, and the timber fence post is then secured inside the shoe. The post does not need to be buried, which helps reduce direct ground contact and can make installation faster than traditional concrete-set posts.
Post spikes are commonly used for light to medium domestic garden fencing, trellis screens, temporary boundaries, and some decorative fence panel installations. They are particularly useful where you want to avoid digging, where access is limited, or where the job needs to be completed with minimal mess.
When Drive-In Post Spikes Are a Good Choice
Drive-in spikes work best where the ground is firm enough to grip the spike but not so stony that the spike cannot be driven in accurately. They are usually most successful in compacted soil, clay-based garden ground, and established lawns or borders with stable subsoil.
Good uses include:
- Low to medium height timber fencing in sheltered gardens
- Decorative fence panels and privacy screens
- Short fence runs where speed and neatness matter
- Replacing individual posts where digging out old concrete would be difficult
- Fence lines away from heavy gates or high wind exposure
Think carefully before using them if:
- Your site is very exposed to wind
- The fence panels are tall, heavy, or solid with little wind relief
- The ground is waterlogged, loose, made-up, sandy, or very soft
- You are supporting a gate, pergola, retaining structure, or anything load-bearing
- The ground contains rubble, large stones, old concrete, or tree roots
If the fence needs to resist significant wind loads, or if you are installing heavy posts or gates, concrete-set posts or specialist ground anchors may be more appropriate. A drive-in spike is a useful fixing, but it cannot compensate for unsuitable ground or an over-ambitious fence design.
Choosing the Right Spike and Post Combination
Before you buy fittings, check that your post size matches the shoe of the spike. A loose post will be difficult to secure properly, while a post that is too large may not fit without forcing the metal shoe out of shape. Always match the internal size of the post holder to the timber post section recommended by the spike manufacturer.
You should also consider spike length. Longer spikes usually provide more ground grip, but they are harder to drive in and need suitable ground depth. Shorter spikes can be easier to install but may not provide enough resistance for taller fencing. For typical domestic fencing, many people use spikes designed for common timber post sizes, but you should always follow the manufacturer’s guidance for the specific product.
Key decision criteria
- Fence height: Taller fences place more leverage on the fixing.
- Panel type: Solid panels catch more wind than open trellis or slatted designs.
- Ground condition: Firm, undisturbed soil is preferable.
- Post size: The post must fit the shoe correctly.
- Exposure: Sheltered locations are better suited to drive-in spikes.
- Line length: Long, continuous runs need very accurate alignment.
Tools and Materials You Will Need
Preparation is important because once a spike starts to enter the ground, correcting its direction becomes increasingly difficult. Gather everything before you begin so you can check alignment as you work.
Basic installation checklist
- Drive-in post spikes of the correct size
- Matching timber fence posts
- Fence panels, rails or screens as required
- Driving tool or suitable installation aid for the spike
- Lump hammer or sledgehammer
- Long spirit level or post level
- String line and pegs
- Tape measure
- Marker spray, chalk or timber stakes
- Drill and suitable screws or bolts for fixing posts to shoes
- Timber offcuts for temporary bracing
- Gloves, eye protection and sturdy footwear
Do not drive the spike by hammering directly onto the thin edges of the post shoe. This can distort the metal and make it difficult to insert the post squarely. A proper driving tool, or a manufacturer-approved method, helps transfer force into the spike without damaging the shoe.
Planning the Fence Line
Mark the exact position of the fence before you install any spikes. If you are working near a boundary, confirm where the boundary lies and whether the fence must sit wholly within your property. Also check for underground services such as electrical cables, water pipes, drainage, irrigation systems, and lighting cables. If you are uncertain, do not drive metal spikes into the ground until the area has been checked.
Use a string line to establish the face of the fence. The string should represent a consistent reference point, such as the front face of the posts or the centre line of the posts. Keep it taut and clear of obstructions. Mark each post position according to the width of your panels or rail spacing. Standard decorative garden panels are often around 1.8 m wide, but you should measure your actual panels rather than rely on nominal sizes.
Allow for the full construction
Remember that the spike shoe, post, panel brackets, gravel boards and any capping can affect the final position. If the fence is close to a wall, path or neighbouring structure, make sure there is room to fit and secure the panels. It is better to discover a spacing issue at the marking stage than after several spikes have been driven in.
How to Install Drive-In Post Spikes
The basic method is straightforward, but precision matters. Work slowly, check repeatedly, and do not assume the spike will correct itself as it goes in. It usually will not.
1. Mark the first post position
Set out the first post carefully. This is the reference point for the rest of the fence, so spend time getting it right. If the fence starts against a wall, building or existing post, check that your first spike position allows enough space for the panel or rail fixings.
2. Start a pilot point
Place the spike point on the ground and press it into position. In very firm soil, you can create a small starter hole with a metal bar or similar tool, but avoid making an oversized hole. The spike needs tight ground contact to remain stable.
3. Fit the driving tool or approved aid
Use a driving tool that suits the spike and post shoe. For example, a driving tool designed for use with a 400 mm post spike helps protect the metal shoe during hammering by taking the impact and distributing force more evenly. This type of tool is particularly useful where the post holder could otherwise become distorted, preventing the timber post from fitting properly. The tool is an installation aid, not a structural component of the finished fence.
4. Drive the spike gradually
Strike firmly and squarely with a lump hammer or sledgehammer. After every few blows, stop and check the spike with a spirit level on two adjacent faces. Correct small errors early by applying pressure in the opposite direction as you continue to drive. If the spike is badly out of line, it is often better to pull it out and restart rather than force it at the end.
5. Check height and alignment
Drive the spike until the shoe sits at the required height and the spike is fully stable. Do not leave the spike partly driven unless the manufacturer’s instructions allow it; insufficient embedment can make the post unstable. Keep checking against the string line so the row remains straight.
6. Insert the timber post
Place the post into the shoe and check it for plumb. If the post is slightly tight, do not hammer it in aggressively in a way that splits the timber or bends the shoe. Check for debris or distortion first. Once seated, secure the post using the correct fixings through the holes provided in the shoe.
7. Brace the post temporarily
Before fitting panels, brace the post so it cannot twist or lean. Timber offcuts fixed as temporary props can hold the post in position while you set the next spike and confirm the spacing.
8. Repeat along the fence run
Install the next spike according to the exact panel width or rail spacing. Fit one panel at a time or use a spacer to confirm the distance between posts. If you install all the spikes first without checking the actual panels, small errors can accumulate and leave you with gaps that are too tight or too wide.
Fitting Fence Panels to Posts in Spikes
Once the posts are secure, fit the fence panels or rails according to the panel manufacturer’s instructions. Work with a helper where possible, especially with large timber panels. Even a standard garden panel can be awkward to hold level while fixing brackets.
Keep the bottom of timber panels slightly above ground level where possible to reduce water contact. If you are using gravel boards, allow for their height in the post and panel layout. Check that the panel is level before final tightening, and use corrosion-resistant fixings suitable for outdoor timber work.
For decorative or trellis-topped panels, take particular care with alignment because uneven posts are immediately noticeable. A slight lean at the post base can become very visible at the top of a 1.8 m panel.
Common Practical Mistakes to Avoid
Hammering directly onto the post shoe
This is one of the most common causes of poor installation. Direct impact can deform the metal holder, closing the opening or twisting it out of square. The post may then be difficult to fit, or it may sit crooked even if the spike itself is straight.
Ignoring ground conditions
Soft, disturbed or waterlogged ground will not grip the spike properly. If the spike rocks by hand after installation, the fence will not become stronger once the panel is attached. Consider a different foundation method if the ground is unsuitable.
Failing to check for services
Driving a metal spike into the ground without checking for cables or pipes is unsafe. Garden lighting, pond pumps, outbuilding supplies and irrigation lines are easily overlooked.
Installing spikes to nominal panel sizes only
Fence panels can vary slightly in size, and posts may not sit exactly where expected once fixed into shoes. Measure the actual components and test the spacing as you go.
Trying to correct a badly leaning spike too late
Small corrections are possible while the spike is still shallow. Once it is deep in the ground, forcing it sideways can enlarge the hole and weaken the hold. If it is significantly wrong, remove it and start again.
Using spikes for loads they were not intended to support
Drive-in spikes are not a universal replacement for concrete footings. Heavy gates, retaining features and very exposed fence lines require more robust support.
Maintenance After Installation
After the fence is installed, check the posts after the first period of strong wind or heavy rain. Look for movement at the base, loose fixings, or panels that have settled out of level. Tighten fixings where needed, but do not overtighten into timber that has split or softened.
Keep soil, mulch and wet leaves away from the base of the timber posts and panels. Although the post is raised in a metal shoe, trapped damp can still shorten the life of timber components. Maintain any timber treatment according to the fence or post manufacturer’s guidance.
FAQ
Are drive-in post spikes as strong as concrete?
Not usually. Concrete-set posts generally provide greater resistance for heavy, tall or exposed fencing. Drive-in spikes can be effective for suitable domestic installations in firm ground, but they must be used within their practical limits.
Can I install post spikes in stony ground?
It depends on how stony the ground is. Small stones may not be a problem, but large stones, rubble or old concrete can deflect the spike and make it impossible to drive straight. If the spike repeatedly twists or stops abruptly, choose another fixing method.
Do I need a driving tool?
A driving tool is strongly recommended where the spike manufacturer provides or specifies one. It helps protect the post shoe from distortion while you hammer the spike into the ground.
Can I use post spikes for a garden gate?
Be cautious. Gates create twisting and pulling forces every time they are opened and closed. Many gate installations need more substantial posts set in concrete or a fixing system designed specifically for gate loads.
How do I keep the posts straight?
Use a string line, check each spike with a spirit level on two faces, and make corrections early. Temporary bracing helps keep posts plumb while you fit panels or rails.
Conclusion
Drive-in post spikes can be a clean and efficient way to install timber garden fence posts, particularly for decorative panels, screens and short domestic fence runs in firm ground. The key is to assess the site honestly, choose compatible spikes and posts, protect the spike during installation, and check alignment at every stage.
If your ground is stable and the fence is not excessively tall, heavy or exposed, post spikes can save time and reduce mess. If conditions are poor or loads are high, a more substantial foundation will usually give a safer and longer-lasting result.