
How to Make a Small Aluminium Greenhouse Sit Comfortably in the Garden
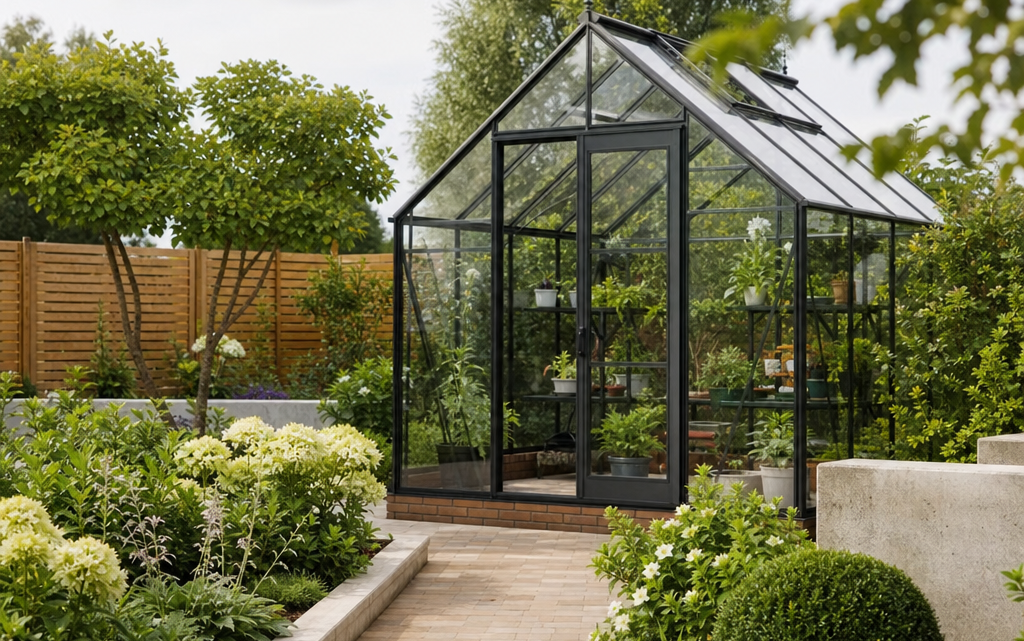
You may have found the right small aluminium greenhouse for growing tomatoes, raising seedlings and overwintering tender plants, but the next question is often harder: how do you make it look as though it belongs in the garden? A greenhouse can easily become a useful but awkward object, dropped onto a spare patch of paving or squeezed behind a shed. With a little planning, however, even a compact aluminium greenhouse can sit comfortably among planting, paths, edging and seating areas.
The aim is to treat the greenhouse as part of the garden design rather than as a separate piece of equipment. That means thinking about its position, base, approach, surrounding planting, views from the house and practical access in all weathers. Whether your garden is a narrow terrace, a suburban lawn or a small cottage-style plot, the same principles apply: make it easy to use, give it visual purpose, and connect it to the rest of the garden through materials and planting.
Inhaltsverzeichnis
Start with the role of the greenhouse in your garden
Before choosing paving slabs or planting climbers nearby, be clear about what the greenhouse needs to do. A small aluminium greenhouse might be used mainly for seed sowing in spring, summer crops such as tomatoes and chillies, propagation, storing tender plants over winter, or a mixture of all of these. Its role affects where it should sit and how much surrounding space you need.
If you will visit it daily in spring and summer, put it somewhere convenient rather than at the far end of the garden. If you mainly use it for seasonal storage and overwintering, it can be a little more tucked away, provided there is still adequate light and access. If you intend to carry compost, watering cans, seed trays and pots in and out, the route to the greenhouse matters just as much as the structure itself.
Key decision criteria
- Light: Choose an open position with good daylight and avoid deep shade from buildings, high fences or evergreen trees.
- Access: Make sure you can reach the door comfortably with a tray, watering can or bag of compost.
- Stability: The greenhouse must stand on a firm, level surface, not directly on uneven soil.
- Water: Consider proximity to an outdoor tap or the opportunity to collect rainwater from gutters.
- Appearance: Think about how the greenhouse will look from the house, patio and main garden viewpoints.
- Maintenance: Leave enough room to clean glass or polycarbonate, clear gutters and manage nearby planting.
Choose a position that works visually and practically
The best position is rarely the last unused corner. A greenhouse needs light, ventilation and easy access, but it also benefits from being visually anchored. In a small garden, placing it against a boundary can save space, yet it should not be so tight to a fence or hedge that you cannot maintain it. In a larger garden, it can become a destination at the end of a path, particularly if framed by low planting or a simple paved apron.
Try viewing the proposed site from the kitchen window, patio and main seating area. If the greenhouse will be in direct view, align it carefully with an existing path, wall, bed edge or fence line. A slightly skewed greenhouse is very noticeable, especially where aluminium glazing bars create strong vertical and horizontal lines.
Orientation and light
For general domestic use in the UK, an open position is usually more important than achieving a perfect orientation. Avoid placing the greenhouse where it will be shaded for much of the day by a north-facing wall, dense hedge or large tree. Deciduous trees may seem less problematic in winter, but they can still drop leaves into gutters and reduce light in the growing season.
If you have a narrow garden, a greenhouse often works well along one side, parallel to the boundary, with a path leading directly to it. In a wider garden, it may look better set into a working area with raised beds, a compost bay or potting bench nearby, forming a small productive zone.
Use hard landscaping to make the greenhouse feel intentional
Hard landscaping is what turns a greenhouse from a standalone object into a considered garden feature. The base, path, edging and surrounding surface all influence how settled it feels. A well-made base also protects the greenhouse, improves stability and makes day-to-day use easier.
Build a firm, level base
All greenhouses should be placed on a firm, level surface. This is not just a matter of neatness. A level base helps the frame sit square, doors run properly and glazing fit as intended. Suitable options may include concrete, paving slabs laid on a properly prepared sub-base, or a purpose-made greenhouse base installed according to the manufacturer’s instructions.
For a small aluminium greenhouse, avoid the temptation to place the frame directly on lawn or loose soil. Ground movement, settlement and damp conditions can all cause problems. A slightly raised or clearly edged base also makes the greenhouse look more permanent and deliberate.
Create a usable apron at the entrance
The area immediately outside the door is often overlooked. Provide a small paved apron or hardstanding where you can stand comfortably, put down a watering can, open the door fully and clean muddy boots. This does not need to be large, but it should be stable and non-slip.
If the greenhouse has a sliding door, as many compact aluminium models do, you still need enough clear space in front for comfortable access. A narrow stepping-stone route may look charming, but it becomes irritating when you are carrying compost or seed trays.
Link materials to the rest of the garden
Use hard landscaping materials that already appear elsewhere in the garden. If your patio is sandstone, a small sandstone or complementary gravel area near the greenhouse will help it belong. If you have brick edging, repeat the brick around the greenhouse base or nearby beds. If the garden is contemporary, simple concrete pavers, steel edging or compacted gravel may be more suitable.
Gravel is particularly useful around greenhouses because it drains well, suppresses mud and can soften the junction between paving and planting. Use a proper edging to stop gravel migrating into beds or lawn. For wheelbarrow access, choose a compacted surface or stable gravel grid rather than deep, loose aggregate.
Integrate the greenhouse with planting
Planting is the easiest way to soften an aluminium frame, but it must be chosen carefully. You want the greenhouse to feel settled, not smothered. Plants should frame the structure, lead the eye towards it and blend it with the garden without blocking light, ventilation or access.
Keep tall planting away from the glass
A common mistake is planting shrubs too close. What looks modest in a nursery pot may become a large, light-blocking mass within a few seasons. Keep vigorous shrubs, climbers and trees far enough away to allow air movement, cleaning and gutter maintenance. Avoid thorny plants near the entrance and avoid plants that shed sticky residue, heavy leaf litter or excessive seeds onto the glazing.
Low perennials, herbs, compact grasses and seasonal bedding can work well around the base. They soften the edges without shading the interior. Lavender, thyme, hardy geraniums, nepeta, erigeron and compact ornamental grasses can suit sunny sites, depending on your soil and local conditions. In a more traditional kitchen garden, low box alternatives, chives, calendula and strawberries can create a productive feel.
Use planting to frame views
Think of the greenhouse as a small focal point. A pair of low planters by the entrance, a narrow border along one side or a run of raised beds leading towards it can create a sense of arrival. Repeating plants from nearby borders helps connect the greenhouse to the wider garden.
If the frame is green, it will usually sit more quietly among foliage than a bright metallic finish. Even so, contrast matters. Dark evergreens behind a dark green greenhouse may make the structure disappear in winter, while pale gravel or light paving can lift the area and keep it from feeling gloomy.
Practical example: sizing the space around a compact aluminium greenhouse
As a practical example, a small aluminium greenhouse with a footprint of about 5 square metres can be large enough for serious hobby growing while still fitting into many domestic gardens. The important point is not only the footprint of the greenhouse itself, but the working space around it. You should allow room for the base, an entrance apron, access for cleaning, and planting that will not crowd the frame.
A model measuring around 1.93m wide by 2.57m deep gives a useful sense of scale. In a typical small garden, this size can sit at the end of a path, beside raised beds, or along a sunny boundary. If the eaves are relatively low and the ridge is under 2m, the greenhouse may feel less dominant than a taller structure, but you still need to consider how it appears from upstairs windows and neighbouring viewpoints.
When using any specific greenhouse as a planning reference, check the exact dimensions, door position, vent arrangement, glazing options and base requirements before setting out hard landscaping. It is much easier to adjust a path on paper than to move paving once the greenhouse has arrived.
Plan the approach and circulation
A greenhouse that is awkward to reach will be used less often. The path should be wide enough for comfortable movement and, ideally, for a wheelbarrow if you use one. For most domestic gardens, a path of around 600mm may be acceptable for occasional foot traffic, but 750mm to 900mm is more comfortable when carrying trays or tools.
A direct route from the house is useful, especially in poor weather. If the greenhouse is part of a productive area, connect it to compost bins, raised beds and water storage. This reduces wasted effort and makes gardening tasks flow naturally.
Think about year-round access
Spring seed sowing often happens when the garden is wet, cold and muddy. A route that looks fine in July may be unpleasant in February. Avoid relying on lawn as the only access route unless you are happy with worn grass and muddy footprints. Paving, brick, compacted gravel or stepping stones set flush into gravel can all work, provided they are safe and stable.
Use water and ventilation details to shape the surrounding layout
Small greenhouses need regular watering and good ventilation. These practical needs should influence where you place butts, taps, beds and paths. Integral gutters on some aluminium greenhouses can provide an opportunity to collect rainwater, but make sure there is room for a water butt without blocking access or looking like an afterthought.
Position water storage on a firm base, ideally where it is visually screened by planting or incorporated into the working area. A slimline water butt may suit a narrow side space. Keep it close enough to be useful, but not so close that it prevents you reaching the greenhouse sides.
Ventilation also matters. Do not hem the greenhouse in with dense evergreen hedging or tall fences on all sides. Still, stagnant air encourages overheating and disease. If the greenhouse has roof ventilation, ensure nearby overhanging branches will not obstruct opening or drop debris onto the vent.
Checklist: making a small aluminium greenhouse sit comfortably
- Mark out the greenhouse footprint with canes, string or spray marker before buying materials.
- Check the view from the house, patio, main path and upstairs windows.
- Confirm that the position receives adequate light and is not shaded for most of the day.
- Allow space for a firm, level base and follow the greenhouse manufacturer’s base guidance.
- Provide a practical hard surface at the entrance.
- Connect the greenhouse to existing paths or create a new all-weather route.
- Repeat paving, gravel, brick or edging materials already used in the garden.
- Keep shrubs and climbers far enough away for cleaning, airflow and light.
- Plan where water butts, compost, staging and tools will go.
- Check that doors, vents and any optional accessories can operate freely.
Common mistakes to avoid
Putting the greenhouse where there is space rather than where it works
The leftover corner is not always the right place. If it is shaded, hard to reach or visually disconnected, the greenhouse will feel inconvenient and may look temporary. Choose the best workable site, then design the surrounding area to support it.
Underestimating the base
A poorly prepared base can lead to alignment problems, unstable glazing and doors that do not run properly. The base should be level, firm and suited to the greenhouse design. If in doubt, spend more time and budget on the base rather than on decorative extras.
Planting too close too soon
New planting can look sparse at first, but crowding the greenhouse is a long-term problem. Leave room for mature growth and maintenance access. You can use pots or annuals to fill temporary gaps while permanent planting establishes.
Ignoring working space
A greenhouse is not just an object with a footprint; it is a place where you work. You need room to stand, carry, clean, water and ventilate. If every side is tight against a fence, bed or wall, routine tasks become frustrating.
Mixing too many materials
Small gardens can quickly look cluttered if every feature has a different surface. Try to limit hard landscaping around the greenhouse to two or three compatible materials, such as brick edging, gravel and timber raised beds, or paving, gravel and steel edging.
Design ideas for different garden styles
For a cottage-style garden
Set the greenhouse beside informal borders with low perennials and herbs spilling gently towards a gravel path. Use reclaimed brick or natural stone edging to make the base feel established. Keep the planting romantic but controlled, ensuring that flowers do not lean onto the glazing.
For a modern garden
Use clean lines, simple paving and restrained planting. A green aluminium frame can sit well against clipped evergreens, ornamental grasses and pale gravel. Align the greenhouse carefully with existing geometry, such as a patio edge or raised bed layout.
For a productive kitchen garden
Place the greenhouse within a practical growing zone, with raised beds, compost and water nearby. A central path leading to the door can make the greenhouse feel like the focal point of the productive area. Use durable surfaces that tolerate mud, compost and regular foot traffic.
FAQ
Should a small aluminium greenhouse be hidden or made into a feature?
It depends on your garden, but it should usually be integrated rather than hidden. If it is useful and well positioned, it can become an attractive working feature. Use paths, edging and planting to connect it to the garden rather than trying to disguise it completely.
How much space should I leave around a greenhouse?
Leave enough room to clean glazing, maintain gutters, manage planting and reach any vents or accessories. The exact amount depends on the site and model, but avoid placing the greenhouse tight against fences, walls or large shrubs unless the manufacturer’s instructions allow it and you can still maintain it safely.
Is gravel suitable around a greenhouse?
Yes, gravel can be very suitable because it drains well and reduces mud. Use a stable sub-base and edging, and choose a surface that remains comfortable to walk on. If you need wheelbarrow access, avoid deep loose gravel.
Can I grow climbers over or near an aluminium greenhouse?
It is generally better not to grow vigorous climbers directly over the greenhouse, as they can reduce light, obstruct vents and make maintenance difficult. If you want vertical planting nearby, use a separate trellis or arch set far enough away from the glazing.
Does frame colour matter?
Frame colour affects how prominent the greenhouse appears. A green frame often blends more easily with foliage, while a silver aluminium finish may look more utilitarian or contemporary. The surrounding materials and planting will have just as much influence on the final effect.
Conclusion
A small aluminium greenhouse will sit comfortably in the garden when it is planned as part of the whole space. Start with light, access and a firm level base, then use hard landscaping to give the structure purpose and permanence. Connect it with paths, repeat existing materials, and soften the edges with planting that will not block light or make maintenance difficult.
The most successful designs balance usefulness with appearance. If you can reach the greenhouse easily, work around it comfortably and enjoy seeing it from the house, it will feel like a natural part of the garden rather than an add-on. Plan the setting as carefully as the greenhouse itself, and even a compact structure can become one of the most rewarding features in your outdoor space.

