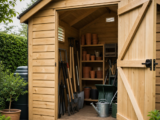
How to Set Up a Compact Timber Shed for Potting and Seed Sowing

If you raise seedlings on windowsills, prick out plants on the kitchen table, and keep compost bags wherever there is a spare corner, a compact timber shed can quickly become one of the most useful parts of the garden. The key is to plan it as a working potting and seed-sowing area rather than simply moving clutter outdoors. Even a modest shed can hold a bench, seed trays, hand tools, labels, pots, compost and seasonal supplies, provided you organise the space around the jobs you actually do.
This guide explains how to set up a compact timber shed for potting, seed sowing and everyday gardening tasks. It focuses on practical decisions: where to put the bench, how to manage light and ventilation, what to store inside, and how to avoid the common mistakes that make small sheds awkward to use.
Inhaltsverzeichnis
Start With the Jobs You Need the Shed to Do
Before buying fittings or moving tools in, list the activities you want to carry out inside the shed. A potting and seed-sowing area is different from a general storage shed. It needs a clean work surface, dry storage, light, airflow and enough floor space to move without knocking over trays.
Typical jobs include:
- sowing seeds in modules, trays and pots;
- filling pots and pricking out seedlings;
- labelling and watering trays;
- storing compost, grit, vermiculite and plant feed;
- keeping hand tools, twine, dibbers, secateurs and gloves close to hand;
- overwintering small empty pots and propagation equipment;
- temporarily holding seed trays before they move to a greenhouse, cold frame or windowsill.
Once you know the jobs, you can divide the shed into zones. In a compact building, this matters more than the total size. You need one main work zone, one clean storage zone, one heavier storage zone and a clear route from the door to the bench.
Assess the Shed Size and Layout Carefully
A compact timber shed of around 2 metres by 2 metres can work well for potting if the layout is disciplined. You will not have room for deep furniture on every wall, so the best arrangement is usually a bench along one side, shelves above it, and bulkier supplies on the opposite side or under the bench.
Door position
The door position controls how easy the shed is to use. An offset door is helpful because it may leave a longer uninterrupted wall for a workbench. If the door is central, you may need to split storage across both sides. Make sure the door can open fully without hitting pots, water cans or compost bags.
Window position
A window is useful for natural light and ventilation, but it should not be treated as the only light source if you will work on dull days. Place the potting bench near the window if possible, especially if you sow small seeds or write labels indoors. However, avoid blocking the window with tall shelves, stacked pots or hanging tools.
Headroom and roof shape
An apex roof can make a small shed feel more spacious in the centre. Use the higher middle section for standing and moving, and keep wall storage shallow enough that you do not bump into it. If you add hooks or suspended storage, keep them away from your head-height working route.
Choose the Best Position in the Garden
Where you place the shed affects comfort, durability and how often you use it. A potting shed should be convenient, not hidden in the least accessible corner of the garden.
Look for a practical route
You will carry compost, trays, watering cans, tools and young plants to and from the shed. A firm path is worth having, especially in winter and early spring when seed sowing often begins. Avoid a route over wet grass if possible.
Balance light with temperature
Good light is helpful, but a shed that overheats in full summer sun can be uncomfortable and can dry out stored compost or seedlings. Morning or late-afternoon sun is often more manageable than intense all-day exposure. If the shed has an opening window, position it so you can take advantage of airflow.
Keep the base dry and level
A timber shed should stand on a level, stable and well-drained base. This is especially important for a potting area because compost and water will inevitably be used inside. A poor base can lead to movement, sticking doors and damp conditions. Common base options include concrete, paving slabs or a suitable timber-framed base set on firm supports. The exact choice depends on the garden and the shed manufacturer’s instructions.
Plan the Interior Around a Proper Potting Bench
The workbench is the heart of the shed. In a small space, it should be practical rather than oversized. A bench that is too deep can make the shed feel cramped, while one that is too low will soon make your back ache.
Bench height and depth
As a guide, a bench height of around kitchen worktop height suits many people, but choose a height that lets you fill pots without bending. A depth of around 450 to 600 mm is usually enough for seed trays and pots while preserving floor space. If space is very tight, a narrower bench with a removable tray or side shelf may work better.
Bench surface
The surface should be easy to sweep and tolerate damp compost. A removable plastic potting tray on top of a timber bench is useful because it contains spills and can be lifted out for cleaning. If you make the bench yourself, avoid rough timber that traps compost and splinters.
Under-bench storage
The area below the bench is valuable. Use it for heavy, low-level items such as bags of compost, grit, seed trays, spare pots or a lidded tub of potting mix. Keep the heaviest items on the floor rather than on shelves, so the shed remains stable and the walls are not overloaded.
Use a Compact Shed Example to Visualise the Space
As a practical example, a shed around the size of the 6’9 x 6’6 Shire Abri Apex Wooden Garden Shed, listed as 2.05 m x 1.98 m, gives you a useful footprint for a small potting area without dominating many gardens. The important point is not the specific model, but the type of layout it illustrates: a compact rectangular space where the door, window and workbench position must be planned together.
In a shed of this general size, you might place a potting bench along the wall least interrupted by the door, use shelving above for seed packets and hand tools, and reserve the opposite side for shallow storage. A single opening window can help with light and ventilation, while a timber tongue and groove floor gives a defined surface that should be kept swept and protected from repeated wet compost spills.
When comparing compact timber sheds for this purpose, look at the construction and layout as much as the external dimensions. For example, features such as tongue and groove cladding, a boarded floor, an apex roof with felt finish, an opening window and a door that can be arranged to suit the garden can all influence how easily the shed can become a working potting space. Do not assume that a shed is suitable just because it appears large enough on paper; the usable wall runs and door swing are what matter most.
Decision Criteria for a Potting and Seed-Sowing Shed
Use the following criteria when planning a new shed or adapting an existing one.
1. Is there enough uninterrupted wall space?
You need at least one practical wall run for a bench. If the door, window or internal framing breaks up every wall, you may need a shorter bench, a corner layout or a fold-down surface.
2. Can you ventilate it?
Ventilation helps reduce stale air, condensation and heat build-up. An opening window is useful, but also consider whether the door can be left open safely while you work. Avoid storing damp compost in sealed bags against timber walls for long periods.
3. Is the floor suitable for messy work?
Seed sowing and potting produce spills. A durable timber floor can be practical, but it should be swept regularly and kept as dry as possible. Consider a washable mat or removable floor protection in the main work area, especially where compost bags are opened.
4. Can you keep supplies dry?
Seed packets, labels, string, paper bags and plant food should be stored in dry containers. Use lidded boxes or tins rather than leaving packets loose on a shelf. This also helps deter pests.
5. Will the layout still work in winter?
Many gardeners begin sowing early in the year. Think about wet boots, low light and cold hands. Keep frequently used items close to the bench, and avoid layouts that require moving half the shed’s contents every time you want to sow a tray.
Practical Layout Ideas for a Small Shed
The single-wall bench layout
This is usually the simplest option. Place the bench along one side wall, with shelves above and bulk storage below. Keep the opposite wall shallow, using hooks, narrow shelves or a small rack for canes and hand tools. This layout preserves a central standing area.
The corner work layout
If the window and door positions allow, an L-shaped bench can create more surface area. However, corners can become dumping grounds, so only choose this if you will use the extra space. Keep one part of the L narrower if the shed is compact.
The fold-down bench layout
A hinged fold-down work surface is useful where the shed must also store a mower or larger tools. It gives you flexibility, but it needs strong fixings and a safe support arrangement. Do not rely on lightweight brackets for heavy trays of wet compost.
Storage That Works in a Potting Shed
Good storage keeps the workbench clear. In a compact shed, vertical space is valuable, but it must be used sensibly.
Shelves
Install shelves above the bench for light items only: seed trays, small pots, labels, propagator lids and hand tools. Keep seed packets in a sealed box rather than open baskets. If shelves are deep, you will lose headroom and light, so shallow shelves are often better.
Hooks and rails
Hooks are ideal for trowels, hand forks, scissors, twine, gloves and a small brush. A rail behind or beside the bench keeps tools visible. Avoid hanging heavy tools where they could fall onto seed trays.
Boxes and tubs
Clear plastic boxes help you separate items by task: seed sowing, potting on, plant supports, labelling, pest control and spare fittings. Label the boxes so the shed does not become a jumble by midsummer.
Compost storage
Keep compost bags off damp corners and close them after use. If you decant compost into a tub, choose one with a lid. Store only the amount you realistically use; several half-open bags will quickly take over a small shed.
Checklist: Setting Up Your Compact Potting Shed
- Confirm the shed is on a level, well-drained base.
- Check the door opens fully and the route into the shed is clear.
- Place the potting bench where it gets the best practical light.
- Keep the bench depth modest so you still have standing space.
- Use under-bench space for heavy compost and trays.
- Add shallow shelves for light, frequently used items.
- Store seeds in airtight, dry containers away from damp.
- Fit hooks or a rail for hand tools, labels, string and gloves.
- Keep a small brush, dustpan and waste tub inside for quick clean-ups.
- Protect the floor where you open compost or water trays.
- Maintain ventilation when working with damp compost.
- Retreat and maintain the timber according to the manufacturer’s guidance.
Seed-Sowing Workflow Inside the Shed
A good shed layout should support a simple workflow. Keep clean items, messy materials and finished trays separate where possible.
- Prepare the surface: Clear the bench and set out a potting tray, labels, pencil, seed packets and clean modules.
- Handle compost: Bring only the compost you need onto the bench. Break up lumps before filling trays.
- Sow and label immediately: Label each tray as soon as it is sown. Do not rely on memory, especially when sowing several varieties.
- Water carefully: Use a fine rose or spray bottle. Avoid soaking the bench and floor.
- Move trays to the right conditions: Most compact sheds are not automatically ideal growing spaces. Many seeds need controlled warmth or better light, so move trays to a greenhouse, propagator, cold frame or windowsill as appropriate.
- Clean down: Sweep compost from the bench and floor after each session to reduce damp and pests.
Common Practical Mistakes to Avoid
Using the shed as overflow storage first
If you fill the shed with garden furniture, paint tins, broken pots and rarely used tools, there will be no room left for potting. Decide that the bench area is protected working space, not a shelf for miscellaneous items.
Fitting a bench that is too large
A huge bench may seem useful, but in a small shed it can prevent comfortable movement. You need space to stand, turn, lift compost and carry trays. A slightly smaller bench with better storage is usually more effective.
Ignoring ventilation
Damp compost, wet trays and poor airflow can make a shed unpleasant and may contribute to condensation. Open the window or door when working, and avoid leaving wet materials piled against timber.
Keeping seeds in damp or hot conditions
Seed packets should be stored cool, dry and protected from pests. A shed can become hot in summer and cold or damp in winter, so use sealed containers and consider keeping valuable or long-term seed supplies indoors.
Overloading walls and shelves
Compact timber sheds are practical, but shelves and hooks should be fitted sensibly. Heavy compost, large tubs and full watering cans belong on the floor, not high on the walls.
Forgetting maintenance
Timber sheds need care. If the shed is supplied treated, that does not mean it can be ignored indefinitely. Follow the manufacturer’s maintenance schedule, including retreatment where required, and keep vegetation from pressing against the walls.
Comfort and Safety Considerations
You are more likely to use the shed if it is comfortable. Keep a kneeling pad or small stool if you spend long periods sorting pots. Good lighting is useful for fine seed and labels; if you use any electrical equipment, have it installed safely and in line with appropriate outdoor electrical requirements. Do not run unsafe temporary cables through wet areas.
Security also matters. Potting sheds often contain tools, secateurs, plant feed and equipment. Use the door fastening provided and add suitable security where appropriate. Keep sharp tools out of reach of children and store chemicals or treatments according to their labels.
FAQ
Can a compact shed really work for seed sowing?
Yes, provided you treat it as a planned working area. You need a clear bench, dry storage, good organisation and enough light to work. The shed may not be the best place to germinate all seeds, but it can be excellent for sowing, potting and organising supplies.
Should I put the potting bench under the window?
Often, yes. Natural light helps when filling trays and reading seed packets. However, the best position also depends on door swing, wall space and whether shelves would block the window.
Can I store compost in the shed?
Yes, but keep it contained, closed and away from prolonged damp. Store heavy bags on the floor or under the bench. Avoid letting wet compost sit against timber walls.
Do seedlings get enough light inside a timber shed?
Usually not for long-term growing, unless the shed has substantial glazing and suitable conditions. Use the shed for sowing and potting, then move trays to the right germination or growing environment.
How do I stop the shed becoming cluttered?
Limit what is stored inside, use labelled boxes, keep the bench clear, and remove broken pots or unused items regularly. A five-minute tidy after each potting session makes a major difference.
Conclusion
A compact timber shed can make seed sowing and potting far more efficient, even when space is limited. The most important decisions are practical: a dry and level base, a sensible bench position, shallow storage, good ventilation and a clear route through the door. Use the shed as a working area first and storage space second. With a well-planned layout and regular maintenance, you can turn a small garden building into a reliable, organised potting station for the whole growing season.