Planning Greenhouse Staging, Potting Space and Clear Walkways
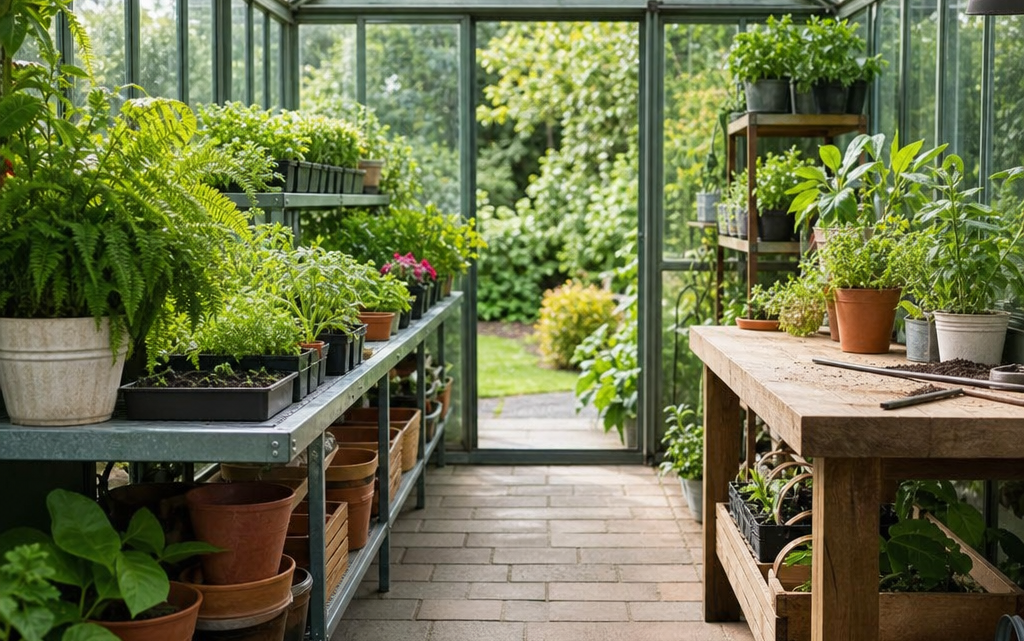
You have bought, inherited or are planning a greenhouse, and the first temptation is often to fill every sunny edge with trays, pots and shelves. Within a few weeks, however, a poorly planned layout can make watering awkward, seedlings difficult to reach and the doorway permanently blocked by compost bags. Good greenhouse planning is not just about fitting in the maximum number of plants. It is about creating staging, potting space and clear walkways that let you work safely and keep plants healthy.
This guide explains how to plan greenhouse staging, choose a practical potting bench position and maintain sensible circulation routes. It is written for everyday domestic greenhouses, including compact 6 ft wide models, where every centimetre matters.
Inhaltsverzeichnis
Start With How You Will Use the Greenhouse
Before buying staging or fixing shelves in place, decide what jobs the greenhouse must support. A greenhouse used mainly for seed raising needs a different layout from one used for tomatoes, cucumbers and overwintering tender plants.
Ask yourself the following questions:
- Will you grow mostly seedlings, crops in large pots, or a mixture of both?
- Do you need a permanent potting area, or will you pot up elsewhere?
- Will you use grow bags, raised beds, staging, or floor-standing pots?
- How often will you need to move compost, watering cans and trays through the doorway?
- Will more than one person need to work inside at the same time?
- Do you need space for a heater, water butt, propagator or storage box?
Your answers should guide the layout. For example, if you raise many seedlings in spring, a run of slatted staging on the brightest side may be more useful than permanent floor beds. If you grow tall summer crops, removable or fold-down staging may give you better seasonal flexibility.
Understand the Space You Really Have
Greenhouse dimensions can be misleading because the stated footprint is not the same as usable working space. Glazing bars, sloping sides, eaves height, the door opening and the position of vents all influence what you can actually fit in.
In a narrow greenhouse, the central path is usually the most important design feature. If the path is too tight, you will brush against plants, knock over pots and make routine jobs feel like a chore. If it is too generous, you may lose valuable growing space. The aim is to balance access with productive area.
Allow a Sensible Central Walkway
As a practical guide, a central path of about 450 mm is a minimum for careful access in a small greenhouse. Around 500 to 600 mm is more comfortable, especially if you carry watering cans, trays or bags of compost. If you use a wheelbarrow or mobility aid, you will need considerably more space, and a compact greenhouse may not be suitable for that type of access.
Door width also matters. If the doorway is 600 mm wide, for instance, there is little point creating an internal bottleneck of only 350 mm immediately inside the entrance. Keep the first metre of the greenhouse as clear as possible so that you can step in, turn slightly and set items down safely.
Remember Headroom and Eaves Height
Staging placed under low eaves can be very useful for seed trays and small pots, but it may not suit tall plants. In many domestic greenhouses, the side height is much lower than the ridge height, so a plant that looks fine in the centre may quickly press against the glass at the edges.
Use the lower side areas for trays, herbs, young plants and compact crops. Reserve the centre line, back wall or roof apex area for taller plants such as tomatoes, cucumbers and climbing crops where height allows.
Choosing Greenhouse Staging
Greenhouse staging gives you a raised working and growing surface. It improves light exposure, makes watering easier and helps you keep seedlings away from cold floor level. The right type depends on what you grow and how permanent you want the layout to be.
One-tier Staging
One-tier staging is usually the most flexible option. It gives you a clear upper surface for seed trays, pots and tools while leaving the floor underneath available for storage, overwintering plants or low containers. Slatted staging is particularly useful because it allows water to drain and air to circulate around pots.
Choose one-tier staging if you need a strong general-purpose surface and want to keep your options open throughout the year.
Two-tier Staging
Two-tier staging increases capacity but needs more careful planning. The lower shelf can be shaded by the upper shelf, so it is best used for items that tolerate lower light, temporary storage, empty pots, or plants that are not actively growing. It can be very efficient in spring when you have many trays waiting to germinate, but it may become restrictive once plants need more height.
Use two-tier staging where you value storage and tray capacity more than growing tall specimens beneath it.
Seed Tray Frames
Purpose-made seed tray frames are useful if your main focus is propagation. They can hold multiple trays neatly and make it easier to manage batches of seedlings. However, they are less versatile than a plain bench surface if you regularly pot up, divide plants or use larger containers.
They suit gardeners who sow in quantity and want an organised spring production area.
Planning the Potting Bench
A potting bench is different from ordinary staging. It is a working station where you handle compost, prick out seedlings, label plants and clean tools. It should therefore be positioned for comfort and tidiness, not just squeezed into a spare corner.
Place the Bench Near the Door
In most small greenhouses, the best position for a potting bench is close to the entrance. This reduces the distance you carry compost and pots, keeps mess near the door and makes it easier to sweep out spilled growing media. It also means you can work with the door open on warm days without overheating.
A bench at the far end can work if you want an uninterrupted run of staging near the door, but it often encourages clutter along the path because everything has to be carried through the greenhouse first.
Keep the Working Surface Clear
Your potting bench should not become permanent plant storage. If every surface is covered with trays, you will end up potting on the floor or outdoors in poor weather. Leave at least one section of bench available for active work, even at busy times of year.
It is sensible to store frequently used items close to the bench: labels, pencil, dibber, hand fork, secateurs, twine and a small brush. Compost bags are better kept outside the greenhouse if possible, or under the bench in a tray or container, because they take up valuable circulation space.
Using a Compact 6 x 10 Greenhouse as a Layout Example
To make the planning process more realistic, consider a typical compact greenhouse with a width of around 1.93 m and a depth of around 3.19 m, giving a base area of about 6.2 m². In a greenhouse of this size, you cannot treat staging, potting and circulation as separate decisions; each one affects the others.
If you allow a central path of about 500 mm, you are left with roughly 700 mm on each side before allowing for framing and clearance. That is enough for useful staging or pots, but not enough for deep benches on both sides and comfortable working space. A practical arrangement might include staging along one side, a narrower run or seasonal pots on the other, and a potting bench near the door or at one end. Tall crops may be better positioned where they can rise towards the ridge rather than being forced against the eaves.
The example above shows why dimensions should be turned into a working plan before you order accessories. A greenhouse may have optional one-tier or two-tier staging, a seed tray frame, a potting bench and a heater available, but you rarely need all of them installed permanently at once. Choose the combination that supports your growing routine and still leaves clear access.
Practical Layout Options
There is no single correct greenhouse layout, but most domestic greenhouses fall into a few useful patterns. Choose the one that best matches your priorities.
Layout 1: Staging on One Side, Crops on the Other
This is one of the most practical arrangements for a mixed-use greenhouse. One side is fitted with staging for seedlings, small pots and propagation. The opposite side is kept for grow bags, larger pots or seasonal crops. The central path remains clear from the door to the far end.
This layout works well if you raise plants in spring and then switch to tomatoes, chillies, cucumbers or aubergines in summer. It also reduces the risk of shading small plants with tall crops.
Layout 2: Staging Both Sides With a Clear Centre
Staging on both sides maximises tray and pot capacity. It is particularly useful for propagation, collections of small plants, alpines or overwintering tender specimens. The drawback is reduced flexibility for tall crops and large containers.
If you choose this arrangement, avoid making both sides deep and cluttered. You should still be able to reach the back row of pots without leaning heavily over plants or pressing against the glass.
Layout 3: Potting Bench Near the Door, Growing Space Beyond
This layout treats the greenhouse as a working room as well as a growing space. A potting bench sits near the entrance, while the remainder is arranged with staging or floor crops. It is efficient if you regularly sow, prick out and pot on inside the greenhouse.
The key is discipline. The bench must be kept usable, and the entrance must not become a dumping ground for empty pots, trays and compost sacks.
Layout 4: Seasonal or Removable Staging
Removable staging is ideal if your needs change during the year. You might use staging heavily from February to May, then remove or reduce it to make room for tall summer crops. In autumn, staging can return for cuttings, overwintering plants and spring bulbs.
This approach is especially effective in small greenhouses because it prevents the layout being dictated by one season only.
Checklist: Planning Staging, Potting Space and Walkways
Use this checklist before buying or installing greenhouse furniture:
- Measure the internal width and length, not just the advertised footprint.
- Check the door opening and keep the entrance free from permanent obstructions.
- Mark out a central path of at least 450 mm, preferably nearer 500 to 600 mm where possible.
- Decide which side gets the best light and reserve it for seedlings or sun-loving plants.
- Allow for eaves height before placing tall plants or high shelving at the sides.
- Choose staging depth carefully so you can reach plants without stretching.
- Keep a dedicated potting surface rather than covering every bench with plants.
- Plan where water, tools and labels will go so they do not block the path.
- Leave space around vents and heaters so air can circulate safely and effectively.
- Review the layout seasonally and remove furniture that is not earning its space.
Circulation, Ventilation and Plant Health
Clear walkways are not just about your comfort. They also affect airflow and plant health. A greenhouse packed tightly from floor to roof can trap humid air, encourage fungal disease and make pest problems harder to spot.
Leave small gaps between trays and avoid pressing foliage directly against the glazing. Plants touching glass can scorch in strong sun and become chilled in cold weather. Good spacing also makes it easier to water accurately and inspect the undersides of leaves for aphids, whitefly and other pests.
Ventilation should be considered when placing staging. Do not block louvre windows, roof vent operation, door movement or airflow around heaters. If automatic vent openers are fitted, make sure shelves, canes or hanging baskets cannot interfere with the mechanism.
Storage Without Losing the Greenhouse
Greenhouses often become sheds by accident. Empty pots, old compost, plant supports, seed packets and tools gradually take over the space intended for growing. Some storage is useful, but it should be deliberate.
Store light items under staging in boxes or trays. Keep sharp tools in a fixed container rather than loose on a bench. Hang canes or clips only where they will not catch your clothing as you walk past. If you use a heater, keep the surrounding area clear and follow the manufacturer’s safety guidance.
Bulky items such as large compost bags, spare glazing materials and unused containers are usually better kept in a shed, garage or outdoor storage box. In a small greenhouse, floor space is too valuable to use as general storage.
Common Practical Mistakes to Avoid
Buying Staging Before Planning the Path
It is easy to buy attractive staging and then discover that the remaining walkway is too narrow. Always plan the path first, then choose staging that fits around it.
Using Every Surface for Plants
A greenhouse full of plants may look productive, but you still need somewhere to work. Keep part of the potting bench clear, especially during spring.
Ignoring Reach
If staging is too deep, the back row of plants becomes difficult to water and inspect. You may also lean on glazing or damage plants at the front. Choose a depth you can comfortably reach.
Blocking the Doorway
The entrance must remain clear for safe access. Avoid storing watering cans, compost bags or stacks of trays just inside the door.
Forgetting Seasonal Change
A spring propagation layout may not suit summer crops. Plan for movement, removal or reorganisation as plants grow.
Placing Tall Crops Under Low Eaves
Tall plants need headroom. If they are positioned too close to the sides, they may lean, scorch or become difficult to train.
Short FAQ
How wide should a greenhouse path be?
For a small domestic greenhouse, about 450 mm is a practical minimum, while 500 to 600 mm is more comfortable. If you need step-free or assisted access, plan for a wider route from the beginning.
Is one-tier or two-tier staging better?
One-tier staging is more flexible and gives useful space beneath. Two-tier staging increases capacity but can shade the lower level and reduce headroom. Choose according to whether you need flexibility or maximum tray space.
Where should I put a potting bench?
Near the door is usually most practical because compost, pots and tools can be moved in and out easily. It also keeps mess close to the entrance for cleaning.
Can I put staging on both sides of a narrow greenhouse?
Yes, but only if the central walkway remains usable and you can reach the back of the staging safely. In many compact greenhouses, staging on one side and flexible growing space on the other is more practical.
Should greenhouse staging be permanent?
Not necessarily. Removable or seasonal staging can be very useful, particularly if you raise seedlings in spring and grow tall crops in summer.
Conclusion
Planning greenhouse staging, potting space and clear walkways is about making the greenhouse work in real life. Start with your growing habits, measure the usable space and protect the central path before adding benches or shelves. Keep a dedicated potting area, allow for ventilation and avoid filling every gap with storage.
A well-planned greenhouse is easier to water, safer to move around in and better for plant health. Whether you are working with a compact starter greenhouse or a larger structure, the best layout is the one that lets you grow, pot, clean and harvest without fighting the space every time you step inside.