Framed Closeboard Timber Gates for Side Passages
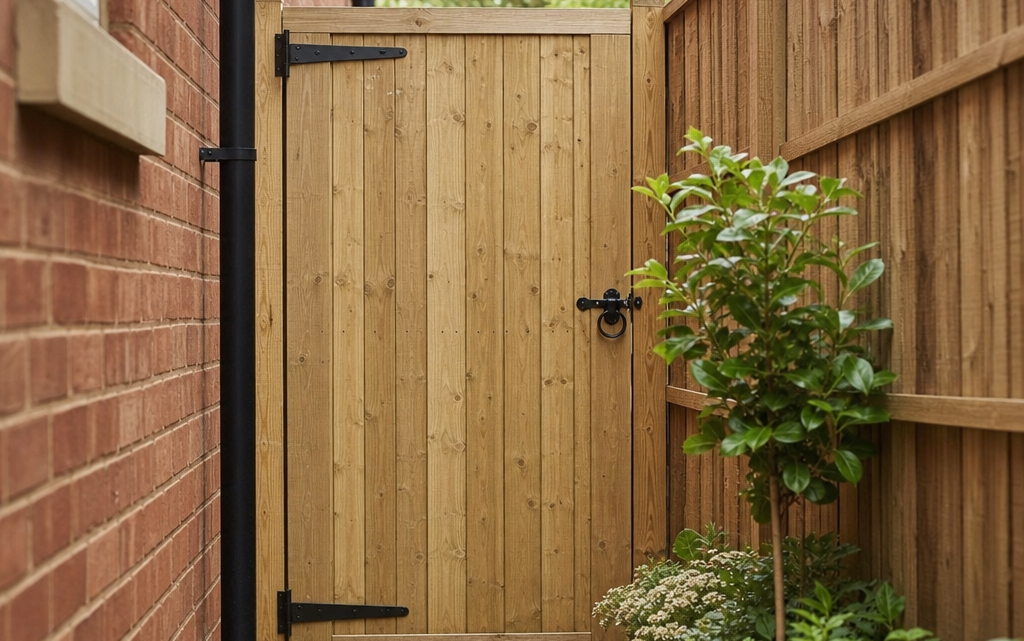
A side passage gate often has to do more than simply mark a boundary. It may screen bins, protect a rear garden, keep pets or children away from the road, and provide everyday access to a shed, bicycle store or back door. If the opening is visible from the street, it also has to look presentable and feel secure. For many UK homes, a framed closeboard timber gate is a practical answer: it gives good privacy, suits traditional fencing and can be specified to work neatly in narrow side entrances and rear garden openings.
This article explains how to choose and specify a framed closeboard timber gate, what to measure, which details matter, and the common mistakes to avoid. The aim is to help you buy a gate that fits the opening, hangs properly and lasts well with sensible maintenance.
Inhaltsverzeichnis
What is a framed closeboard timber gate?
A closeboard timber gate is made from vertical timber boards fixed closely together, usually to reduce gaps and improve privacy. A framed version has an outer perimeter frame, which gives the gate more structure than loose boards fixed only to rails. This is particularly useful for side passages, where the gate may be used daily and exposed to wind, rain and knocks from bins, bikes or garden equipment.
The closeboard style is a natural match for closeboard fence panels and featheredge fencing, but it can also work as a standalone gate between brick walls, timber posts or a fence line and a house wall. The key is to specify it as part of the whole opening, rather than treating the gate leaf as the only item you need.
Where framed closeboard gates work best
Framed closeboard timber gates are commonly used in the following places:
- Side passages between a house and boundary fence: a common location where privacy and security matter.
- Rear garden entrances: especially where there is access from a lane, driveway or shared path.
- Bin store or utility areas: where you want to screen the view from the front or side of the property.
- Transitions between garden zones: such as separating a main lawn from a working area or dog run.
- Openings in closeboard fencing: where matching the surrounding fence gives a consistent appearance.
They are less suitable where you need a highly decorative entrance, very wide vehicular access, or a gate that must be exceptionally light. Timber is also a natural material, so it will move slightly with changes in moisture and temperature. A good installation allows for that movement.
Start with the opening, not the gate
The most important step is measuring the opening accurately. Many problems with garden gates come from ordering a gate leaf that is too large, too small, or unsuitable for the posts and hardware available.
Measure the clear width
Measure the gap where the gate will be fitted at three points: near the top, in the middle and near the ground. Side walls, fences and posts are not always perfectly parallel. Use the smallest measurement as your starting point.
Remember that the gate itself must not fill the whole gap. You need clearance for hinges, latch hardware and seasonal timber movement. If you are fitting between timber posts, you also need to account for the thickness and position of those posts.
Measure the required height
A 6ft timber gate is a common choice for privacy, but you should check how it will relate to the surrounding fence, walls, ground level and sightlines. On a sloping path, one side of the gate may sit much closer to the ground than the other. You need enough clearance underneath to prevent scraping, especially if the paving is uneven or gravel is used.
Check the ground and drainage
Timber gates last better when they are not sitting in water or rubbing against damp ground. Look for puddling, poor drainage, raised paving, loose gravel and plant growth. If the passage is narrow and shaded, timber may dry more slowly after rain, so maintenance becomes more important.
Choosing the right size and format
Side passage gates are often around 900mm wide and 1.8m high, but you should not assume this will suit your opening. A gate that is close to 0.91m wide and 1.83m high, for example, may work well in a typical pedestrian side entrance, provided the clearances and posts are correctly planned. However, the actual opening, hinge arrangement and latch position decide whether it is appropriate.
If your opening is much wider than a standard pedestrian gate, you may need a bespoke gate, a pair of gates, or a redesigned entrance with new posts. If it is very narrow, check that the gate will still give practical access for wheelie bins, bicycles, pushchairs or garden machinery.
Frame strength and closeboard construction
A framed closeboard gate relies on both the vertical boards and the frame. The boards provide screening; the frame helps the gate keep its shape and gives hinges and fixings a stronger base. When comparing options, look for a fully framed construction rather than only focusing on appearance.
For regular garden use, consider:
- whether the gate has a complete outer frame;
- how the boards are fixed to the frame;
- whether the design feels suitable for daily opening and closing;
- whether it will be exposed to strong wind in its location;
- how well it matches the existing fence or boundary treatment.
In a windy side passage, a solid timber gate can act like a sail. The stronger and more exposed the wind, the more important the posts, hinges and fixings become. Do not judge the installation only by the gate leaf.
Timber treatment and maintenance expectations
Many timber gates are supplied treated against rot and fungal decay, but treatment type and maintenance requirements vary. Dip treatment, for example, provides initial protection, but it usually relies on regular retreatment to maintain performance. If a gate is described as having an anti-rot guarantee subject to annual retreatment, you should factor that maintenance into your decision.
For a side passage, maintenance can be awkward because access may be tight and one face of the gate may be close to a wall or fence. Before you buy, consider whether you can realistically clean, inspect and retreat the timber each year. Pay particular attention to the bottom edge, end grain, joints and any areas where water can sit.
Hardware is not an afterthought
Many gates are sold without fixings, which is normal, but it means you must specify the correct hardware separately. Hinges, screws, latch and bolts should be suitable for external use and for the weight and size of the gate. Poor hardware can make a good gate difficult to use.
Hinges
For a tall framed timber gate, use hinges that support the gate properly and spread the load. The correct hinge type depends on the gate size, post material, opening direction and desired appearance. In many cases, strong tee hinges or hook-and-band style hinges are used for timber garden gates. Make sure the hinge length and fixing points suit the frame.
Latch and locking
Think about how you will use the gate every day. Do you need to open it from both sides? Is it mainly for privacy, or does it need to be lockable? A simple latch may be enough for a private rear garden, but a side gate visible from the street may benefit from a lockable latch or padbolt arrangement. Avoid placing locks where they are easy to reach over if security is a concern.
Posts and fixing surfaces
A gate is only as stable as the structure it hangs from. Timber posts must be adequately sized, sound and firmly fixed. If you are fixing to masonry, use appropriate wall plates, plugs, anchors and exterior-grade fixings. Do not hang a substantial gate from a weak fence panel, rotten post or loose brickwork.
Example of a typical framed closeboard side gate
As a practical reference point, a product such as the Forest 3′ x 6′ Wooden Board Side Garden Gate measures 0.91m x 1.83m and is described as a fully framed closeboard gate with vertical boards on a strong perimeter frame. It is intended for side entrances and can be used with closeboard fence panels or as a standalone garden gate. It is made in the UK from FSC certified timber and is dip treated, with a stated 10-year anti-rot guarantee when supported by annual retreatment. Fixings are sold separately, so hinges, latch and any locking hardware would need to be chosen to suit the installation.
That type of specification is useful when comparing gates, but you should still check the actual opening, the required clearances and the supporting posts before ordering.
Planning the opening direction
Decide whether the gate should open into the garden, into the side passage, or outwards. In many domestic situations, inward opening is preferred because it avoids swinging into a public path or shared access. However, tight side passages can make this difficult if bins, bikes or steps are in the way.
Ask yourself:
- Will the gate hit a wall, downpipe, step, bin or planter?
- Can you still open it fully when the passage is in normal use?
- Is there enough room for the latch and handle on the preferred side?
- Will the gate obstruct an escape route or shared access?
- Will the bottom of the gate clear sloping ground throughout its swing?
If the ground rises behind the gate, you may need to increase the bottom clearance, alter the opening direction or rework the surface.
Privacy, security and appearance
Closeboard gates are popular because they offer a high level of privacy. Vertical boards with minimal gaps can screen the view into a rear garden or side path. For security, however, privacy is only one part of the picture. You should also consider height, latch access, hinge position, the strength of posts, and whether the surrounding fence or wall is easy to climb.
A 6ft gate can deter casual access and improve screening, but it should be proportionate to the boundary. In some settings, especially front gardens or areas affected by planning restrictions, you may need to check whether height limits apply. This is particularly relevant if the gate is adjacent to a highway or forms part of a front boundary.
Visually, closeboard timber works best when it relates to nearby fencing. If your fence panels are closeboard or featheredge, a matching gate helps the entrance look intentional. If the surrounding boundary is brick, rendered wall or decorative fencing, you may want to think carefully about stain colour and hardware finish.
Installation steps to plan before delivery
Whether you are installing the gate yourself or using a tradesperson, it helps to plan the sequence before the gate arrives.
1. Confirm all dimensions
Recheck the opening width, required height and ground clearance. If new posts are being installed, mark where they will sit and calculate the final clear opening after they are in place.
2. Prepare or replace posts
If existing timber posts are soft, split or moving, replace them before hanging the new gate. A new gate on failing posts will quickly drop or twist. Posts set into the ground should be installed securely and protected from prolonged moisture as far as possible.
3. Select exterior-grade hardware
Choose hinges, latch, screws and bolts suitable for outdoor use. Check that screw lengths are appropriate for the frame and post. If fixings are not included with the gate, do not leave this decision until the day of installation.
4. Trial position the gate
Offer the gate into the opening using packers to create the intended clearance. Check level, plumb and swing before final fixing. This step often reveals issues with uneven paving, leaning posts or latch alignment.
5. Seal and treat vulnerable areas
If the supplier’s instructions allow or require retreatment before installation, apply the recommended product, especially to cut ends, drilled holes and bottom edges. Follow the manufacturer’s guidance rather than mixing incompatible treatments.
6. Fit, adjust and test
Once hung, open and close the gate several times. Check that it does not bind, drop or bounce against the latch. Confirm that any lock or bolt works without forcing it.
Side passage gate specification checklist
Use this checklist before you buy:
- Opening width measured at top, middle and bottom: use the narrowest point for planning.
- Gate height confirmed: consider privacy, fence height, ground slope and planning constraints.
- Clearance allowed: include space for hinges, latch and seasonal timber movement.
- Opening direction chosen: check for bins, walls, steps, drains and public paths.
- Posts or wall plates specified: ensure the supporting structure is strong enough.
- External hardware selected: hinges, latch, bolts and screws suitable for outdoor use.
- Security needs assessed: decide whether a lockable latch or padbolt is required.
- Timber treatment understood: note any annual retreatment requirement.
- Maintenance access checked: make sure you can treat both faces and edges.
- Delivery and handling planned: ensure the gate can be carried through the property or around the side.
Common mistakes when buying framed closeboard gates
Ordering to the exact gap size
A gate should not be the same width as the opening. You need working gaps for hinges, latch clearance and timber movement. Ordering too tightly can result in a gate that rubs, sticks or cannot be installed without cutting.
Ignoring the condition of existing posts
Old posts may look acceptable until a heavier or taller gate is hung on them. If the post moves when pushed, is rotten at ground level, or has split around old hinge fixings, it is not a reliable support.
Choosing the gate before checking the swing
A side passage may be narrow, sloped or cluttered. If the gate cannot open fully, everyday use becomes frustrating. Always check the swing path before deciding the hinge side.
Using unsuitable internal fixings
Indoor screws and light-duty hardware are not suitable for an external timber gate. They may corrode, loosen or fail. Use appropriate exterior-grade fixings and hardware matched to the gate.
Forgetting annual maintenance
Timber gates need care. If the gate is dip treated and the guarantee depends on annual retreatment, missing that maintenance can shorten service life and affect the validity of the guarantee.
Letting the gate sit too close to the ground
A low bottom clearance may look neat on the day it is installed, but it can cause problems when timber swells, gravel shifts or leaves collect. It also increases exposure to splashback and damp.
Budgeting realistically
The gate leaf is only one part of the cost. You may also need posts, hinges, latch, lock, bolts, wall plates, concrete, treatment, delivery and labour. A gate priced at a modest level can still require additional spending to install correctly. Conversely, saving money by reusing poor posts or cheap fixings can lead to early failure.
When comparing products, compare the complete installed specification, not just the headline price. A fully framed timber gate with suitable hardware, sound posts and regular maintenance is usually better value than a cheaper arrangement that needs reworking within a short time.
FAQ
Is a framed closeboard gate suitable for a side entrance?
Yes, it is often a good choice because it provides privacy, a traditional appearance and a stronger structure than an unframed boarded screen. You must still check the opening size, posts, hardware and swing direction.
Do timber gates come with hinges and latches?
Some do, but many are sold without fixings. Always check what is included. If fixings are sold separately, choose exterior-grade hinges and latch hardware suitable for the gate size and installation.
How much clearance should I allow?
The exact clearance depends on the hinge type, latch and site conditions. You should allow enough space for the gate to swing freely and for timber movement. Avoid ordering a gate to the exact size of the opening.
Does dip treated timber need further treatment?
Usually, yes. Dip treatment provides initial protection, but many products require regular retreatment, often annually, to maintain protection and any anti-rot guarantee. Follow the manufacturer’s instructions.
Can I hang a timber gate from a wall?
Yes, provided the wall is sound and you use suitable wall plates, anchors and fixings. Do not fix a heavy or frequently used gate into weak masonry or unstable brickwork.
Conclusion
A framed closeboard timber gate is a practical, private and familiar solution for side passages and rear garden entrances. To specify one well, focus on the complete opening: measure accurately, allow proper clearances, choose strong supports, use suitable exterior hardware and understand the maintenance requirements of treated timber.
The best result comes from matching the gate to your site rather than simply buying a standard size and hoping it fits. If you plan the posts, swing direction, latch position and annual care before you order, your side passage gate should be easier to use, better looking and more durable.