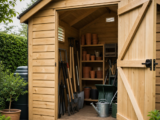
Making Practical Use of Extra Headroom in a Timber Garden Shed

You have cleared space in the garden, chosen a timber shed with more headroom than a standard pent or apex model, and now want to avoid the usual problem: everything ending up on the floor within six months. A high-roof timber shed can be far more useful than a simple store for a mower and a few tools, but only if you plan the vertical space carefully from the start.
Extra height is valuable because it lets you separate long, awkward and seasonal items from everyday equipment. The aim is not to fill every spare centimetre above your head, but to create safe, accessible storage that suits how you actually use the shed. This guide explains how to plan vertical storage in a high-roof timber garden shed, including what to hang, what to shelve, what to keep low, and what mistakes to avoid.
Inhaltsverzeichnis
Why headroom changes how you should plan shed storage
In a low shed, most storage decisions are made at floor and waist height. A high-roof timber shed gives you more options: overhead rails, tall shelving, wall-mounted tool racks, hanging hooks and storage above door height. This can make a modest footprint work much harder, particularly where garden space is limited.
However, extra height also introduces practical considerations. The higher you store something, the harder it is to lift down safely. You must also think about the shed’s timber framework, roof shape, door swing, window position, ventilation and how weight will be transferred. A good plan uses the height without overloading the structure or making the shed awkward to use.
Start with what you need to store
Before fitting shelves or hooks, list the items that will live in the shed. Group them by size, weight and frequency of use. This is the simplest way to avoid building storage that looks neat but does not suit your routine.
Everyday items
Keep regularly used tools within easy reach. Secateurs, hand forks, trowels, watering cans, plant food, gloves and small power tools should not be stored above shoulder height. If you need a step ladder every time you want a hand tool, the system will quickly become inconvenient.
Long-handled tools
Spades, rakes, hoes, forks, brooms and loppers are ideal for vertical wall storage. They are usually light enough to hang, but awkward when left leaning in a corner. A rail with adjustable clips or individual wall hooks can keep them visible and prevent them falling across the floor.
Bulky seasonal items
Folded garden furniture covers, fleece, cloches, empty pots, seed trays and lightweight camping or leisure items can often be stored higher up. These are good candidates for overhead shelves or high wall shelving, provided they are not heavy and are packed securely.
Heavy equipment
Lawnmowers, bags of compost, paving materials, fuel containers, pressure washers and large power tools should stay low. Heavy items are safest on the floor or on low, robust shelving. Extra headroom should not tempt you to lift heavy loads above head height.
Divide the shed into practical storage zones
A high-roof shed works best when you think in zones rather than simply adding shelves wherever there is space. Each zone should have a purpose and should leave enough room for you to stand, turn and lift items safely.
Floor zone: heavy and wheeled equipment
The floor zone is for anything heavy, wheeled or awkward to lift. Keep a clear route from the double doors to the back of the shed if you need to move a mower, wheelbarrow, shredder or storage boxes. If the shed has wide doors, use that advantage by placing the bulkiest equipment so it can be rolled straight in and out without tight turns.
Wall zone: tools and shallow shelving
The wall zone is the most useful area for everyday organisation. Fit tool racks, pegboards, narrow shelves and hooks to the side walls where you can see items at a glance. In a timber shed, fixings should go into structural framing or suitable battens, not just thin cladding. If you are unsure where the framing is, inspect the inside carefully before drilling.
High zone: lightweight occasional storage
The high zone is best for items you use occasionally and can lift safely. This might include spare pots, folded tarpaulins, garden netting, cushions stored in protective bags, or empty storage crates. Avoid storing fragile items where they may be knocked down, and avoid anything that could cause injury if it fell.
Door and gable space
The area above or beside the doors can be useful, but only if it does not obstruct the entrance. Hooks for lightweight items such as kneeling pads, hand brushes or extension leads can work well. In a barn-style or high-roof shed, the gable area may offer useful height, but it is not automatically suitable for heavy storage. Treat it as a place for light, well-secured items only.
Assess the structure before adding vertical storage
Timber sheds vary in construction, so you should check the actual building before deciding how much to attach to the walls. Look at the cladding thickness, internal framework, roof boards, floor strength and how the panels are assembled. Do not assume that a shed wall can carry the same loads as a house wall.
For wall-mounted storage, spread the load. A timber batten fixed across several framing members can provide a better fixing point for hooks and racks than placing multiple screws directly into cladding. For heavy shelving, consider floor-standing shelving units that are secured back to the wall only to prevent tipping. This places the main weight onto the floor rather than the wall.
Be particularly cautious with roof storage. Roof boards and roof framing are designed primarily to support the roof covering and normal environmental loads, not necessarily hanging storage. Unless the manufacturer specifically allows it, avoid suspending heavy items from roof members. If you want overhead storage, a freestanding rack or a shelf supported by wall battens and vertical posts is often a safer solution.
A practical example of a high-roof timber shed
As a practical example, a barn-style shed such as the 6’9 x 6’6 Shire Barn Double Door Wooden Garden Shed is designed with a higher roof form, wide double doors and an opening window. Its stated construction includes 12mm tongue and groove boarding for the walls and floor, supported by a 34 x 34mm framework, with an 11mm OSB solid sheet roof finished in felt. Features like wide access and increased storage height are relevant when planning how to move bulky items in and how to use upper wall areas sensibly.
This type of shed illustrates the planning principles well. The high roof can help you store lightweight seasonal items above normal reach, while the double doors make it easier to keep the centre of the floor clear for larger equipment. The opening window can support ventilation, which matters if you are storing timber, fabric, tools or anything prone to damp. The window position also affects where shelving can go, so decide on storage layout before permanently filling wall space.
Choose storage fittings that suit a timber shed
Wall battens and tool rails
A simple timber batten fixed horizontally to the internal framework can be one of the most adaptable storage solutions. You can then attach hooks, clips or brackets to the batten. This is useful for long-handled tools, hoses, folding chairs and lightweight garden accessories.
Place tool rails at a height where the handles clear the floor but the tool heads can still be lifted out easily. If several people use the shed, choose a height that works for the shortest regular user, not just the tallest.
Shelving
Shelving should match the weight and size of what you plan to store. Narrow shelves are good for sprays, small pots, gloves and fixings. Deeper shelves are useful for crates and seed trays, but they can make the shed feel cramped if fitted at shoulder height in a small footprint.
For heavy loads, use robust freestanding shelving on a level floor. Secure it to the wall to reduce the risk of tipping, but do not rely on the wall alone to take the full load. Keep the heaviest items on the bottom shelves.
Overhead shelves
Overhead shelving can be useful in a high-roof shed, especially above the door line or along a gable end. Keep it shallow enough that you can see what is stored there. Use lidded, labelled boxes for lightweight items, and avoid stacking loose objects that may slide off.
If you need steps to reach an overhead shelf, leave enough floor space to use them safely. Do not create a layout where you must balance on a mower, stool or storage box to reach items.
Pegboards and panels
Pegboards can work well for small hand tools, but they need firm support behind them. In a timber shed, mount the board on battens so there is space for hooks and so the load is spread. Pegboards are best for light items, not heavy power tools unless the board and fixings are suitable.
Plan around doors, windows and ventilation
High-roof storage must not interfere with the shed’s basic functions. Doors need to open fully, especially if the shed has double doors intended for wide access. Do not fit hooks or shelves where they will catch the door leaf, block the padbolt, or make it difficult to manoeuvre bulky items.
Windows are equally important. Avoid covering an opening window with shelving, crates or hanging tools. You may need the window for light and ventilation, particularly if the shed is also used for small workshop tasks. Airflow helps reduce stale, damp conditions, although it is not a substitute for proper maintenance or keeping wet items out of the shed.
Leave a little breathing space behind stored items where possible. Packing every wall tightly from floor to roof can trap moisture, reduce visibility and make it harder to inspect the timber for signs of damp or damage.
Step-by-step method for planning your vertical layout
- Measure the inside of the shed. Record usable wall lengths, internal height, door openings and window position. Measure inside rather than relying only on nominal external dimensions.
- Mark no-fix areas. Identify doors, window swing, vents, roof slopes, electrical routes if present, and any areas you need to keep clear.
- Map your floor route. Decide where large items will sit and how they will move in and out. Keep a central walkway where possible.
- Allocate wall storage. Put long-handled tools on one wall, small items near a work surface if you have one, and shallow shelving where it will not obstruct movement.
- Reserve high storage for light items. Choose only occasional-use items for overhead or high shelves.
- Fix to suitable structure. Use framing, battens or freestanding units rather than relying on thin cladding alone.
- Label and review. Label high boxes clearly and adjust the layout after a few weeks of use.
Vertical storage checklist
- Have you kept heavy items at floor level or on low shelving?
- Can you reach everyday tools without steps?
- Are wall hooks fixed into framing or a properly secured batten?
- Can the doors open fully without hitting stored items?
- Is the window still usable for light and ventilation?
- Are high shelves limited to lightweight, occasional-use items?
- Is there a clear walking route through the shed?
- Are boxes labelled so you do not need to search overhead?
- Can you inspect the walls and floor for damp or damage?
- Have you avoided hanging heavy loads from the roof unless approved by the manufacturer?
Common mistakes to avoid
Using the roof as a general hanging frame
It is tempting to hang bicycles, ladders, timber and tools from the highest point, but a shed roof is not automatically designed for that purpose. Heavy hanging loads can stress fixings and roof members. Use floor-standing or wall-supported systems instead, unless the shed manufacturer provides specific guidance.
Putting too much weight on one wall
A run of heavy shelves loaded with compost, paint tins and power tools can overload a wall or distort fixings. Spread storage across the shed and keep heavy items low. If in doubt, use freestanding shelving that transfers weight to the floor.
Blocking ventilation
Covering the opening window or packing items tightly against every surface can encourage damp conditions. Timber sheds need reasonable airflow, and stored items should not prevent you from opening the window or checking the structure.
Making items difficult to retrieve
Storage is only practical if you can use it. If a high shelf requires you to move three other items and fetch a ladder each time, it will become a dumping area. Store occasional items high, not regular tools.
Ignoring treatment and maintenance access
Timber sheds need ongoing care. If the shed requires annual retreatment to maintain an anti-rot guarantee, you should plan storage so you can still access walls and corners when needed. Avoid permanent installations that make maintenance impossible.
Safety considerations when using extra height
Always think about what happens if something falls. Store sharp tools with points down or securely clipped. Keep chemicals, fuels and sprays in accordance with their labels, away from children and sources of heat. Do not place glass, heavy metal items or unstable stacks overhead.
If you use steps inside the shed, choose a stable step ladder and keep enough floor space to open it fully. Good lighting also matters. A high-roof shed can cast shadows under shelves, making it harder to find items and increasing the risk of knocks or trips.
FAQ
Can I fit shelves right up to the roof in a high-roof shed?
You can use high-level shelving for lightweight items, but it is rarely sensible to fill the full height with deep shelves. Leave space for airflow, safe access and roof inspection. Keep frequently used items lower down.
What should I store in the highest part of the shed?
Use the highest area for light, occasional items such as empty pots, fleece, netting, folded covers or labelled plastic boxes. Avoid heavy, sharp, fragile or liquid-filled items overhead.
Is it better to use wall-mounted or freestanding shelving?
For light tools and small items, wall-mounted storage can be very efficient. For heavier loads, freestanding shelving is usually more practical because the weight is carried by the floor. Securing freestanding units back to the wall can help prevent tipping.
Should I decide on the window position before planning storage?
Yes. The window affects light, ventilation and available wall space. If the shed allows a choice of window positions, consider where shelves, a workbench and tool racks will go before committing to a layout.
How do I stop a high-roof shed becoming cluttered?
Give each category of item a defined place, label high boxes, and keep the centre floor route clear. Review the layout at the end of each gardening season and remove items you no longer use.
Conclusion
Extra headroom in a timber garden shed is most useful when it is planned carefully. Treat the shed as a set of storage zones: heavy items low, everyday tools within easy reach, long tools on the walls, and lightweight seasonal items higher up. Check the structure before fixing anything, avoid overloading walls or roof members, and keep doors, windows and ventilation clear.
A high-roof shed can provide excellent practical storage, but the best layouts are simple, safe and easy to maintain. By measuring first, choosing the right fittings and storing items according to weight and frequency of use, you can make the most of the vertical space without turning the shed into an unsafe or cluttered store.