Slotted Timber Fence Posts for Decorative Garden Panels
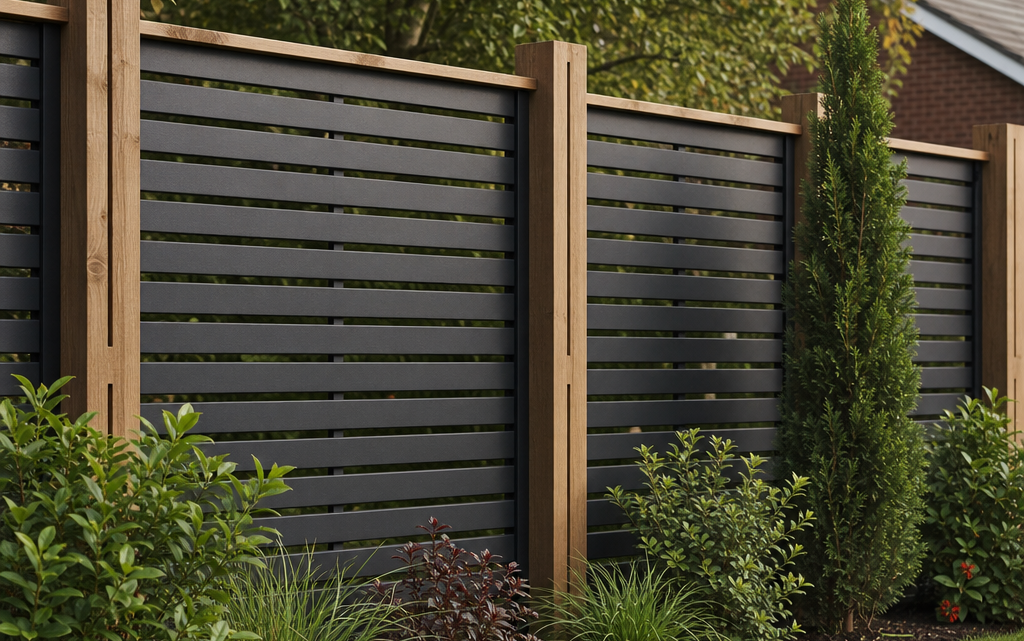
You may be planning to replace a tired boundary with decorative garden panels, screen a patio from view, or create a smarter division between two parts of the garden. In all of these situations, the panels usually get most of the attention, but the posts decide whether the finished fence looks straight, stays secure and remains easy to maintain. Slotted timber fence posts are a popular choice for decorative panels because they allow panels to slide neatly into place without visible brackets on the face of the fence.
Good planning is especially important with decorative fencing. Many panels have shaped tops, trellis sections, planed frames or continental-style construction, so they need accurate spacing and suitable post grooves. This guide explains how to plan slotted timber fence posts for decorative garden boundaries, including what to measure, how to choose post length, how to set out the line, and which common mistakes to avoid.
Inhaltsverzeichnis
What slotted timber fence posts are used for
Slotted timber fence posts are wooden fence posts with a vertical groove running down one or more sides. Instead of fixing a panel to the face of the post with clips or brackets, you slide the panel edge into the slot. This gives a cleaner appearance and helps keep decorative panels aligned within the run.
They are commonly used with framed timber fence panels, including decorative garden screens, trellis-topped panels and planed continental panels. The neatest results come when the panel frame thickness is compatible with the groove width and when the posts are set accurately at the correct centres.
Why planning matters before you buy
Decorative boundaries are less forgiving than basic utility fencing. If the post spacing is slightly wrong, panels may not sit fully into the grooves. If the posts are not vertical, the shaped tops can look uneven. If the post length is too short, the fence may not have enough support in the ground.
Before ordering materials, you should decide:
- where the fence line will run;
- the height and width of the decorative panels;
- the thickness of the panel frame;
- whether the fence will follow level or sloping ground;
- how many end, intermediate and corner posts are needed;
- whether gravel boards will be used;
- how deep the posts must be set into the ground.
Taking these decisions early helps you avoid mismatched components and reduces the risk of having to cut panels or reposition posts later.
Choose posts to suit the panel, not the other way round
The most important compatibility point is the relationship between the panel thickness and the post groove. A decorative fence panel must fit into the slot without forcing, but it should not be so loose that it rattles excessively in normal wind.
As a practical example, some slotted timber posts are designed with a groove that accepts panels up to 48mm thick. This suits many framed decorative panels, but you should always check the exact thickness of the panels you intend to use. Do not rely only on the panel height and width; the frame depth is just as important for slotted construction.
Key measurements to check
- Panel width: commonly around 1.8m for many decorative garden panels, but always confirm the actual measurement.
- Panel height: this affects the post length and how much post remains above ground.
- Panel thickness: must be compatible with the post slot.
- Post length: must allow enough timber below ground for stability.
- Post section: wider posts generally provide a more substantial visual effect and better bearing around the slot.
- Slot depth: affects how securely the panel edge is held and how much tolerance you have during fitting.
Work out the right post length
For a full-height decorative boundary, a common panel height is 1.8m. With timber posts, you should allow a substantial amount of the post to be set into the ground. A typical planning rule is to allow at least 600mm below ground for a 1.8m high panel, subject to soil conditions, exposure and local circumstances.
For example, a 2.4m slotted timber post is often suitable for a 1.8m high panel because it allows approximately 600mm to be set into the ground. This assumes the panel is installed close to ground level and that you are not adding extra height with gravel boards or raised bases. If you add a gravel board beneath the panel, you may need a longer post or you may need to reduce the visible panel height.
Consider ground conditions and exposure
A sheltered town garden with firm soil is different from an exposed rural boundary with soft ground. If your fence line is exposed to strong winds, do not reduce post depth. Decorative panels can still catch the wind, especially where they include close-boarded or framed sections. Trellis may reduce some wind load, but it does not remove the need for secure posts.
Where ground is made up, sandy, waterlogged or unstable, you may need deeper holes, wider concrete footings, additional support, or professional advice. The post may be the correct length on paper but still under-supported if the ground cannot hold it firmly.
Set out the fence line accurately
Accurate setting out is essential with slotted posts. Unlike brackets, which can sometimes compensate for small errors, slotted posts require the gap between grooves to match the panel width. If the posts are too close together, the panel may not slide in. If they are too far apart, the panel may sit shallow in the slots or become insecure.
Start by marking the proposed line with a string line. Check the boundary position before digging, especially if the fence is near a neighbour’s property, a path, a wall, tree roots or underground services. If the line is shared or uncertain, resolve this before installation.
How to measure post positions
Measure from slot to slot, not simply from post centre to post centre, unless you have already calculated the exact post section and groove position. For many standard installations, the panel width determines the clear distance between the receiving grooves. However, decorative posts and rebated profiles can vary, so it is worth checking with the actual components before committing concrete to the ground.
A practical method is to dry-test the first pair of posts and one panel on the ground. This helps you understand how much of the panel sits inside each groove and what the real installed spacing should be.
Plan end posts, corner posts and changes in direction
A straight run of fencing needs posts at each end and between each panel. Corners, returns and changes in direction need special attention because the grooves must face the correct way. Some slotted posts are grooved on particular faces, while others may be designed for specific end, intermediate or corner use.
Before ordering, sketch the fence line and mark:
- the start and end of the run;
- every panel position;
- corners and returns;
- gate positions, if any;
- changes in height;
- areas where panels need to step on sloping ground.
This sketch will help you order the correct number and type of posts. It also helps prevent the common mistake of buying only intermediate posts and then discovering that the end or corner detail cannot be finished neatly.
Using a slotted timber post as a practical example
When comparing products, look at the post length, section size, treatment, finish and slot dimensions. For instance, a 2.4m x 94mm x 94mm pressure treated reeded slotted timber fence post is a typical example of a substantial timber post intended for decorative planed panels. A post of this length can be appropriate for 1.8m high panels where around 600mm is set into the ground. If its groove accepts panels up to 48mm thick, it should be checked against the frame thickness of your chosen decorative panels before purchase.
The pressure treatment and anti-rot warranty information can be useful when comparing options, but you should still install the post properly and avoid trapping water around the timber. A durable product can fail early if the installation leaves it sitting in constantly wet conditions or if cut ends are left untreated where treatment is required.
As a budgeting example, a listed price of 41.99 EUR for a decorative slotted timber post gives you a starting point, but the total project cost will also include panels, concrete, gravel boards if used, post caps if required, delivery, tools and any labour.
Decide whether to use gravel boards
Gravel boards are often used beneath fence panels to lift timber away from the ground and reduce direct contact with soil and standing water. For decorative panels, they can also create a neat horizontal base line. However, they affect the finished height and the post length required.
If you install a 150mm gravel board beneath a 1.8m panel, the visible fence height becomes approximately 1.95m before allowing for any clearance or shaped panel top. This may affect planning considerations, neighbour discussions and the visual balance of the garden. It may also mean a 2.4m post no longer gives sufficient depth in the ground, depending on the final arrangement.
Plan the complete build-up: ground level, gravel board height, panel height and post depth. Do not select the post length based on panel height alone if other components will add height.
Account for sloping ground
Few gardens are perfectly level. Sloping ground can be handled in different ways, and the best method depends on the panel style and the amount of fall.
Stepped fencing
With rigid decorative panels, stepped fencing is often the simplest approach. Each panel remains level, but the next panel starts higher or lower. This works well with framed panels and slotted posts because the panel can still sit squarely in the grooves. The step should be planned so that the change in height looks deliberate rather than accidental.
Raking with the slope
Some fencing systems can follow a slope, but many framed decorative panels are not designed to rake significantly. Forcing a rigid panel to follow a slope can distort the frame, open joints or prevent the panel from fitting properly in the slot. Unless the panel manufacturer states that raking is suitable, assume that a stepped installation is safer.
Installation sequence for slotted timber posts
The exact method may vary by site, but the following sequence is a practical approach for many garden boundaries.
- Clear the line: remove old fencing, vegetation, loose soil and obstructions.
- Mark the run: use a string line and pegs to establish the face of the fence.
- Confirm levels: decide whether the panels will run level or step with the ground.
- Dig the first post hole: make it deep enough for the required buried post length and wide enough for proper concrete support.
- Set the first post: check it is vertical in both directions and aligned with the string line.
- Use a panel or spacer: position the next post using the actual panel width or a carefully measured spacer.
- Check the slot alignment: make sure the grooves face each other and are not twisted.
- Support before concreting: brace posts so they cannot move while the concrete cures.
- Fit panels carefully: slide panels into the slots without forcing or damaging the frame.
- Finish the tops: consider post caps where suitable to help shed water from exposed end grain.
Checklist before you order materials
- Have you confirmed the exact boundary line?
- Do you know the panel height, width and frame thickness?
- Is the panel thickness compatible with the post groove?
- Have you allowed enough post length below ground?
- Are you using gravel boards, and have you allowed for their height?
- Have you counted end, intermediate and corner posts separately?
- Have you planned how the fence will deal with any slope?
- Have you checked whether the finished height is appropriate for the location?
- Have you allowed for concrete, fixings, post caps and delivery?
- Have you checked for underground services before digging?
Common practical mistakes to avoid
Setting posts too shallow
One of the most common errors is trying to save effort by digging shallower holes. A post that is not deep enough may lean, especially after wet weather or high winds. For a 1.8m decorative panel, allowing at least 600mm of post in the ground is a sensible starting point, subject to site conditions.
Ignoring the groove size
Decorative panels vary in frame thickness. If the panel is too thick for the groove, it will not fit without damage. If it is much thinner, it may not sit securely. Always compare actual panel thickness with the stated slot capacity.
Measuring between the wrong points
Measuring from the outside of one post to the outside of the next can lead to errors. The critical distance is the space available for the panel between the opposing grooves. Use the panel itself as a guide where possible.
Concreting too many posts before test fitting
If you set a whole run of posts before trying a panel, a small repeated error can affect every bay. It is better to set out progressively, checking each bay as you go.
Forgetting water management
Timber lasts longer when water can drain away. Avoid creating a hollow around the base of the post where rainwater can collect. Shape the top of the concrete slightly away from the post and do not bury decorative panels directly into soil.
Forcing decorative panels into position
If a panel will not slide into the slots, stop and find the cause. Forcing it can split the frame, damage the finish or twist the post. The problem may be spacing, a post that is out of plumb, debris in the groove or an incompatible panel thickness.
Maintenance after installation
Pressure treated timber is designed for longer service life, but it still benefits from sensible maintenance. Keep soil, mulch and dense planting away from the base of the posts where possible. Check annually for movement, trapped debris in the grooves, damaged panel frames and vegetation pressing against the fence.
If you cut or drill treated timber, follow the manufacturer’s guidance on treating exposed surfaces. Do not assume that a cut end has the same level of protection as the original treated faces. Also keep climbing plants under control; they can add weight, trap moisture and increase wind loading on decorative fencing.
Short FAQ
Can I use slotted timber posts with any fence panel?
No. The panel must be suitable for slotted installation and must fit the groove. Check the panel thickness, frame shape and manufacturer’s guidance before buying.
How much post should be in the ground?
For many 1.8m high garden fence panels, at least 600mm of post in the ground is commonly allowed. Exposed sites, poor soil or added fence height may require more support.
Do decorative panels need gravel boards?
They are not always essential, but they can help keep timber panels away from wet ground and provide a neater base. Remember that they add to the overall height.
Can I install slotted posts on a slope?
Yes, but rigid decorative panels are usually best installed in steps rather than forced to follow the slope. Plan the step positions before digging.
Should the posts be installed before the panels arrive?
It is safer to have at least one panel available for checking the actual spacing. This is particularly important with decorative panels and slotted posts.
Conclusion
Slotted timber fence posts are a neat and practical way to support decorative garden panels, but the success of the project depends on careful planning. Check panel thickness against the groove, allow sufficient post length below ground, set out the line accurately and account for gravel boards, slopes and corners before you start digging.
If you treat the posts and panels as one complete system rather than separate purchases, you are far more likely to achieve a straight, stable and attractive garden boundary that looks intentional and performs well over time.