Planning Garden Boundaries with Overlap Timber Fence Panels
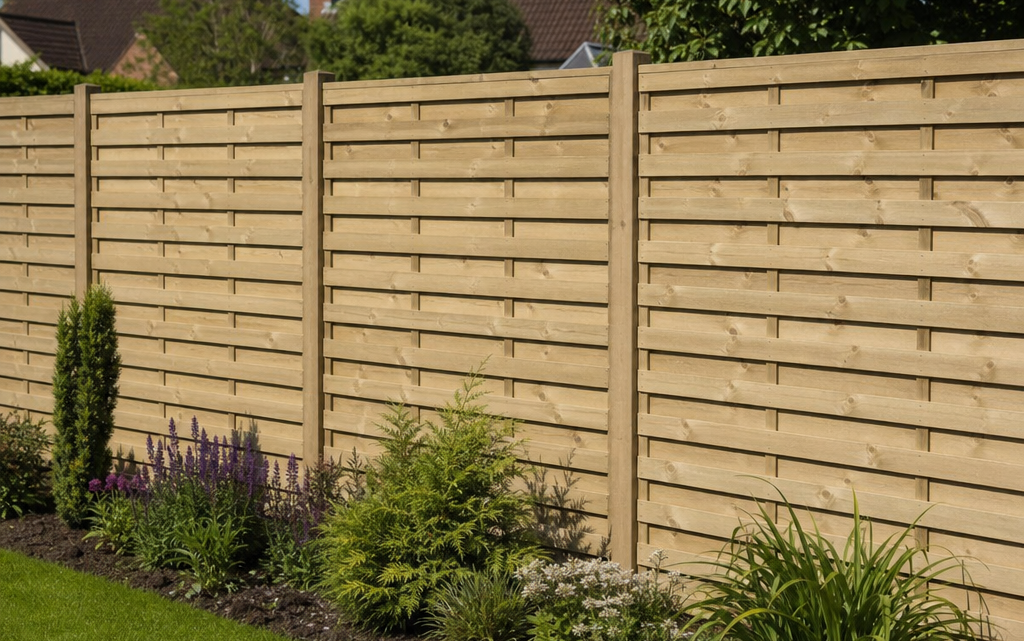
When you move into a new home, redesign a tired garden or replace storm-damaged fencing, the boundary is often one of the first jobs that affects how the whole space feels. A fence is not just a line around the garden. It influences privacy, security, light, planting, maintenance and the way neighbouring properties relate to one another. Straight-cut overlap timber fence panels are a practical option for many UK gardens because they offer a tidy, familiar look while remaining relatively simple to plan, install and maintain.
This article explains how to plan garden boundaries using straight-cut overlap timber fencing, including where it works best, what decisions you need to make before buying, and which mistakes to avoid. The focus is on practical boundary design rather than on any single product, although a pressure-treated 6ft x 4ft overlap panel is used later as a useful example of the type of panel you might consider.
Inhaltsverzeichnis
Planning Garden Boundaries with Overlap Timber Fence Panels
Overlap timber fencing is made from horizontal boards that overlap one another, fixed to a supporting frame. Traditional overlap panels often have waney-edged boards, while straight-cut overlap panels use cleaner, more regular boards for a neater finish. This makes them suitable for gardens where you want a straightforward timber boundary without the rustic appearance of rougher-edged fencing.
Before choosing panels, think about what the boundary needs to do. A front garden fence may need to define the edge of your property without blocking views. A rear boundary might need more privacy. A side return may need to screen bins, create a sheltered passageway or stop pets from straying. These different uses affect the height, post type, gravel board choice and overall layout.
Why Choose Straight-Cut Overlap Timber Fencing?
Straight-cut overlap fencing is popular because it balances cost, appearance and practicality. It is generally more economical than many decorative panel types, yet it can still look smart when installed accurately with level posts and consistent heights. The regular lines of straight-cut boards give a cleaner look than standard waney-edge overlap fencing, which can be useful in contemporary or well-ordered garden designs.
Timber fencing also suits a wide range of planting schemes. Left in a natural finish, it blends with hedging, lawns and cottage-style borders. If suitable for coating, it can be stained or painted to create a darker backdrop for foliage or a paler boundary for a lighter, more open feel. Always check the manufacturer’s guidance before applying additional treatments, particularly where pressure-treated timber is concerned.
Where This Type of Fencing Works Well
- Low-level garden boundaries: Panels around 3ft or 4ft high can mark a boundary while keeping the garden open and neighbourly.
- Rear and side fences: Taller versions can provide more screening where privacy is required, subject to planning rules and local restrictions.
- Practical family gardens: Overlap panels are straightforward and robust enough for everyday garden use.
- Budget-conscious projects: They can be a sensible choice when you need to fence a long run without choosing a highly decorative panel.
- Natural garden schemes: Timber works well with shrubs, climbers, raised beds and informal planting.
Check Boundaries, Rules and Responsibilities First
Before ordering any fence panels, confirm where your boundary actually lies. Title plans can be useful, but they are often general rather than precise. If the boundary is shared or uncertain, speak to your neighbour before work begins. A polite conversation at the planning stage can prevent disputes later, especially if access will be needed from their side or an old fence is being removed.
In the UK, you should also consider planning restrictions. In many cases, a garden fence can be up to 2 metres high without planning permission, but the limit is commonly lower next to a highway used by vehicles, where 1 metre may apply. Listed buildings, conservation areas, covenants and local planning conditions can also affect what you are allowed to install. If in doubt, check with your local planning authority before committing to the work.
Decide Which Side Should Face Out
Many fence panels have a more finished-looking side and a side where the battens or framing are more visible. There is no universal legal rule that the “good side” must face your neighbour, but local expectations and deeds may influence this. For a harmonious result, discuss it beforehand. If both sides of the fence will be seen regularly, consider whether a panel style with a neat appearance on both sides is important to you.
Choose the Right Height for the Job
Height is one of the most important design decisions. It affects privacy, light levels, wind resistance and the sense of enclosure. A very tall fence can make a narrow garden feel boxed in, while a low fence may not provide enough screening for seating areas or overlooked windows.
Common Height Choices
- 3ft panels: Useful for front gardens, internal divisions and decorative boundary marking.
- 4ft panels: A good low-level option where you want definition without creating a solid screen.
- 5ft panels: A middle-ground height for partial privacy while still allowing light and openness.
- 6ft panels: Common for rear gardens where privacy and security are priorities.
If you are using gravel boards, remember that they add to the total height. For example, a 6ft panel on a 150mm gravel board will create a boundary higher than the panel itself. Check the finished height against any planning limits and against the visual effect you want.
Measure the Fence Run Carefully
Accurate measuring helps you avoid awkward gaps, unnecessary cutting and over-ordering. Most standard fence panels are 6ft wide, which is approximately 1.83m. Measure the total length of each run, including changes in direction, gates, existing walls and any obstacles such as trees, sheds or raised beds.
Divide each straight run by the panel width to estimate how many panels you need. Where the length does not divide neatly, you may need to cut a panel, adjust post spacing, create a narrower end bay, or include a gate. Plan these details before installation, because small adjustments are much easier on paper than once concrete has set around the posts.
Practical Measuring Steps
- Sketch the garden boundary and mark each straight section separately.
- Measure along the intended fence line, not just from corner to corner across uneven ground.
- Mark the position of gates, walls, trees, inspection covers and level changes.
- Note whether the ground slopes, rises or dips along the run.
- Calculate panel numbers using the actual panel width, usually around 1.83m for a 6ft panel.
- Add posts, gravel boards, fixings and post caps to your materials list.
Using a 6ft x 4ft Pressure-Treated Panel as a Practical Example
A typical low-level boundary might use a panel measuring 6ft wide by 4ft high, or approximately 1.83m x 1.22m. This size can work well where you want to define the edge of a garden without creating the more enclosed feeling of a full-height fence. For example, a 4ft panel may suit a front boundary, a shared side boundary in an open garden, or a division between a lawn and a utility area.
Pressure-treated overlap panels are often chosen because the treatment helps protect the timber against rot, reducing the need for immediate additional preservative treatment. Some products also include strengthened battens and a framed construction for rigidity. When comparing panels, look for clear information on timber source, treatment, guarantee, frame size, battens and compatibility with gravel boards.
The example above illustrates the type of information worth checking when you compare panels: overall size, treatment, construction, guarantee, timber certification and whether the panel can be used with gravel boards. It should not be the only basis for your decision. You still need to consider your site conditions, exposure to wind, desired height, local rules and how the fence will be installed.
Posts, Gravel Boards and Fixings
Fence panels rely on the supporting structure. Even a good panel will perform poorly if the posts are undersized, badly aligned or not fixed securely. Timber posts are traditional and blend well with timber panels. Concrete posts are heavier and visually more prominent, but they are durable and make future panel replacement easier because panels can often be slid out and replaced.
Should You Use Gravel Boards?
Gravel boards sit beneath the fence panel and lift it away from direct ground contact. They can be timber or concrete. Their main purpose is to reduce the amount of moisture and soil contact at the base of the panel, which can help prolong the life of the fence. They are particularly useful where soil levels are high, borders run against the fence, or the garden is damp.
You may decide not to use gravel boards for a low-cost project or where the fence sits above a clean, well-drained surface. However, for most long-term boundary installations, they are worth considering. Remember to include their height in your finished boundary calculation.
Choosing Fixings
Use suitable exterior-grade fixings and brackets. Galvanised or otherwise corrosion-resistant fixings are usually preferable outdoors because ordinary fixings may rust quickly. Follow the panel and post manufacturer’s installation advice, especially if the panel has specific framing or batten positions.
Designing Around Slopes and Uneven Ground
Many gardens are not perfectly level. On a sloping site, you generally have two main options: stepping the fence or following the slope. With standard rectangular overlap panels, stepping is often the simpler approach. Each panel remains level, but the height changes from bay to bay. This creates a stepped top line.
Following the slope can look smoother, but it may require more cutting and careful setting out. It is not always suitable for framed panels, depending on how much adjustment is needed. If the ground rises or falls sharply, consider whether retaining edges, gravel boards of different depths, or a short section of custom fencing would be more appropriate.
Checklist: Before You Buy Fence Panels
- Have you confirmed the correct boundary line?
- Have you spoken to neighbours if the work affects a shared boundary?
- Have you checked planning limits, covenants or conservation area restrictions?
- Do you know the total length of each fence run?
- Have you allowed for posts, gravel boards, fixings and gates?
- Have you chosen a height that suits privacy, light and legal requirements?
- Is the panel suitable for your level of wind exposure?
- Have you planned how to deal with slopes or uneven ground?
- Is there safe access for delivery and installation?
- Have you checked whether timber treatment or aftercare is required?
Installation Principles for a Neat, Durable Fence
Good installation starts with setting out. Use a string line to mark the fence run and keep posts in line. Check corners carefully, because small errors at the start can become obvious over a long run. Post holes need to be deep and wide enough for the post size, ground conditions and fence height. Taller fences and exposed sites require especially secure posts.
Posts should be vertical, aligned and properly supported while concrete or post-setting material cures. Do not rush this stage. If posts move before the base has set, panels may become difficult to fit and the finished fence can look uneven. Where using timber posts, keep the base detailing sensible and avoid trapping water around the timber.
Allow for Wind
Overlap panels form a relatively solid barrier, so they catch wind. This is important in exposed gardens, coastal locations, open countryside or long straight runs. In windy locations, consider stronger posts, deeper post holes, shorter panel heights, more sheltered layouts or specialist advice. A fence that is too tall and lightly supported may fail during storms, even if the panels themselves are sound.
Common Practical Mistakes to Avoid
Ignoring the Finished Height
One of the most common mistakes is thinking only about the panel height and forgetting posts, gravel boards and changes in ground level. Always calculate the final height from the higher side of the ground where rules may apply.
Putting Panels Directly on Soil
Timber panels that sit directly on damp soil are more likely to deteriorate at the base. Use gravel boards or maintain a suitable gap where appropriate, while ensuring pets cannot escape if that is a concern.
Underestimating Wind Load
A long run of solid fencing can act like a sail. Do not use light-duty posts or shallow holes for tall panels in exposed positions. If your garden regularly experiences strong winds, design the boundary accordingly.
Failing to Plan the End Bay
If the final gap is much narrower than a full panel, you need a plan. Cutting a panel may be possible, but it can affect the frame and appearance. Sometimes it is better to adjust the layout, add a gate, or create a balanced narrower bay at both ends.
Forgetting Maintenance Access
Fences need occasional inspection and cleaning. Avoid planting large shrubs too tightly against new panels, especially while they establish. Leave enough space to check for damage, trapped moisture and movement.
Maintaining Straight-Cut Overlap Timber Fencing
Maintenance depends on the type of timber and treatment. Pressure-treated panels may not require immediate additional treatment, but you should still inspect them periodically. Look for loose fixings, damaged boards, leaning posts and vegetation that holds moisture against the timber.
Keep soil, compost and mulch away from the lower edge of the panel where possible. Trim climbers and shrubs so they do not force boards apart or add excessive weight. If you apply a stain, paint or preservative in future, use a product suitable for exterior timber and follow the manufacturer’s instructions.
Design Tips for a Better-Looking Boundary
A practical fence can still contribute positively to garden design. Keep the top line consistent where possible, especially along visible runs. Use planting to soften the base of the fence, but avoid burying the timber in damp soil. Repeated shrubs, grasses or climbers can help a simple overlap fence feel intentional rather than purely functional.
Colour also makes a difference. Darker finishes can make boundaries visually recede and help green foliage stand out. Lighter finishes can brighten a shaded garden but may show dirt more readily. Natural timber tones suit informal gardens, while black, grey or muted green can work well in contemporary spaces.
FAQ
Are overlap fence panels suitable for privacy?
Yes, overlap panels can provide good screening, particularly in taller heights. For full privacy in a rear garden, many people choose higher panels, subject to planning limits and site suitability. Lower panels are better for defining boundaries while keeping an open feel.
What is the benefit of straight-cut boards?
Straight-cut boards give the panel a cleaner and more uniform appearance than traditional waney-edged overlap boards. This can make the fence look neater and more modern while retaining the practical benefits of timber overlap construction.
Do I need gravel boards?
You do not always need them, but they are often a sensible addition. Gravel boards lift the panel away from ground moisture and can help protect the lower edge. They are particularly useful in damp gardens or where soil and planting beds sit close to the fence.
Can I install overlap fencing myself?
Many competent DIYers can install a short, straightforward run, provided they have the right tools and take care with setting posts. Longer runs, sloping sites, exposed locations and heavy materials may justify using a professional installer.
How long will timber fencing last?
Service life depends on timber quality, treatment, installation, exposure and maintenance. Pressure-treated panels with appropriate installation and sensible care generally last longer than untreated timber left in damp contact with the ground.
Conclusion
Straight-cut overlap timber fence panels are a practical choice for many garden boundaries. They provide a clean, simple appearance, suit a wide range of garden styles and can be used at different heights depending on privacy and design needs. The key to a successful fence is careful planning: confirm the boundary, check rules, measure accurately, choose suitable posts and consider gravel boards, wind exposure and long-term maintenance.
By treating the fence as part of the overall garden design rather than a last-minute barrier, you can create a boundary that is functional, tidy and appropriate for your space. Whether you are replacing a single tired run or planning a full garden redesign, a well-specified overlap timber fence can give your garden structure, privacy and a more finished appearance.