Siting an Attached Greenhouse Around Windows, Routes and Views

Inhaltsverzeichnis
Siting an Attached Greenhouse Around Windows, Routes and Views
An attached greenhouse can be one of the most useful additions to a garden, especially where space is limited or you want easy access from the house. It can provide a sheltered place for raising seedlings, overwintering tender plants, or simply enjoying a bright, protected spot beside the home. However, placing a greenhouse against a house wall is not just a matter of choosing the sunniest elevation and fixing it in place.
You also need to think carefully about windows, doors, garden paths, outdoor seating, views from inside the house, drainage, ventilation, privacy and day-to-day movement around the garden. A greenhouse that looks ideal on paper can become awkward if it blocks a kitchen window, narrows a main route, overheats beside a patio, or interrupts the view from a favourite room.
This guide explains how to plan the position of an attached greenhouse so that it works with your house and garden rather than against them. It is written for practical decision-making before you buy, prepare a base or start assembly.
Start With How You Use the House and Garden
Before measuring for an attached greenhouse, spend a few days observing how the area beside the house is actually used. Many siting problems happen because the greenhouse is planned as a structure in isolation, rather than as part of a working route between the house, garden, bins, washing line, shed, patio or side gate.
Ask yourself which doors are used most often, which windows you look through daily, and where people naturally walk. A greenhouse beside a rarely used utility wall is very different from one outside a living room, kitchen or dining area. If the greenhouse will sit near outdoor seating, consider whether it will improve the space by adding shelter and greenery, or make it feel enclosed and visually crowded.
You should also consider seasonal changes. In winter, low sun may make the greenhouse valuable for light and warmth, but in summer it may cast glare, reflect heat or reduce airflow around a seating area. If the site is used for entertaining, children’s play or regular garden access, leave more generous clearance than you think you need.
Assess Windows Before Choosing the Exact Position
House windows are often the most sensitive issue when siting an attached greenhouse. A greenhouse placed in front of a window can change the amount of daylight entering the room, affect privacy, alter ventilation and influence the view from indoors.
Do Not Block Essential Daylight
Even clear or translucent greenhouse panels reduce and alter light. They may diffuse it pleasantly, but they can still make an internal room feel more enclosed, particularly on north-facing or already shaded elevations. Be cautious about placing a greenhouse directly outside small windows, low windows, basement-level windows or rooms that rely on one main source of daylight.
For living rooms, kitchens and home offices, stand inside and mark the main sightlines. If the greenhouse roofline, frame or staging would sit across the central view, consider moving the structure along the wall or choosing a shorter length. For bathrooms, utility rooms and corridors, some loss of view may be less important, but ventilation and maintenance access still matter.
Keep Opening Windows Usable
Check whether windows open outwards, tilt, slide or have restrictors. An attached greenhouse should not stop a window from opening properly unless that window is genuinely redundant and there is still adequate ventilation for the room. Remember that you may need to clean the glass, paint frames, clear trickle vents or maintain seals in future.
If a window opens into the planned greenhouse area, allow enough clearance for the sash or casement to operate without hitting the structure. Where a window opens into the greenhouse interior, think about whether warm, humid greenhouse air will enter the house. That may be welcome occasionally, but it can also contribute to condensation if unmanaged.
Think About Privacy and Night-Time Appearance
A greenhouse beside a house window can make internal rooms feel more exposed at night, especially if the greenhouse has clear side panels and interior lighting is used. If the position is near a boundary, neighbouring window or seating area, consider blinds, planting, partial screening or a layout that avoids direct views into the house.
Plan Routes Around the Greenhouse
Attached greenhouses often sit beside patios, side returns or rear paths, so route planning is essential. The structure must not make the garden difficult to use, especially when carrying trays, compost bags, watering cans, tools or furniture cushions.
Minimum Practical Clearance
As a general guide, a narrow maintenance gap is rarely enough for a main route. If people need to pass comfortably, aim for a clear path that allows normal walking without turning sideways. If wheelbarrows, prams, mobility aids or garden trolleys use the route, allow substantially more space and avoid sharp corners at the greenhouse door.
Measure the space with canes, string or temporary tape on the ground. Then walk through it while carrying something bulky. This simple test often reveals problems that a scale drawing misses.
Door Position Matters
The door should open or slide into a position that supports how you will use the greenhouse. If the door is at the end of a lean-to structure, check whether that end connects logically to the house door, tap, compost storage and potting area. A door placed at the wrong end can mean unnecessary walking in poor weather or repeated trips along a narrow path.
Where a greenhouse model allows flexible door placement, decide this during the site planning stage rather than during assembly. The best door position is usually the one that gives the shortest, clearest and safest route from the house and avoids conflict with seating, steps, gates or bins.
Protect Outdoor Seating and Views
An attached greenhouse can either enhance or compromise an outdoor seating area. It may create a pleasant backdrop, provide visual interest and support climbing or potted plants. But it can also dominate a patio, reflect sunlight towards seats, trap heat, or obstruct a carefully framed view.
Check the View From Seated Height
Do not judge the greenhouse only while standing. Sit in your usual chair positions and look towards the planned site. A structure that appears low and discreet from standing height may block a garden feature, lawn view or borrowed view from seated height.
Similarly, check the view from inside the house. Dining tables, sofas and kitchen sinks often have fixed sightlines. If the greenhouse will become the main object in view, make sure you are happy with its appearance throughout the year, including when the interior contains pots, seed trays, stored compost or winter plant protection.
Avoid Creating a Cramped Patio
Patios need room for chairs to be pulled out, people to move around a table and doors to open. If the greenhouse sits immediately beside outdoor seating, allow space for circulation as well as maintenance. You should be able to clean panels, open vents, access gutters if present, and move plants without stepping through the seating area every time.
If space is tight, consider whether the greenhouse should be slightly shorter, positioned further from the main entertaining area, or aligned with an existing wall or boundary to reduce its visual impact.
Orientation, Light and Heat
Light is one of the main reasons to choose an attached greenhouse, but more sun is not always better. The best orientation depends on what you want to grow, the surrounding buildings and trees, and how the attached structure affects the house.
A south-facing wall can provide strong light and warmth, which may be useful in cooler months but can create overheating in summer. East-facing sites give morning sun and are often easier to manage for seedlings and leafy crops. West-facing sites receive afternoon sun and can become hot later in the day. North-facing sites are cooler and more shaded, but may still be useful for shade-tolerant plants, overwintering or as a sheltered garden room depending on the design and local conditions.
Observe the proposed wall at different times of day. Note shadows from fences, roof overhangs, neighbouring buildings, trees and the house itself. Remember that a lean-to roof can also affect rain runoff and shade patterns close to the wall.
Use a Real Product Size as a Planning Reference
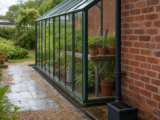
When assessing whether a greenhouse will fit comfortably, use real dimensions rather than a vague idea of “small” or “large”. For example, a 6 ft x 12 ft attached sun room style greenhouse, such as the 6′ x 12′ Palram Canopia Rion White Sun Room Walk-In Wall Greenhouse (1.8 m x 3.6 m), gives you a useful reference for testing routes, wall length and visual scale. Its lean-to form, single door that can be positioned at either end, roof vent, resin frame and polycarbonate panels illustrate the sort of practical details you should consider when planning any attached greenhouse.
Do not focus only on the footprint. A greenhouse of this length can have a significant effect on windows, seating and movement along a wall. Mark out the full length and projection from the house, then add the space needed for access, maintenance and comfortable use.
Check the Wall, Base and Drainage
An attached greenhouse depends on the wall and ground around it being suitable. Before committing to a site, inspect the house wall carefully. Look for air bricks, vents, boiler flues, drainpipes, inspection covers, damp-proof course details, external sockets, taps, cables and wall-mounted lights. These features may prevent fixing, require clearances or need professional advice.
Do Not Cover Vents or Flues
Never build over or enclose a boiler flue, air brick, tumble dryer vent or other service outlet without appropriate professional guidance. These features are there for safety and building performance. Blocking them can cause serious ventilation problems, condensation or unsafe operation of appliances.
Prepare a Solid, Level Base
Many attached greenhouse designs require a solid, level base. This might be paving, concrete or another suitable foundation, depending on the model and manufacturer’s instructions. A poor base can lead to twisted frames, doors that do not operate correctly, panel movement and water pooling.
Check levels in both directions. A slight garden fall may not look important, but it can be enough to affect assembly and drainage. If the greenhouse is designed without a floor, decide what surface you want inside. Paving is practical and easy to clean; gravel can help with drainage but may be less comfortable underfoot; concrete is durable but must be laid correctly to avoid standing water.
Plan Rainwater Runoff
A lean-to roof will shed water, but you need to know where that water will go. Avoid discharging water directly onto a narrow path, seating area, house wall or neighbour’s property. If gutters or water collection accessories are available for your chosen model, consider whether a water butt can be positioned without blocking the route.
Ventilation and Temperature Control
Attached greenhouses can warm up quickly because they receive solar gain and may benefit from heat stored in the house wall. This can be useful in spring and autumn, but overheating is a common problem in summer.
Check the provision for roof vents, side ventilation and door opening. A single roof vent may help, but the overall effectiveness depends on greenhouse size, orientation and how air can move through the space. If the greenhouse is close to outdoor seating, hot air venting from it may affect comfort on warm days.
Also consider shading. You may need blinds, shade paint, shading fabric or carefully positioned plants to reduce excessive heat and glare. If you intend to use an electric heater, propagator, fan or lighting, plan safe power provision through a qualified electrician rather than relying on temporary indoor extension leads.
Practical Siting Checklist
Use this checklist before buying or installing an attached greenhouse:
- Windows: Will the greenhouse block daylight, outlook, cleaning access or opening windows?
- Doors: Are house doors, greenhouse doors, gates and storage areas still convenient to use?
- Routes: Is there enough clear width for people, tools, watering cans and wheelbarrows?
- Seating: Will chairs, tables and patio circulation still work comfortably?
- Views: Have you checked sightlines from inside the house and from seated positions outside?
- Light: Is the orientation suitable for the plants you want to grow?
- Heat: Can you ventilate and shade the greenhouse during hot weather?
- Wall features: Are vents, flues, pipes, cables, taps and inspection covers kept accessible?
- Base: Is the ground solid, level and suitable for the manufacturer’s fixing requirements?
- Drainage: Will rainwater run away safely without causing damp or slippery surfaces?
- Maintenance: Can you clean panels, maintain the house wall and reach fixings?
- Neighbours: Will the structure affect privacy, boundaries or shared drainage?
Common Mistakes to Avoid
Choosing the Sunniest Wall Without Considering Heat
A bright wall may seem ideal, but an enclosed greenhouse can become excessively hot. If you choose a very sunny position, plan ventilation and shading from the start. Do not assume you can solve overheating later with the door left open, especially if pets, pests or security are concerns.
Forgetting the View From Indoors
Many people mark the footprint outdoors but forget to look from inside the house. You may spend more time seeing the greenhouse from the kitchen or living room than standing beside it. Check whether the roofline, frame and contents will be visually acceptable all year round.
Making a Path Too Narrow
A path that looks passable when empty may become irritating when you are carrying compost, plants or tools. Narrow pinch points beside a greenhouse are especially awkward because panels can be scratched and people may brush against wet surfaces after rain.
Ignoring Existing Services
Air bricks, flues, waste pipes and inspection covers are easy to overlook during early planning. Once the greenhouse is installed, moving it can be difficult and costly. Identify all services before ordering.
Underestimating the Base
A level base is not a decorative extra; it is fundamental to the structure performing properly. If the base is uneven or unstable, the greenhouse may be harder to assemble and less reliable in use.
Step-by-Step Planning Method
- Identify possible walls: List the elevations where an attached greenhouse could physically fit.
- Check light and shade: Observe each site in the morning, midday and afternoon.
- Mark the footprint: Use tape, string or canes to show the real length and projection.
- Test movement: Walk normal routes while carrying typical garden items.
- Review windows: Look from inside each affected room and test window operation.
- Place seating: Set out chairs and tables to check circulation and views.
- Inspect the wall: Note vents, pipes, flues, cables and maintenance needs.
- Confirm the base: Decide how the structure will be fixed and how the floor area will drain.
- Plan ventilation and shading: Consider summer use as well as spring growing.
- Check instructions and permissions: Review manufacturer requirements and any local planning or property restrictions that may apply.
Short FAQ
Can I put an attached greenhouse directly in front of a house window?
Sometimes, but it is not always advisable. You need to check daylight, outlook, window opening, cleaning access, privacy and condensation risk. It is usually better to avoid covering important living space windows unless the impact is clearly acceptable.
How much space should I leave around paths and seating?
Leave enough for comfortable movement, not just the bare footprint. Main routes need more clearance than maintenance gaps, especially if you use a wheelbarrow or carry trays and compost. Test the space physically before committing.
Which orientation is best for an attached greenhouse?
There is no single best orientation. South-facing sites are bright and warm but can overheat; east-facing sites offer useful morning sun; west-facing sites can be hot later in the day; north-facing sites are cooler and more limited for sun-loving crops. Choose according to your plants and how the greenhouse affects the house.
Do I need a level base?
Yes, if the manufacturer requires fixing to a solid, level base, you should follow that guidance. A poor base can affect assembly, door operation, stability and drainage.
Should I consider neighbours when siting an attached greenhouse?
Yes. Think about privacy, reflected light, boundary proximity, rainwater runoff and any shared access. If the greenhouse is close to a boundary, it is sensible to discuss your plans before installation.
Conclusion
The best position for an attached greenhouse is not simply the spare wall with the most sunshine. It is the site that balances plant growth, household daylight, clear routes, comfortable seating, safe drainage, ventilation and long-term maintenance. By marking out the true footprint, checking views from indoors and outdoors, protecting access around windows and paths, and preparing a proper base, you can avoid the most common siting problems.
Take time to plan before buying or building. An attached greenhouse should feel like a natural extension of the home and garden, not an obstacle placed against the wall. With careful siting, it can support productive growing while preserving the routes, views and outdoor spaces you already enjoy.